Layout
Pages in Brightspot are highly configurable. From navigations to modules, editors can easily curate digital experiences for their audiences.
Different elements of a layout depend on the content hierarchy. For example, if you set a navigation at the Global level, it is inherited by all sites, sections, and assets. If you set a list of related articles as an aside at the site level, it is inherited by all sections and assets in that site. See Content hierarchy for details.
Layout structure
Laying out the elements of a web page is a basic step for deploying a website.
The main body of the page will always be the asset itself. Layout refers to the elements around the main body of the page, explained below. Each is populated with modules of your choosing to better build out the experience for your audiences.
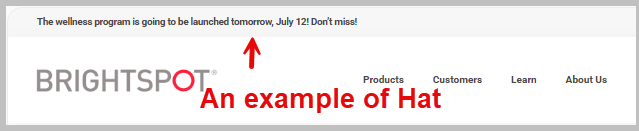
Hat
A hat is a consistent piece of content that appears above a header. Hats are typically very brief messages.
The following image shows how Brightspot renders a hat.
To add a hat:
- Navigate to the level of the content hierarchy where you want to add a hat (see Configuring layouts).
- Select one of the following options:
- Inherit—The hat is inherited by the level above in the content hierarchy. If at the Global level, then this option is the same as None.
- None—No hat displays at this level of the content hierarchy. If lower levels are set to Inherit, then they inherit no hat.
- Select—Select an existing hat, or create a new one by doing the following:
- Click Create New.
- Give the hat an internal name.
- Under Text, write the message that appears in the hat.
- Click Save.
- Click Save.
Header
A header is a consistent piece of content that appears at the top of each page in a website. Brightspot provides the following components that you can include in a header:
- Logo—Publisher’s logo, usually appears in the left or right side of the header.
- Search field—Field for visitors to search for content.
- Navigation—Tools for navigating a website, often containing links to sections, packages, or individual items.
To add a header:
- Navigate to the level of the content hierarchy where you want to add a header (see Configuring layouts).
- Select one of the following options:
- Inherit—The header is inherited by the level above in the content hierarchy. If at the Global level, then this option is the same as None.
- None—No header displays at this level of the content hierarchy. If lower levels are set to Inherit, then they inherit no header.
- Select—Select an existing header, or create a new one. For details on creating headers, see Header.
- Click Save.
Banner
Banners display across the top of a page, usually containing an alert or an important message, either indefinitely or for a specified period of time.
See Breaking news banner for details on creating banners.
To add a banner:
- Navigate to the level of the content hierarchy where you want to add a banner (see Configuring layouts).
- Select one of the following options:
- Inherit—The banner is inherited by the level above in the content hierarchy. If at the Global level, then this option is the same as None.
- None—No banner displays at this level of the content hierarchy. If lower levels are set to Inherit, then they inherit no banner.
- Select—Select an existing banner, or create a new one. For details on creating banners, see Breaking news banner.
- Click Save.
Footer
A footer is a consistent piece of content that appears at the bottom of each page in a website. Footers typically have publication information and navigation.
To add a footer:
- Navigate to the level of the content hierarchy where you want to add a footer (see Configuring layouts).
- Select one of the following options:
- Inherit—The footer is inherited by the level above in the content hierarchy. If at the Global level, then this option is the same as None.
- None—No footer displays at this level of the content hierarchy. If lower levels are set to Inherit, then they inherit no footer.
- Select—Select an existing footer, or create a new one. For details on creating footers, see Footer.
- Click Save.
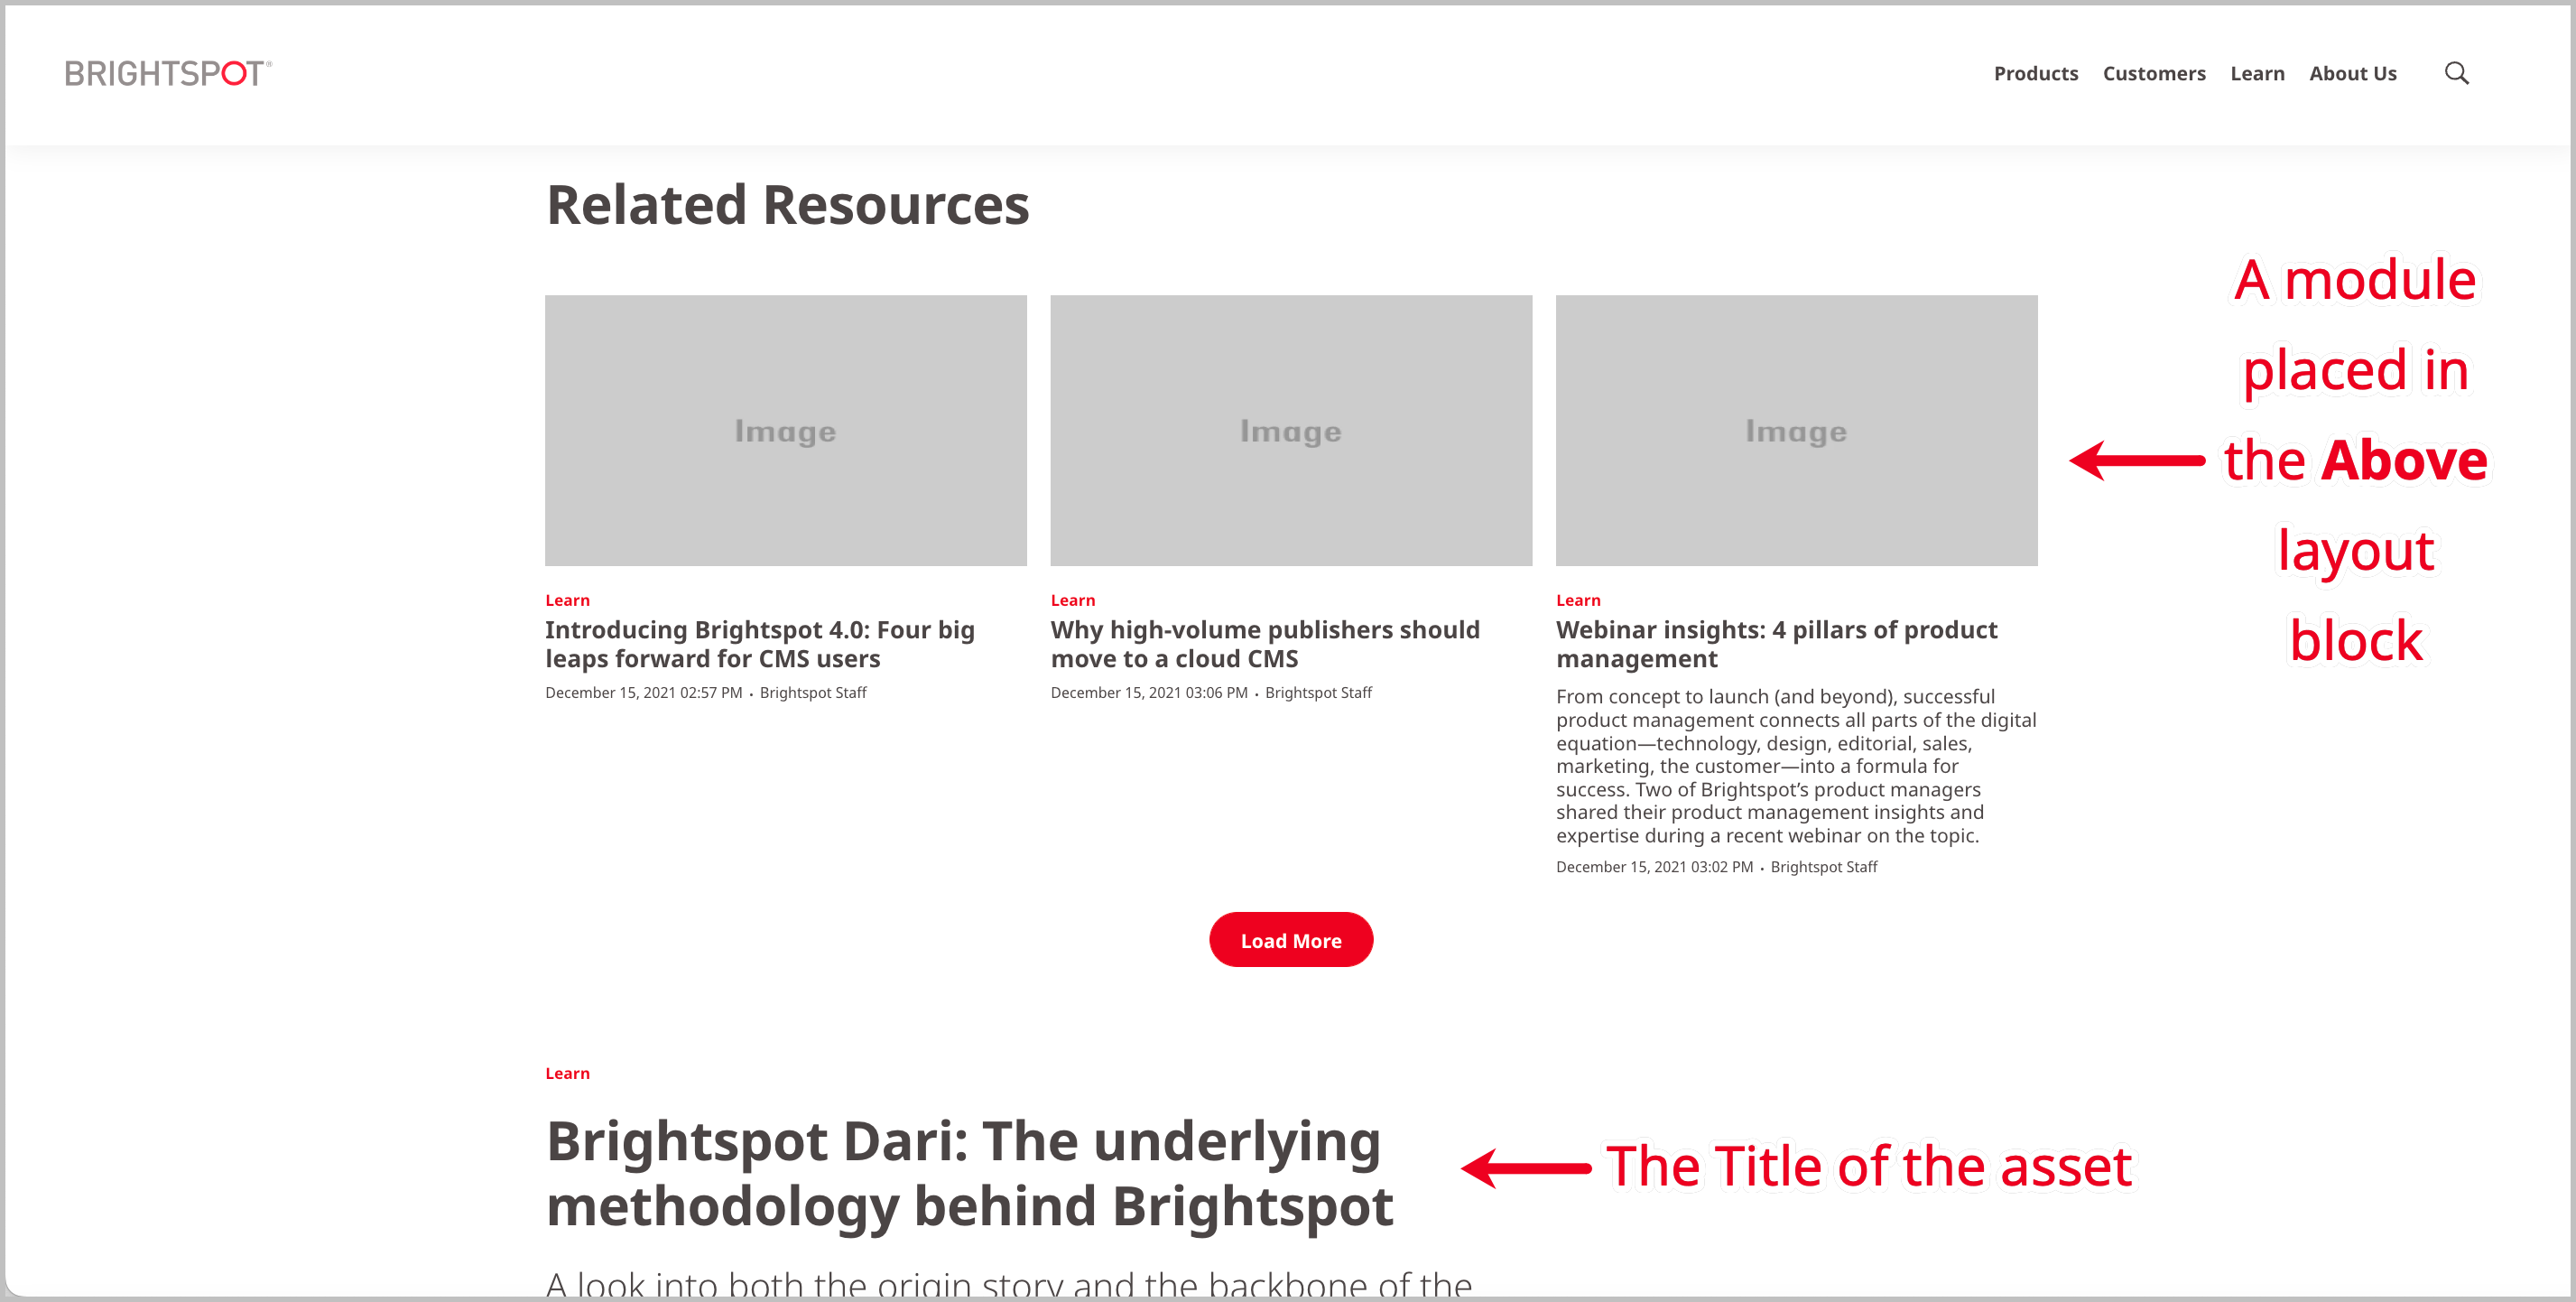
Above
Above is an area of a page that exists above the title of the asset. You can further build out the page structure by adding modules via layout blocks.
To add an above:
- Navigate to the level of the content hierarchy where you want to add an above (see Configuring layouts).
- Select one of the following options:
- Inherit—The above is inherited by the level above in the content hierarchy. If at the Global level, then this option is the same as None.
- Add After—The above is added after any other inherited modules (if there are no inherited modules, then this works the same as Replace). Click Add Module to create a new module, or click Add Shared to add an existing one. See Modules for details on which modules are available, and how to build them.
- Add Before—The above is added before any other inherited modules (if there are no inherited modules, then this works the same as Replace). Click Add Module to create a new module, or click Add Shared to add an existing one. See Modules for details on which modules are available, and how to build them.
- None—No above displays at this level of the content hierarchy. If lower levels are set to Inherit, then they inherit no above.
- Replace—Replaces any inherited modules in the above with a module of your choosing. Click Add Module to create a new module, or click Add Shared to add an existing one. See Modules for details on which modules are available, and how to build them.
- Click Save.
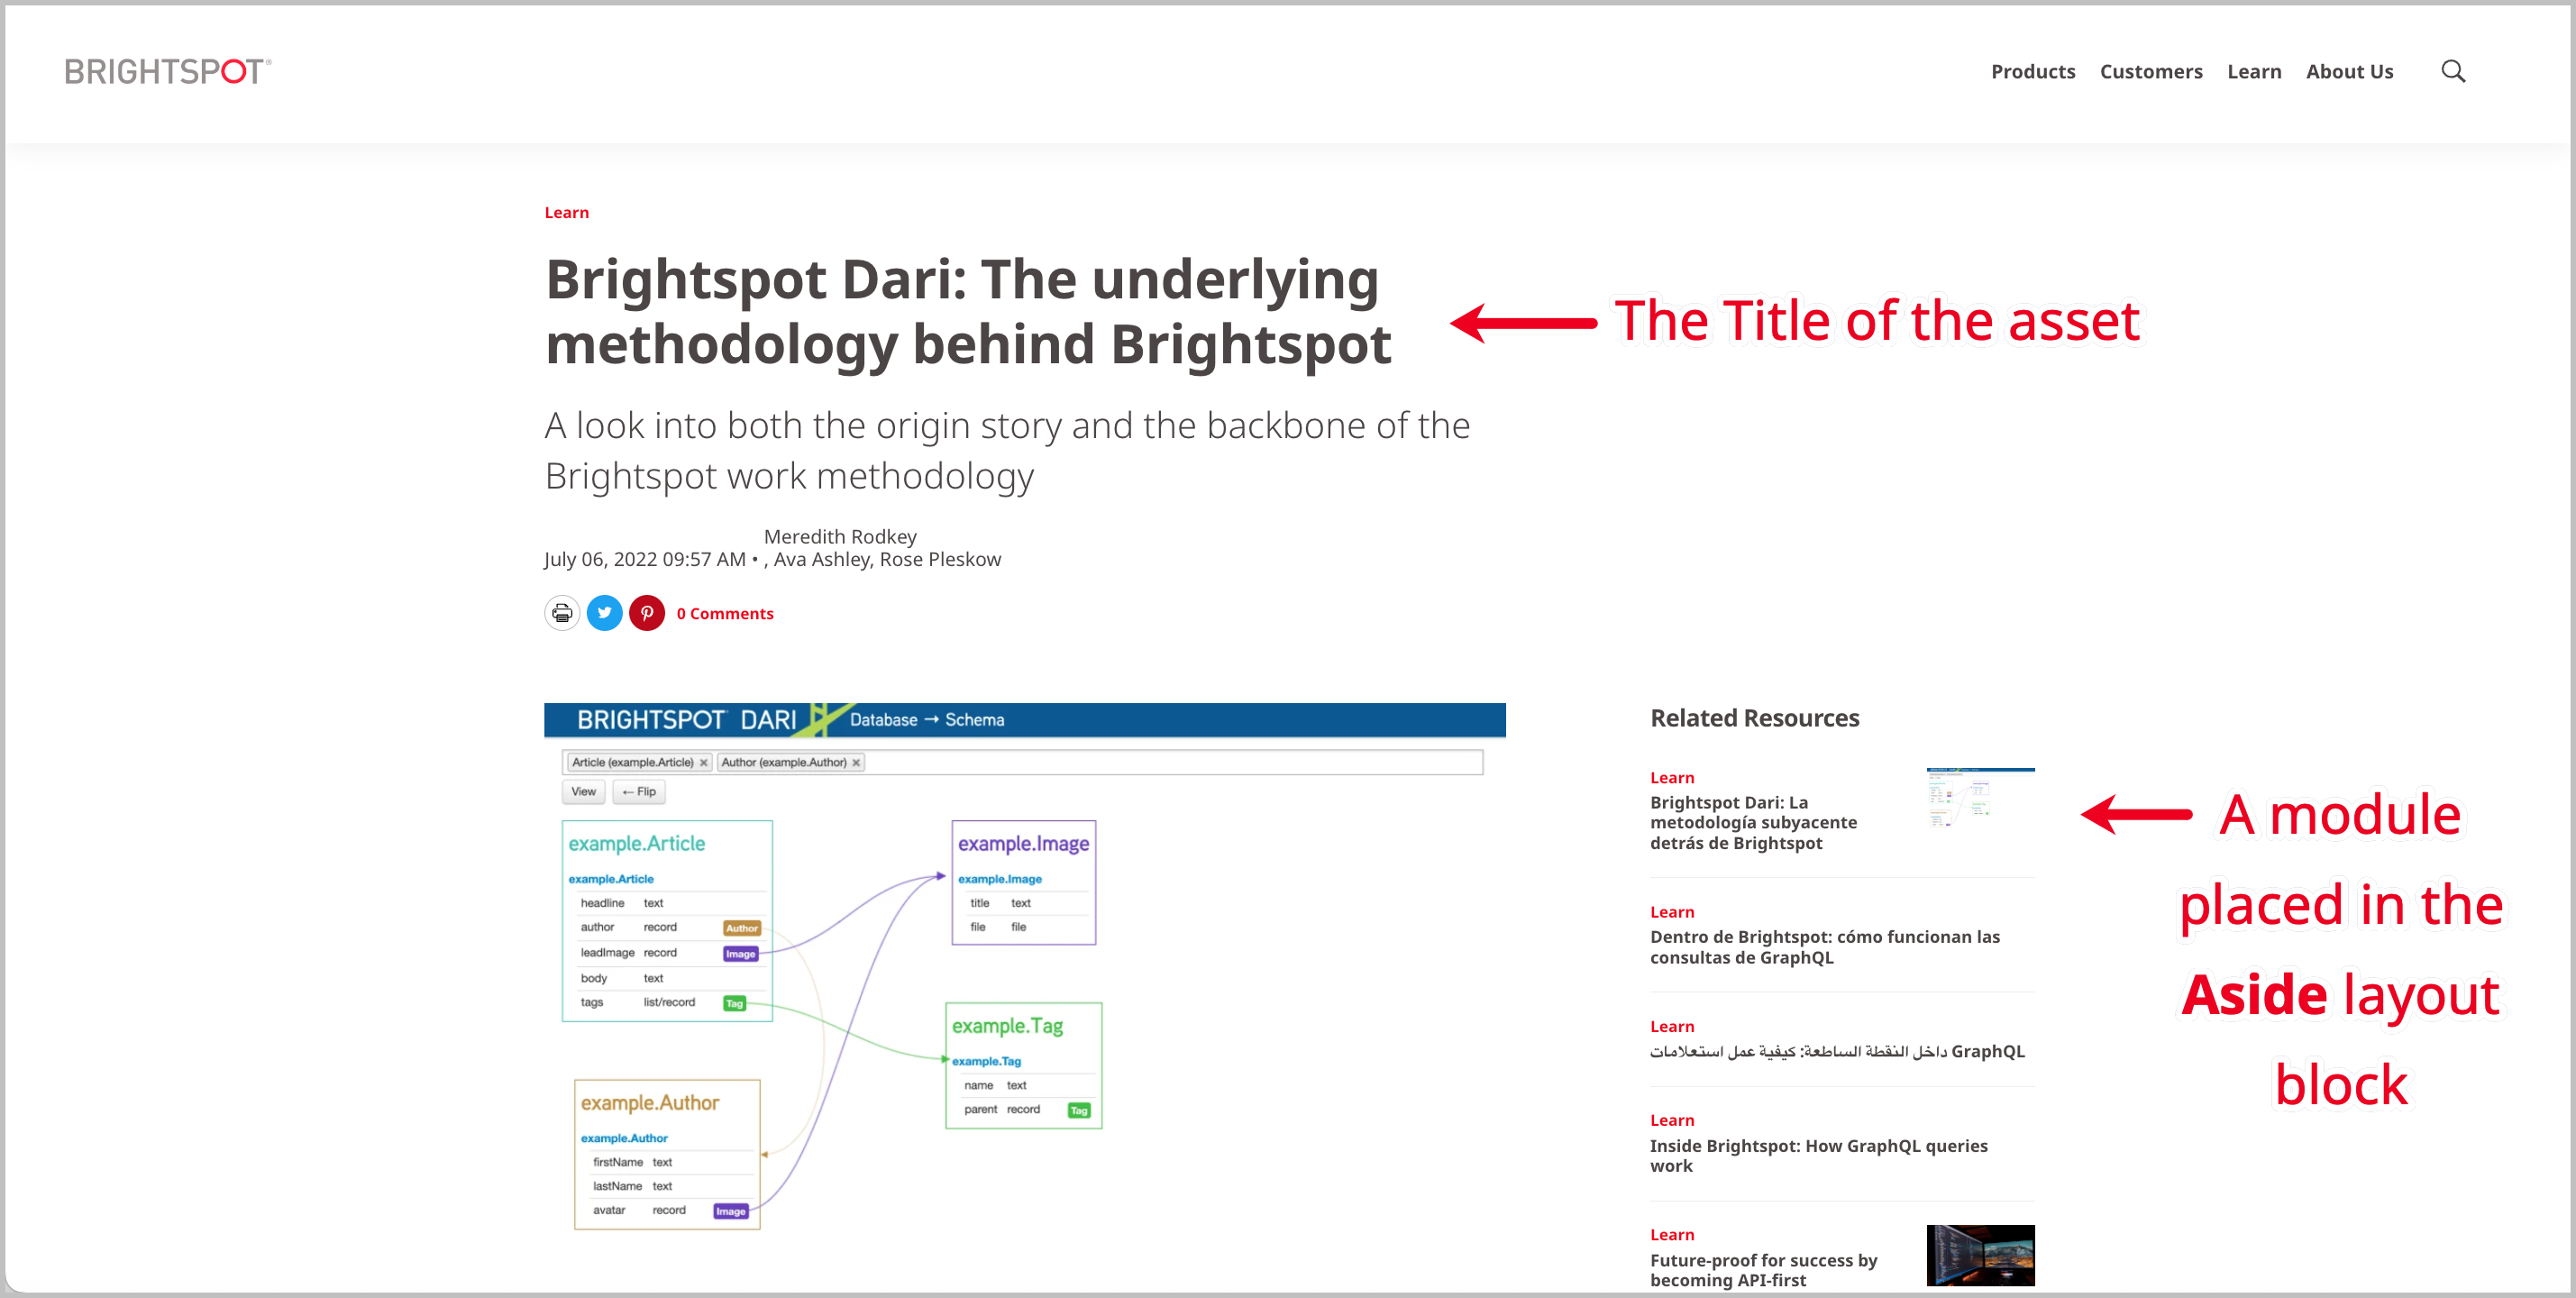
Aside
Aside is an area of a page that exists along the side of the asset's content.
To add an aside:
- Navigate to the level of the content hierarchy where you want to add an aside (see Configuring layouts).
- Select one of the following options:
- Inherit—The aside is inherited by the level above in the content hierarchy. If at the Global level, then this option is the same as None.
- Add After—The aside is added after any other inherited modules (if there are no inherited modules, then this works the same as Replace). Click Add Module to create a new module, or click Add Shared to add an existing one. See Modules for details on which modules are available, and how to build them.
- Add Before—The aside is added before any other inherited modules (if there are no inherited modules, then this works the same as Replace). Click Add Module to create a new module, or click Add Shared to add an existing one. See Modules for details on which modules are available, and how to build them.
- None—No aside displays at this level of the content hierarchy. If lower levels are set to Inherit, then they inherit no aside.
- Replace—Replaces any inherited modules in the aside with a module of your choosing. Click Add Module to create a new module, or click Add Shared to add an existing one. See Modules for details on which modules are available, and how to build them.
- Click Save.
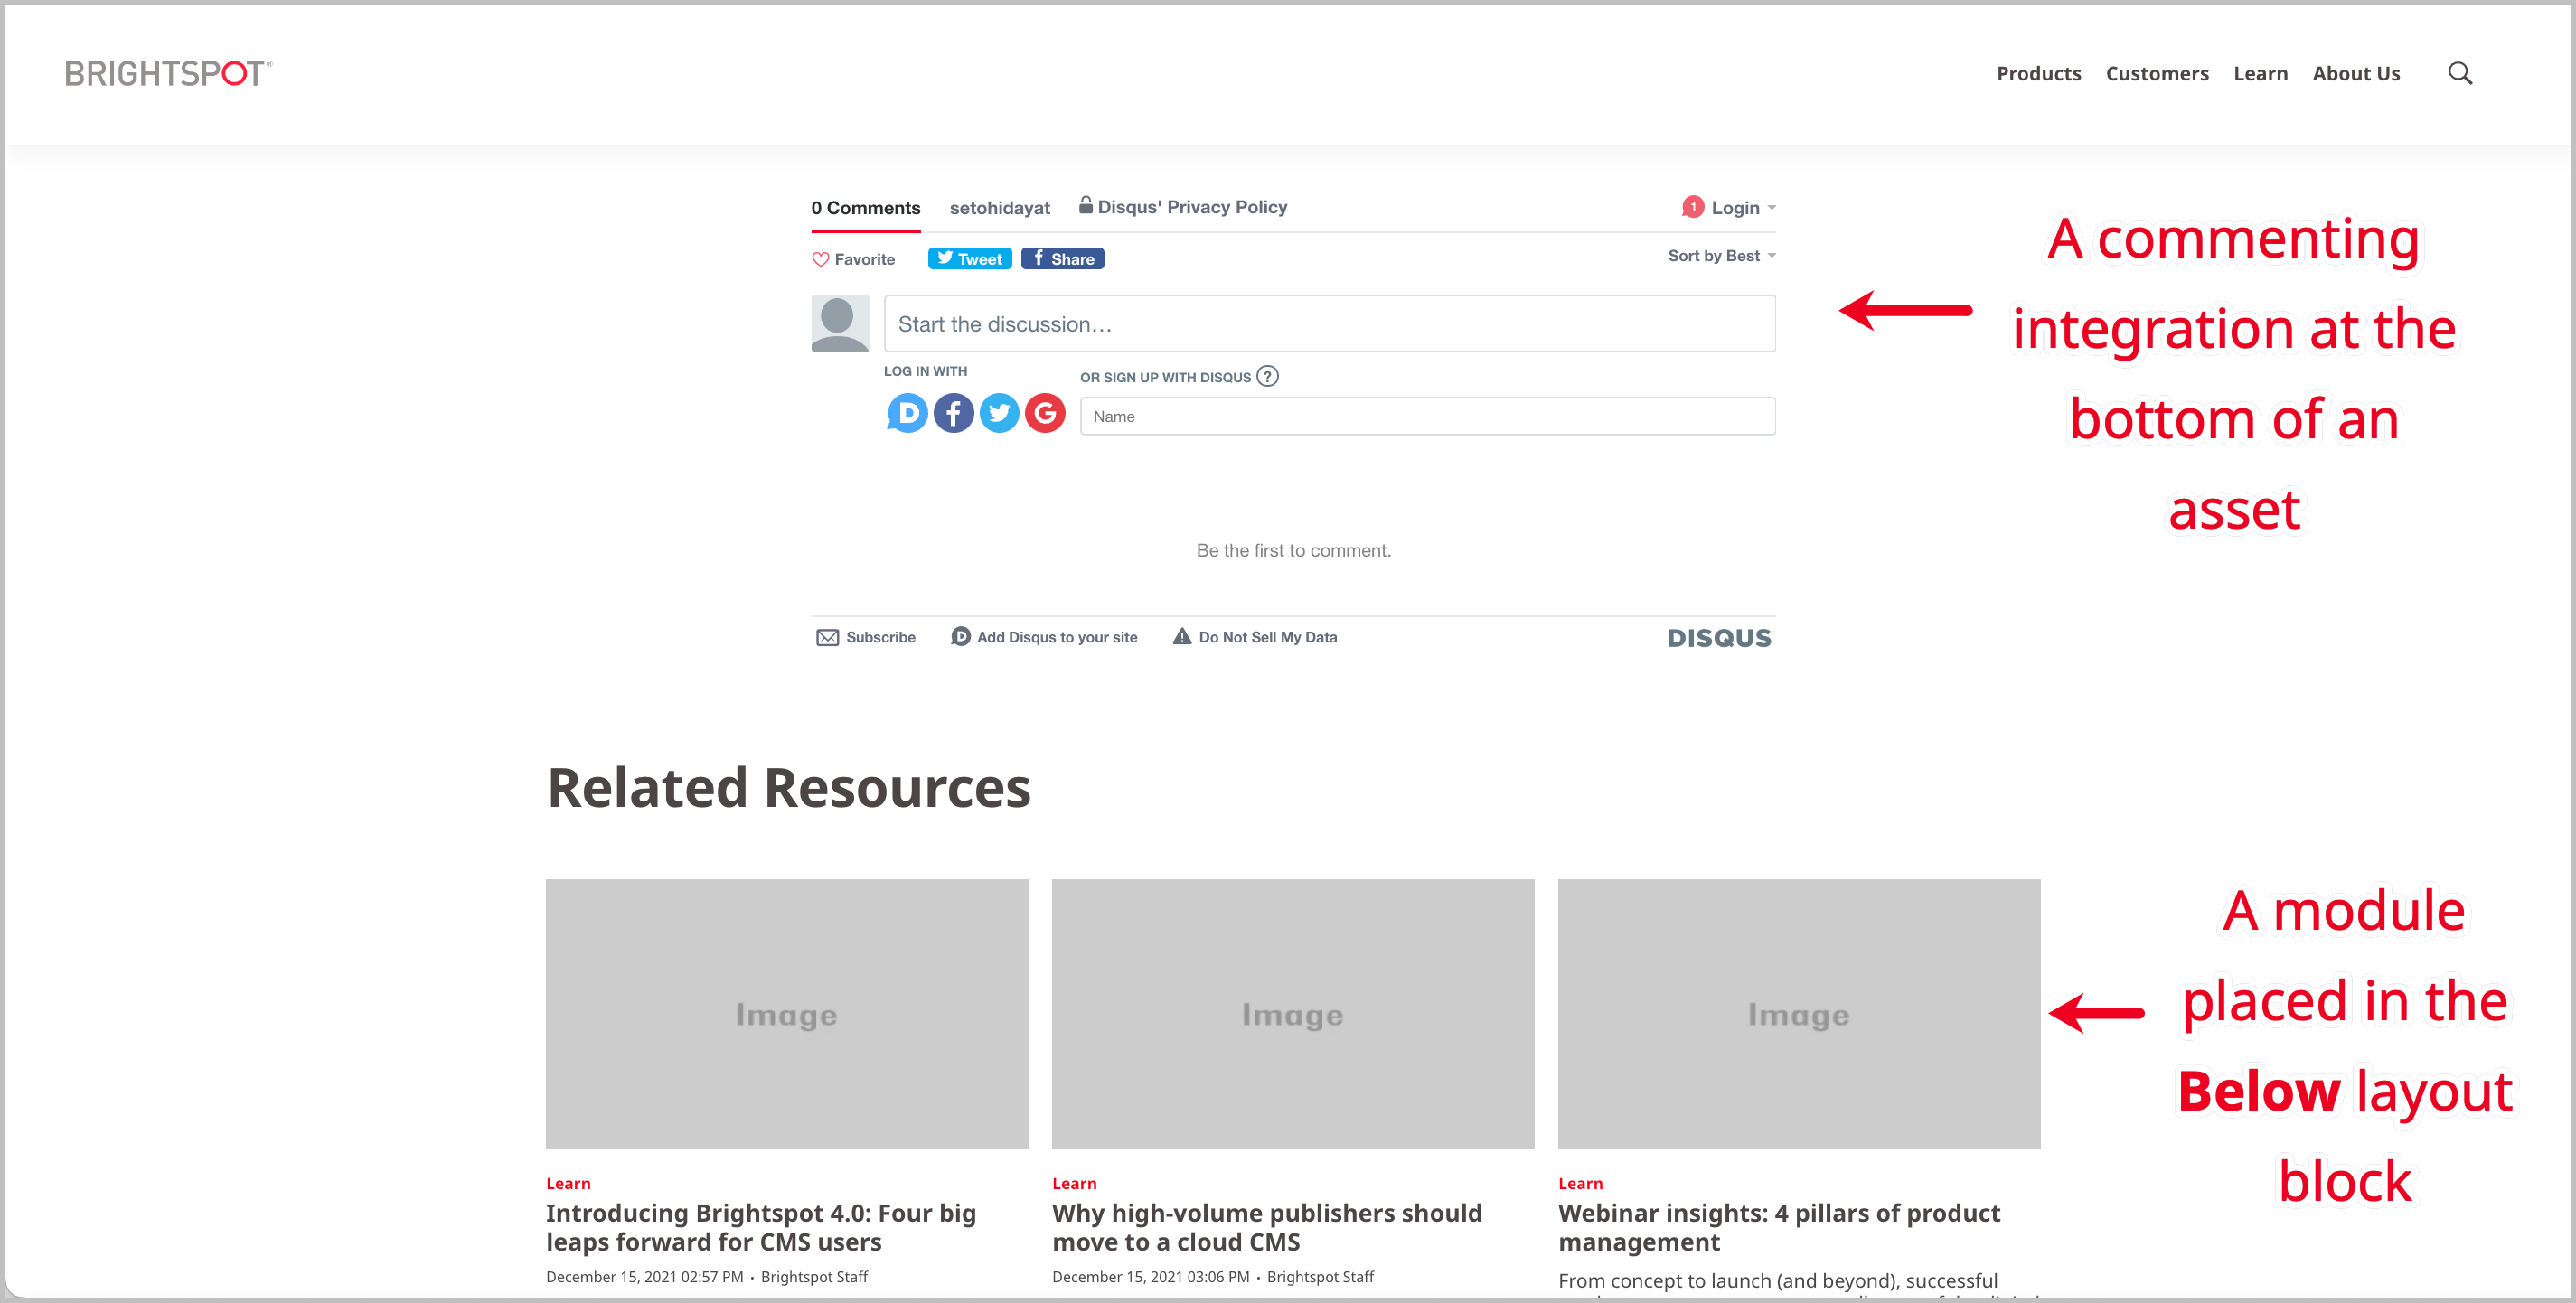
Below
Below is an area of a page that exists at the bottom of the content in an asset, but above the footer, if one exists.
To add a below:
- Navigate to the level of the content hierarchy where you want to add a below (see Configuring layouts).
- Select one of the following options:
- Inherit—The below is inherited by the level below in the content hierarchy. If at the Global level, then this option is the same as None.
- Add After—The below is added after any other inherited modules (if there are no inherited modules, then this works the same as Replace). Click Add Module to create a new module, or click Add Shared to add an existing one. See Modules for details on which modules are available, and how to build them.
- Add Before—The below is added before any other inherited modules (if there are no inherited modules, then this works the same as Replace). Click Add Module to create a new module, or click Add Shared to add an existing one. See Modules for details on which modules are available, and how to build them.
- None—No below displays at this level of the content hierarchy. If lower levels are set to Inherit, then they inherit no below.
- Replace—Replaces any inherited modules in the below with a module of your choosing. Click Add Module to create a new module, or click Add Shared to add an existing one. See Modules for details on which modules are available, and how to build them.
- Click Save.
Configuring layouts
As described in Content hierarchy, the higher up in the content hierarchy you configure layout settings, the more broadly these settings are inherited by other levels downstream. This section focuses on how to access layout settings at the four levels of the hierarchy.
Global
- Click > Admin > Sites & Settings > Sites > Global.
- From the Front-End tab, expand the Layout cluster.
- Referring to Layout structure, configure the layout.
- Click Save.
This layout is inherited by all sites, sections, and assets.
Site
- Click > Admin > Sites & Settings.
- Select the site whose layout you want to configure.
- From the Front-End tab, expand the Layout cluster.
- Referring to Layout structure, configure the layout.
- Click Save.
This layout is inherited by all sections and assets in the site you chose in step 2.
Section
- Search for and open the section whose layout you want to configure.
- From the Overrides tab, expand the Layout Overrides cluster.
- Referring to Layout structure, configure the layout.
- Click Save.
This layout is inherited by all assets that belong to the section you chose in step 1.
Asset
- Search for and open the asset whose layout you want to configure.
- From the Overrides tab, expand the Layout Overrides cluster.
- Referring to Layout structure, configure the layout.
- Click Save.
This layout only affects the asset you chose in step 1.
Action bars
An action bar is a list of social media icons that link off to their respective sites. You can add one to a layout.
To create an action bar:
- Click > Admin > Sites & Settings.
-
In the Sites widget, click the site for which you want to create an action bar, or click Global to create one for all sites.
-
From the Front-End tab, expand the Action Bar cluster.
-
Under Default Action Bar list, select Set.
-
Under Items, click Add, then select an action (for example, copy, download, or social share).
-
To limit an action bar to only appearing on a specific type, do the following:
- Under Type Specific Overrides, click Add Type Specific Action Bar.
- Under Items, click Add and select an action.
- From the Types list, select the content types where the action bar will display.
-
Click Save.
Favicons
A favicon, much like the layout of a site or page, is associated with the branding effort of a website. Most browsers display favicons in tabs, bookmarks, and history listings.
To add a favicon:
- Click > Admin > Sites & Settings.
-
In the Sites widget, select the site for which you want to configure a favicon, or select Global to configure this setting for all sites.
-
From the Front-End tab, expand the Logos and Icons cluster.
-
To upload the favicon, do one of the following:
- Under Favicon, upload a .png or .jpeg file, or add a URL pointing toward the favicon you want to use.
- Under Favicon Ico, upload an .ico file, or add a URL pointing toward the favicon you want to use.
-
Click Save.
You may find it useful to set both the Favicon field and the Favicon Ico field to ensure your favicons are compatible with older browsers. Also, most browsers still request the favicon.ico field. If you don’t specify one, or include a shortcut via <link> you may get a 404 error.
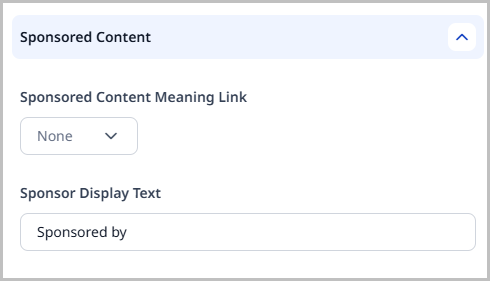
Sponsor intro text
Sponsor display text is a phrase that introduces your site's sponsor. Some examples of sponsor display text might be Sponsored by or Presented by. Once configured, you can override this display text on an individually sponsored asset. For details, see Sponsor.
To set sponsor display text:
- Click > Admin > Sites & Settings.
-
In the Sites widget, select the site for which you want to configure this setting.
-
From the Front-End tab, expand the Sponsored Content cluster.
-
Enter the phrase that introduces the site's sponsor.
-
Click Save.
Broadcast messages
Broadcast messages display at the top of the CMS in a banner and contain information that is important for your users to know. You can configure a broadcast message in the following ways:
- At the Global level only.
- At the Global level, with all sites inheriting it.
- At the site level.
To create a broadcast message:
- Click > Admin > Sites & Settings.
- In the Sites widget, select the site for which you want to enable this feature, or select Global to enable this feature for all sites.
- Under the CMS tab, expand the Broadcast cluster.
- If you are creating this message at the Global level, toggle on Global Only to broadcast only to the global site. Leave this setting off to broadcast to all sites. This field does not appear at the site level.
- In the Broadcast Message field, enter the message that will be broadcast. To include an external link with the message, click , then enter text into the Link Text field and enter the URL itself.
- Under Broadcast Expiration, select the date and time at which the broadcast message will expire and no longer appear.
- Click Save.