Digital asset management
With Digital Asset Management (DAM), you can stand up a site of proprietary assets that subscribers can browse and use in their own publications. A typical DAM workflow is as follows:
- A subscriber submits requests to use your assets.
- You approve or deny the requests, and optionally assign an expiration date for the approved requests.
For example, a subscriber requests permission to use an image of your maple syrup in an article. You can grant the request, and subsequently notify that subscriber that the image is no longer usable after January 1, because the product is being discontinued.
Overview of a DAM environment
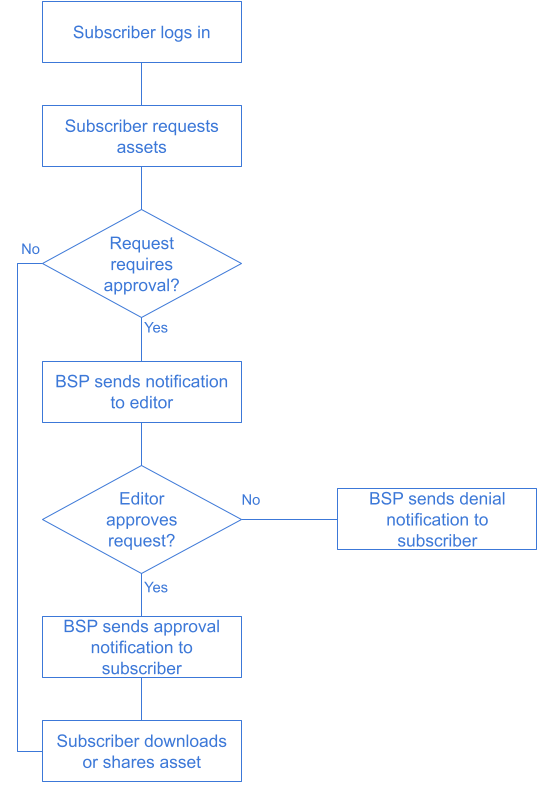
In a typical DAM scenario, you make assets available through a dedicated site, such as assets.mydomain.com. Subscribers log in to the site and select the assets they want to use.
- If the assets require approval before use, Brightspot sends a request to the appropriate editor.
- If the assets do not require approval before use, the subscriber can immediately download or share them.
The following illustration describes a typical DAM workflow.
Implementing this workflow requires setting up a new site and managing subscribers through the Users Integration.
See also:
- Creating a site
- Users Integration
Configuring DAM
Brightspot sends asset-management notifications in the following scenarios:
- A subscriber submitted a request to use one of your assets.
- One of your assets used by a subscriber is about to expire.
- One of your assets used by a subscriber was shared through DAM.
- You changed one of your assets used by a subscriber.
Brightspot can send these notifications over a variety of delivery options.
The following sections describe how to configure DAM.
See also:
Configuring asset request emails
In the DAM workflow (see illustration in Overview of a DAM environment), a subscriber submits a request to use your assets. Brightspot can send an email to the editors responsible for approving or denying such requests. This section describes how to configure such emails.
To configure an email for an incoming asset request:
- Click > Admin > Sites & Settings.
-
Under Sites, select the site for which you want to configure the email, or select Global to configure the email for all sites.
-
Click , located to the left of , and type
DAM Asset Request Approval Settings. -
Do the following:
-
Under No Approval Required By Default, do one of the following:
- Turn on to allow subscribers to use your assets without requesting approval.
- Turn off to explicitly approve subscribers' requests to use your assets.
You can override this setting for individual assets. For details, see Restricting asset availability.
-
In the Email From Address field, enter the email's "From" address, such as
admin@mysite.com. -
In the Email Subject Prefix field, enter the email's subject line, such as
Approval Needed for Asset Request. -
In the Email Body Footer, enter the text that appears after the listing of requested assets.
-
-
Click Save.
See Also:
Configuring asset expiration emails
If you assigned an expiration date to an asset request, Brightspot can send an email to subscribers with an indication of the upcoming expiration date. The email gives the subscribers a chance to update their own content as necessary. This section describes how to configure such emails.
To configure an email for an asset expiration:
- Click > Admin > Sites & Settings.
-
Under Sites, select the site for which you want to configure the email, or select Global to configure the email for all sites.
-
Click , located to the left of , and type
DAM Asset Expiration Settings. -
Do the following:
- In the Email From Address field, enter the email's "From" address, such as
admin@mysite.com. - In the Email Subject Prefix field, enter the email's subject line, such as
Upcoming Asset Expiration. - In the Email Body Footer, enter the text that appears after the listing of expiring assets.
- In the Upcoming Expiration Days field, enter the number of days before expiration that Brightspot sends the email.
- In the Email From Address field, enter the email's "From" address, such as
-
Click Save.
Configuring asset sharing emails
A subscriber who has permission to use one of your assets can share that asset with someone else—even someone who is not a subscriber to your site of managed assets. For example, Alice received permission to use your company's logo, and she subsequently shared the logo with two other editors in her company. Brightspot can send an email notification regarding Alice's sharing of that logo.
To configure an email for asset sharing:
- Click > Admin > Sites & Settings.
-
Under Sites, select the site for which you want to configure the email, or select Global to configure the email for all sites.
-
Click , located to the left of , and type
DAM Asset Share Settings. -
Do the following:
- In the Email From Address field, enter the email's "From" address, such as
admin@mysite.com. - In the Email Subject Prefix field, enter the email's subject line, such as
Recently Shared Assets. - In the Email Body Footer, enter the text that appears after the listing of shared assets.
- In the Link Expiration Days field, enter the number of days before link expiration that Brightspot sends the email.
- In the Email From Address field, enter the email's "From" address, such as
-
Click Save.
Configuring asset update notifications
There may be cases in which you update an asset used by a subscriber. Brightspot can send an email to those subscribers regarding the update. This section describes how to configure such emails.
To configure an email for asset updates:
- Click > Admin > Sites & Settings.
-
Under Sites, select the site for which you want to configure the email, or select Global to configure the email for all sites.
-
Click , located to the left of , and type
DAM Asset Update Notification Settings. -
Do the following:
- In the Email From Address field, enter the email's "From" address, such as
admin@mysite.com. - In the Email Subject Prefix field, enter the email's subject line, such as
Approval Needed for Asset Request.
- In the Email From Address field, enter the email's "From" address, such as
-
In the Email Body Footer, enter the text that appears after the listing of updated assets.
-
Click Save.
Adding DAM widgets to the dashboard
You review and approve DAM requests in following dashboard widgets:
- Expiring Assets—Lists the assets that are about to expire.
- Asset Requests—Lists the requests for your assets that subscribers submitted.
You add these widgets to a shared or one-off dashboard.
To add DAM widgets to a dashboard:
- Create a new shared or one-off dashboard. For details, see Shared dashboard and One-off dashboard.
- To add widgets to your dashboard, complete the following steps:
- Click Save.
See also:
Configuring notifications for asset requirements and expirations
You can create a subscription to receive notifications when the following DAM events occur:
- A subscriber submitted an asset request.
- An asset is about to expire.
To configure notifications for asset requests and expirations:
- In the header, click your username > Profile.
- Expand the Notifications cluster.
- Under Subscriptions, click , and select Asset Expiration Subscription or Asset Request Subscription.
- From the Delivery Options list, select the required delivery options. (For an explanation about configuring delivery options, see Delivery methods.)
- From the Sites list, select the sites for which you want to receive asset notifications, or leave blank to receive notifications for all sites.
- Click Save.
Restricting ability to approve asset requests
If you want to restrict the ability to approve asset requests to a group of specific users, create two roles:
- One role with access to the area Admin → Asset Requests. Users in this role can view, approve, and deny asset requests.
- Another role without access to the area Admin → Asset Requests. Users in this role cannot view asset requests.
For information about creating roles, see Creating roles.
Downloading assets
This section describes the downloading of assets from Brightspot. Specifically, this section explains how to convert assets to different formats when needed, and how to view a log of downloads by subscriber through your published site. See the following topics for more information:
Converting assets to different formats
Subscribers to your digital asset site download assets as-is. If the asset on the site is a PNG, the subscriber downloads it as a PNG. If a subscriber needs the asset in a different format, you can download the asset in the required format and then send it to the subscriber.
To convert and download an asset:
- Search for and open the asset's content edit page.
- Click , and from the menu, select Download This… (such as Download This Image). The Download Options widget appears.
- From the Format list, select one of the available options.
- Click Download. (Your browser downloads the image in a different tab, so you may need to disable the popup blocker for the Brightspot server.)
Reviewing download activity
Brightspot maintains a log of each asset's download activity. The log shows downloads by subscribers through your published site, not by editors through Brightspot.
To review download activity:
- Search for and open the asset's content edit page.
- Expand the Downloaders accordion. A list of subscribers who downloaded the asset appears.
- Click the log entry to review the subscriber's information.
You can also review download activity through the dashboard's Top Downloads widget. For information about adding this widget to your dashboard, see Shared dashboard or One-off dashboard.
Managing assets with DAM
The following sections describe how you manage the sharing of assets through DAM.
Approving or denying asset requests
You can approve or deny asset requests from the dashboard.
To approve or deny asset requests:
- Open the dashboard's Asset Requests widget.
- Sort and filter the asset requests using the drop-down lists.
- For each asset request, in the rightmost column, select Approve or Deny. (You can also approve or deny all requests by selecting a value from the Update All list.)
- Click Save.
For information about adding the Asset Requests widget to your dashboard, see Adding DAM widgets to the dashboard.
Sharing assets from Brightspot
You can share assets with anyone through a link, similar to sharing a web page through a URL. The person with whom you share the link does not need to have a Brightspot account. You can apply an expiration date to the link after which the link is no longer live.
To share an asset through Brightspot:
- Search for and open the asset's content edit page.
- In the editorial toolbar, click > Share this… (such as Share This Image).
- Enter an expiration date after which the share link is no longer valid. If you enter
N/A, the link never expires. - Click Share.
Brightspot displays a URL that you can share with subscribers.
Restricting asset availability
Referring to the illustration in Overview of a DAM environment, subscribers log in to your site and select assets for use in their own publications. You can show or hide individual assets from the site, thereby preventing subscribers from requesting them.
To restrict asset availability:
-
Search for and open the asset's content edit page.
-
Under Usage, from the Settings list, select one of the following:
- Hidden—The asset does not appear on the site, so subscribers cannot use it. Continue to step 5.
- Set—The asset appears on the site, so subscribers can use it. Continue to step 3.
-
Under Approval Required, do one of the following:
- Turn off to allow subscribers to use the asset without requesting approval.
- Turn on to explicitly approve subscribers' requests to use the asset.
-
In the Expiration Date field, select an expiration date after which subscribers cannot use the asset. If you enter N/A, subscribers can use the asset indefinitely.
-
Complete your site's workflow and publish the asset.
See also:
Managing expiring assets
Some asset requests that you approve may have an expiration date after which the subscriber should no longer use the asset. You can manage the asset's use as the expiration date approaches. For example, if you plan to publish a new logo on June 1, you may need to take one of the following actions just before June 1:
- Extend the expiration date. For details, see Restricting asset availability.
- Notify subscribers about the upcoming expiration, because they may need to update their associated content. For details, see Reviewing download activity.
- Check if your own content uses the expiring asset. Click the asset in the Expiring Assets widget, and see where the asset is used in the References widget.
To manage expiring assets:
- In the dashboard's Expiring Assets widget, filter by content type, expiration status, and time period.
- For each asset, take an appropriate action.
For information about adding the Expiring Assets widget to your dashboard, see Adding DAM widgets to the dashboard.
See also:
Sharing collateral
DAM provides additional content types that you can upload to Brightspot. You can use these content types to share collateral you create, such as presentations and spreadsheets, with other publishers through DAM.
The following table lists the content types available with DAM.
| Content type | File types |
|---|---|
| Spreadsheet |
|
| Document |
|
| Presentation |
|
To upload collateral to Brightspot:
- In the Quick Start widget, select one of the content types listed in the previous table.
- Complete the content edit page as required for the collateral.
- Share the collateral as described in Sharing assets from Brightspot.
You can also share images and videos; these content types do not require DAM.
Providing menus for viewing asset activity
Your site's subscribers can review their asset activity by viewing special pages you publish through Brightspot. For example, the following image shows assets that a subscriber shared through your site.
The left rail shows the menu My Assets with two menu items: All Assets and Shares. The following procedure describes how to add such a menu and menu items to your site's navigation.
To provide menus for viewing asset activity:
-
In the header, click .
-
In the Create widget, select Page Navigation.
-
In the Name field, enter a name for the navigation item.
-
Under Items, click , and select Assets Navigation Item.
-
In the Title field, enter a title for the navigation item.
-
Toward the right of the widget, select > Sub-navigation.
-
Under Sub Navigation, click , and select one of the following:
- All Assets Link—Adds a menu item for listing all the subscriber's assets. The list includes assets that do not require approval or for which approval was granted.
- Asset Requests Link—Adds a menu item for listing the subscriber's pending asset requests.
- Asset Shares Link—Adds a menu item for listing assets that the subscriber shared with someone else.
-
In the Text field, enter text to appear in the menu item.
-
Click Publish.