Header module
You can configure a header to streamline visitors' experience on your site. Configuring a header via the header module is an easier way to preview the header all together (versus previewing its individual components), swap configurations, and test styles.
Creating headers
To create a header:
- In the header, click .
- From the Create list, select Header.
- Using the following table as a reference, complete the fields as needed.
- Click Save.
- Main
| Field | Description |
|---|---|
| Internal Name | Enter an internal name. Brightspot uses this name in selection fields. |
| Logo | Select an existing image to be used as the logo for the header, or create a new one. |
| Navigation | Select an existing navigation to be used in the header, or create a new one. You may select multiple navigations to support your business needs. |
| Search | Select an existing site search page to be featured in the header, or create a new one. |
| Language Menu | Select an existing language menu to be featured in the header, or create a new one. See Language menus for details. |
Language menus
Publications that deliver content in multiple locales often add a language menu in the header. Visitors can use the language menu to view content in different locales.
Language menus have the following components:
- A language code, indicating the locale of the asset currently in the browser
- A menu of language display names, indicating the other languages in which you publish content
- Links in the menu of display names
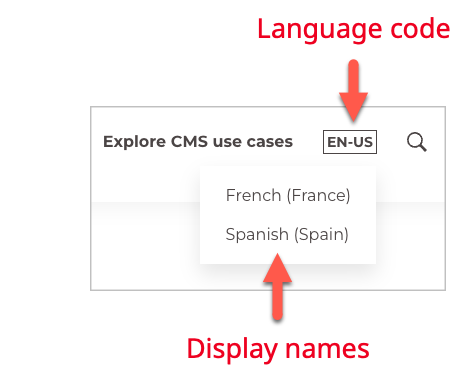
Referring to the previous illustration—
- The current asset in the browser is published in the English (United States) locale, so the language code is
EN-US. - Assets are available in two other locales: French (France) and Spanish (Spain).
- Each locale has a link, typically to the home page of the localized site. For example, clicking
French (France)loads a pagefr.brightspot.com, and clickingSpanish (Spain)loads a pagebrightspot.com/es.
You can customize the text appearing in the language code and the display names.
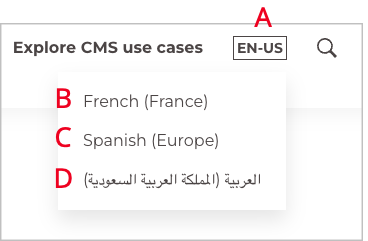
Referring to the previous illustration—
- A—Language code of the asset currently loaded in the browser.
- B—Standard locale provided by your version of Brightspot. For recent versions of Brightspot, you can view the standard locales in JDK 11 Supported Locales.
- C—Customized locale. This feature is useful if you publish content in a locale that is unique to your audience, or is a combination of the standard locales.
- D—Localized locale. This feature is useful if the visitor is not familiar with the standard locales, or is not familiar with Latin characters.
To create a language menu:
- From the header content edit page, under Language Menu, select either Manual Language Menu or Auto Language Menu. Then do one of the following:
-
Manual language menu—
- Enter an internal name.
- Under Items, click Add Menu Item.
- Under Locale list, select a locale you want to include in the language menu.
- From the Link list, select the internal or external asset the visitor sees after clicking the language.
- (Optional) Set default overrides that apply to all locales unless specifically overridden:
- In the Language Code Override field, enter a customized language code to display instead of the default (for example, enter
ESinstead ofES-ES). - In the Display Name Override field, enter a customized display name to show instead of the default English format (for example, enter
Españolinstead ofSpanish (Spain)).
- In the Language Code Override field, enter a customized language code to display instead of the default (for example, enter
- (Optional) Set locale-specific overrides to customize how this menu item appears when viewed in different languages:
- Click Add Localized Locale Name Override.
- Under Display Locale, select the locale context in which this override should appear (for example, select
fr-FRto customize what French visitors see). - Under Language Code Override, enter the language code to display for this specific locale.
- Under Display Name Override, enter the display name to show for this specific locale (for example, enter
Espagnolso French visitors see the menu item in French).
- To localize the display names to the current asset's locale, toggle on Localize Display Names. (For example, if you toggle this on, the display name for Arabic (Saudi Arabia) is العربية (المملكة العربية السعودية)). This setting has no effect if you entered an override display name in step 8.
warningThis is not available for all Locales, use Locale Display Name Overrides for unsupported locales.
- Click Save
ExampleFor locale-specific overrides: For a Spanish (Spain) menu item, you might set the default display name to
Español (España), then add a localized override for French visitors (fr-FR) to showEspagnol (Espagne)instead.
(Optional) Set default overrides that apply to all locales unless specifically overridden:
-
Auto language menu—
- Enter an internal name.
- Under the Defaults field, click Add Default.
- From the Locale list, select a locale you want to include in the language menu.
- From the Link list, select the internal or external asset the visitor sees after clicking the language.
noteLocales published in the defaults field will always display (either by a link to the localized content or by the link published in the defaults field when none exists).
-
To customize the language code or display name, do the following:
-
Under Locale Display Name Overrides, click Add Locale Name Override.
-
From the Locale list, select the locale whose code you want to customize.
-
In the Language Code Override field, enter a customized language code (see
Ain the illustration "Front-end language menu (customized locales)," above; if you don't enter an override, the rendered language code is the locale of the current asset, for example,ES-ESforSpanish Español). -
In the Display Name Override field, enter a customized display name (if you do not enter an override, the rendered display name is the English version of a country-region pair, for example,
Spanish (Spain)). -
(Optional) (Optional) Set locale-specific overrides to customize how this menu item appears when viewed in different languages:
- Click Add Localized Locale Name Override.
- Under Display Locale, select the locale context in which this override should appear (for example, select
fr-FRto customize what French visitors see). - Under Language Code Override, enter the language code to display for this specific locale.
- Under Display Name Override, enter the display name to show for this specific locale (for example, enter
Espagnolso French visitors see the menu item in French).
-
To localize the display names to the current asset's locale, toggle on Localize Display Names. (For example, if you toggle this on, the display name for Arabic (Saudi Arabia) is العربية (المملكة العربية السعودية)). This setting has no effect if you entered an override display name in step 8.
warningThis is not available for all Locales, use Locale Display Name Overrides for unsupported locales.
- Click Save.
For locale-specific overrides: For a Spanish (Spain) menu item, you might set the default display name to Español (España), then add a localized override for French visitors (fr-FR) to show Espagnol (Espagne) instead.