Notifications
Brightspot can send you a notification when certain events occur, such as when someone publishes an asset or completes a translation.
Overview of notifications
During the course of a day, thousands of events occur throughout Brightspot. Editors publish assets, comment on assets, edit graphics, and much more. For each event, Brightspot can emit a message, and editors can retrieve those messages over email, text messaging, or other messaging platform.
The following list contains examples of some of the events around which you can receive notifications:
- Conversation—Includes messages about conversations containing editors' names.
- Publish—Includes messages about publishing, such as when an asset is pushed to a web server for visitors to view.
- Translation—Includes messages about translation jobs, such as when a translation starts, ends, or fails due to an error.
- Workflow—Includes messages triggered when assets transition through a workflow.
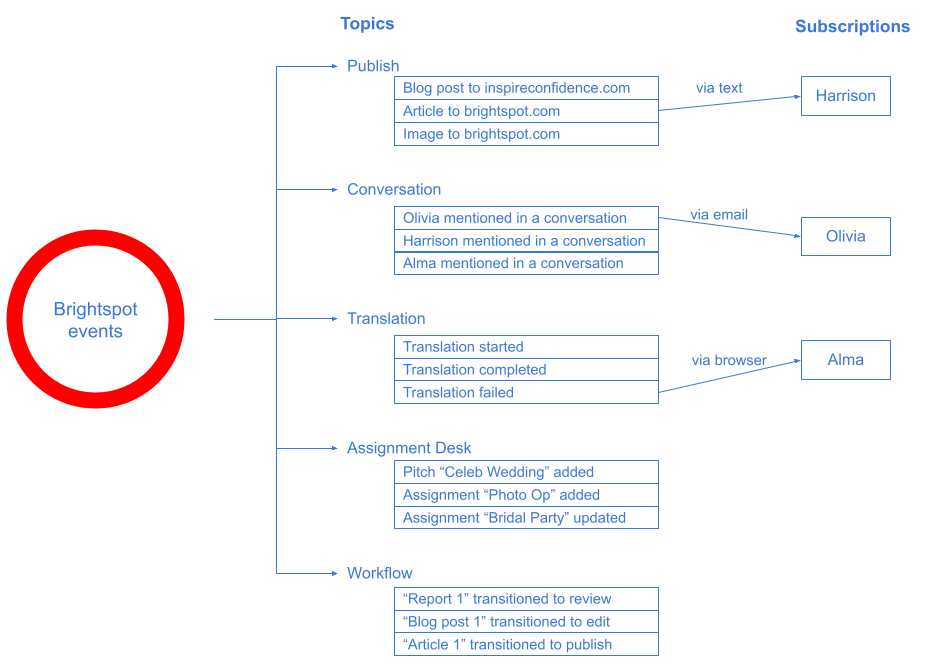
Editors create subscriptions to these topics, specifying for each desired delivery methods. For example—
- Harrison creates a subscription for publishing articles to the site brightspot.com via text message.
- Olivia creates a subscription for receiving notifications via email when she is mentioned in a conversation.
- Alma creates a subscription for translation jobs that fail via browser notification.
The following diagram is an example of the relationship between events, topics, and subscriptions.
Brightspot periodically runs a job that delivers the message to the subscribers using the requested delivery method. Brightspot removes a message from the queue after each subscriber received the message or failed to receive the message after a certain number of attempts. The messages stay in the queue until purged by another job.
Viewing notifications
Whenever your subscriptions trigger a notification, Brightspot adds the notification to the Notifications widget—in addition to sending the notification through the subscriptions' delivery methods. You also receive notifications when one of your subscriptions fails to deliver a message, such as when an email server is down.
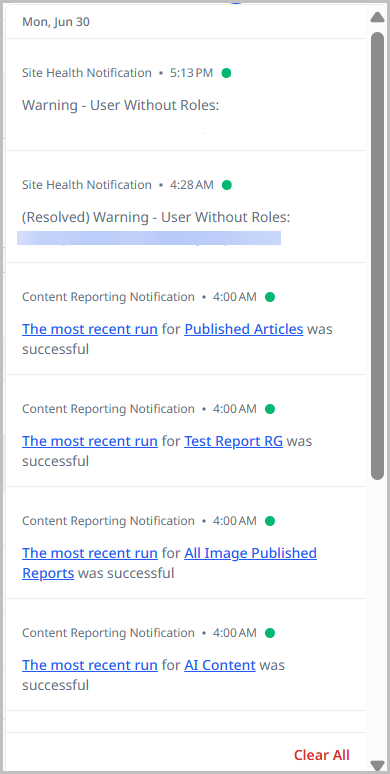
The counter in the header lists the number of unread notifications you have. After you open the Notifications widget, the counter resets to zero.
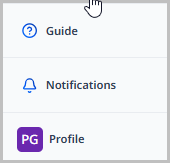
To view notifications:
- In the header, click .
- Click the notification. Brightspot opens the corresponding item in a content edit page.
To clear notifications:
-
Hover over the individual notification that you want to clear.
-
On the right of the notification text, click .
noteTo clear all notifications, click Clear All at the bottom of the Notifications panel.
Delivery methods
A delivery method is the method by which you receive a message.
Brightspot periodically runs through the messages in the various topics, determines which editors want to receive those messages, and sends the messages using the required delivery method. For example, referring to the illustration "Overview of Notifications"—
- Harrison receives messages from the publishing topic over the text-message delivery method.
- Olivia receives messages from the conversation topic over the email delivery method.
- Alma receives messages from the translation topic over the browser delivery method.
The following table describes the available delivery methods and how to configure them.
| Delivery Method | Description | Setup Steps |
|---|---|---|
| Browser | Displays notifications in your web browser | 1. Navigate to Profile > Main > Notifications. 2. Under Delivery Options, click and select Browser. 3. Allow notifications from Brightspot if prompted. 4. Click Save. |
| Sends notifications to your email address | 1. Navigate to Profile > Main > Notifications. 2. Under Delivery Methods, click > Email. 3. Modify the email address as necessary. 4. Repeat to add additional email addresses. 5. Click Save. | |
| Slack | Sends notifications through Slack Requires Slack integration | 1. Navigate to Profile > Main > Notifications. 2. Under Delivery Methods, click > Slack. 3. Click Sign in with Slack and authorize permissions. 4. Select your Slack workspace. 5. Click Save. |
| Text Message | Sends notifications via SMS to your phone | 1. Navigate to Profile > Main > Notifications. 2. Click Delivery Methods > > Text. 3. Enter or modify your phone number. 4. Repeat to add additional phone numbers. 5. Click Save. 6. Verify each phone number by clicking Verify Now. |
For Slack delivery, you must first integrate Slack with Brightspot. See Slack.
Topics
Brightspot provides several topics to which it sends notifications. All topic subscriptions follow the same basic process with topic-specific configuration options:
Assignment Desk topic
Sends messages when editors add or modify assignments or pitches.
Configuration options:
- Toggle on Assignment Notifications to receive messages when assignments are added or modified.
- Toggle on Pitch Notifications to receive messages when pitches are added or modified.
Content Reporting topic
Sends messages when events occur with editorial content reports.
Configuration options:
-
Content Reporting Filters:
- Basic Content Reporting Filter—Generates reports for all editorial content reports across selected sites.
- Specified Content Reporting Filter—Generates reports only for specified editorial content reports.
-
Events (select one or more):
- Successful Report Result—Notification when reports run successfully.
- Failed Report Result—Notification when reports fail to run.
- Changed Report Configuration—Notification when report configurations change.
-
Additional settings for Basic Filter:
- Select Sites containing the reports you want to monitor.
- Toggle Only Report Configurations I Created to limit notifications to your own reports.
-
Additional settings for Specified Filter:
- Click in Specified Configurations field.
- Select from Recently Updated reports or click to search for specific reports.
You must have appropriate permissions to view reports mentioned in notifications.
Conversation topic
Sends messages when you're mentioned in an asset's Conversation widget.
Configuration options: None required beyond basic setup.
See also: Collaboration
Publish topic
Sends messages when publication events occur. Can be configured to filter for specific events.
Configuration options:
Content Filters (select one or more):
-
Match All—Combines criteria where all must be true.
-
Only First—Notifies only on the first publication of any asset.
-
Query Match—Messages based on content type fields (author, section, tag, etc.).
-
Sites & Types—Messages for specific content types and sites.
-
Watching—Messages when watching an asset.
Content Edit topic
You can subscribe to a large array of content edit actions so that you receive notification when those actions occur.
To subscribe to the content edit topic:
- In the left navigation, click your user image, then click Profile.
- In the Main tab, expand the Notifications cluster.
- Under Subscriptions, click Add Subscription.
- Under Delivery Methods, determine how you will receive notifications for this topic.
- Under Topic, select Content Edit.
- Under Sites, select the sites whose content edit actions you want to subscribe to.
- Under Content, select one of the following options:
- Content — From the Contents field, select the specific assets whose content edit actions you want to subscribe to.
- Match All — From the Content Filters field, select the filters that Brightspot uses to determine the assets whose content edit actions you will receive notifications about.
- Query Match — From the Query field, create a dynamic query that Brightspot uses to determine the assets whose content edit actions you will receive notifications about.
- Types — Select the content types whose assets you will receive notifications about.
- Watching — You receive updates on all assets that you are watching.
- Under Actions, determine which content edit actions you want to receive notifications about:
- Archive — When the asset is archived.
- Conversation — When a new message is posted in the asset's Conversation widget. You can add filters to hone down on certain messages by keywords, mentions, posters, replies, by top-level post, or by other conditions.
- Delete — When the asset is deleted.
- Draft (New) — When a new draft is made.
- Merge — When scheduled changes are merged into the live asset.
- Publish — When the asset is published. Toggle on Only First to only be notified of the first time the asset is published.
- Restore — When the asset is restored after being archived.
- Revision — When a revision of the asset is created.
- Schedule — When the asset is scheduled.
- Unschedule — When the asset is unscheduled.
- Workflow — When the asset progresses through a workflow. You can select the workflow and its specific transitions you want to be notified about.
- Toggle on Notify me of my own actions to have your own content edit actions included in the notifications you receive. Leave toggled off if you only want to be notified of other users' actions.
Site Health topic
Sends messages when site health conditions are discovered.
Site health is a plugin. See Health for details.
Translation topic
Sends messages when assets transition through translation statuses.
Translation is a plugin. See Translation for details.
Workflow topic
Sends messages when assets transition through workflow statuses.
Configuration options:
Content Filters (select one or more):
- Match All—Combines criteria where all must be true.
- Watching—Messages when watching an asset (see Watch).
- Workflow, Sites, Types, & Transitions—Messages for specific workflow transitions on specific sites and content types.
See also: Moving assets through a workflow
Subscriptions
A subscription sends notifications pertaining to topic using a specified delivery method when a relevant event occurs. For examples of the different types of subscriptions and events you can configure, see Subscriptions to topics.
Creating a one-off subscription
You can create one-off subscriptions for yourself. Once configured, you receive notifications about the events you specify.
-
In the header, click your username > Profile.
-
Under Main, expand Notifications.
-
Under Subscriptions, click Add Subscription.
-
From the Delivery Methods list, select one or more of the available delivery methods.
noteAt least one delivery method must first be added before this list will populate with options. For information, see Delivery methods.
-
From the Topic list, select a subscription. For details on the types of subscriptions available and instructions on how to add them, see Subscriptions to topics.
-
Click Save.
Creating a shared subscription
You can create a shared subscription that other editors can use. This is a useful feature when a subscription has complex filtering criteria. For example, a group of editors are responsible for monitoring publications of articles and images tagged Astronomy to the site Inspire Confidence. One editor can make a subscription for those messages, and all the other editors subscribe to it.
To create a shared subscription:
-
In the header, click your username > Profile > Main.
-
Under Main > Notifications > Subscriptions, click Add Subscription.
-
From the Topic list, select Shared.
-
In the Subscription field, click .
-
Under Create, select the topic for the subscription, and then click New.
-
In the Name field, type a name for the subscription. As a best practice, use a name that provides a cue about the subscription's content filters.
-
Select a topic.
-
Click Save. Creation of a shared subscription is complete, and other editors can now use it.
-
Click Back at the top of the content edit form to return to the content picker.
-
Click the shared subscription you created, and close the content picker. You return to your profile.
-
Click Save.
Joining a shared subscription
You can join a shared subscription that another editor created. Joining a shared subscription guarantees that you receive the same messages as everyone else with the same subscription.
To join a shared subscription:
- In the header, click your username > Profile > Main.
- Under Main > Notifications > Subscriptions, click Add Subscription.
- From the Delivery Methods list, select one or more of the available delivery methods. (For an explanation about configuring delivery methods, see Delivery methods.)
- From the Topic list, select Shared.
- From the Subscription selection field, select the required shared subscription.
- Click Save.
Automatic subscriptions
Brightspot administrators can automatically subscribe editors to various topics. For example, an administrator can configure a subscription that sends all editors a notification when they are mentioned in a conversation. This avoids the necessity of all editors subscribing individually to the conversation topic.
Editors can configure the delivery options for their automatic subscriptions, and they can opt out of automatic subscriptions.
Configuring automatic subscriptions
Administrators can configure automatic subscriptions that editors automatically receive.
To configure automatic subscriptions:
- Access automatic subscriptions by doing one of the following:
| To… | Access subscriptions… |
|---|---|
| Configure role-level subscriptions | 1. From the left navigation, under Admin, click Users & Roles. 2. Select the role for which you want to configure a subscription. 3. Toward the right of the widget, select > Notifications. 4. Under Automatic Subscriptions, click . |
| Configure system-level subscriptions | 1. From the left navigation, under Admin, click Sites & Settings, then select the Global site. 2. Under CMS, expand Notifications. 3. Under Automatic User Subscriptions, click . |
-
From the Topic list, select the automatic subscription's topic. (For a description of the various topics, see Subscriptions.)
-
(Optional, for workflow and publication subscriptions) Under Content Filters, design a content filter that sends notifications. As a best practice, design a content filter that triggers as few notifications as possible for the users receiving the notifications.
-
(For shared subscriptions) In the Subscription selection field, do one of the following:
- Select one of the available shared subscriptions.
- Create a new shared subscription.
For information about shared subscriptions, see Configure a shared subscription.
-
(For global subscriptions) Under Tool Entities do the following:
- Click .
- Select an editor or role to receive this automatic subscription. If you select a role, all editors in that role receive the automatic notifications.
-
Click Save.
Managing automatic subscriptions
You can review, override, or opt out of automatic subscriptions.
To manage shared and automatic subscriptions:
-
In the header, click your username > Profile.
-
Under Main, expand Notifications.
-
Under Automatic Subscriptions, under Subscriptions, expand the required subscription. You can view the subscription's delivery options and content filters.
-
To cancel the subscription, from the Automatic Delivery Option list, select Disabled.
-
To override the delivery option, do the following:
- From the Automatic Delivery Option list, select Override.
- From the Delivery Options list, select your preferred delivery option.
-
Click Save.
Conditions for sending notifications
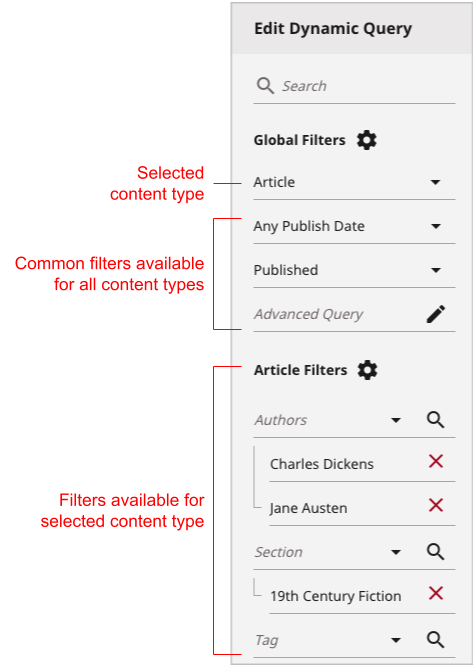
A subscription's content filter is a set of criteria Brightspot applies to an event. If the event satisfies the criteria, Brightspot sends a notification. You can have a subscription with multiple content filters as illustrated in the following example.
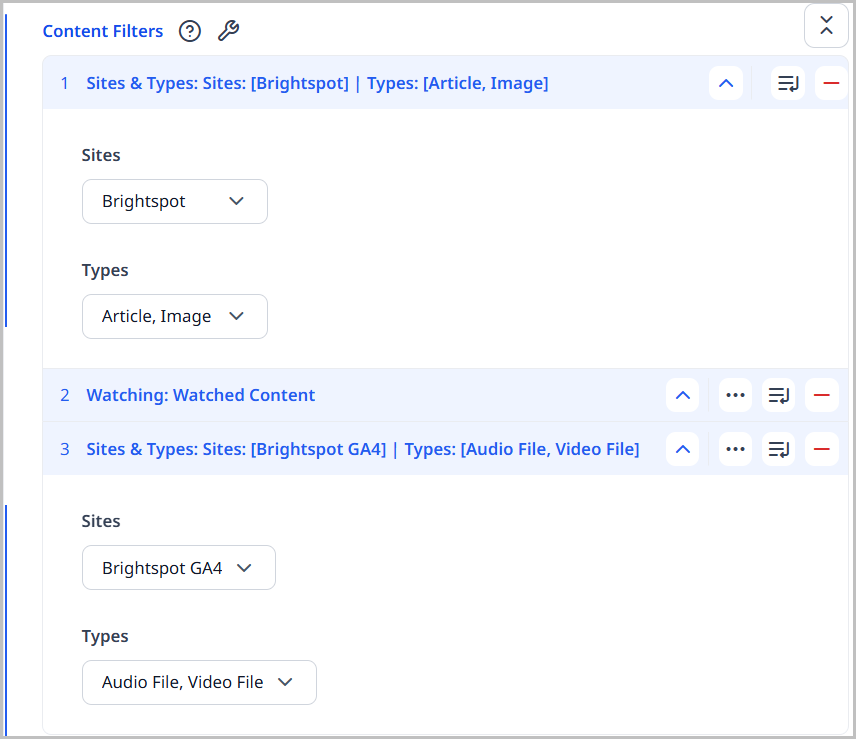
Referring to the previous example, Brightspot sends notifications when any of the following conditions are true:
- An editor publishes an article or gallery to the site Inspire Confidence.
- An event occurred on an asset you are watching.
- An editor publishes an audio or video to the site Inspire Innovation.
One of the content filters you can select when creating a subscription is Match All. In this case, Brightspot checks that all of the conditions in the content filter are satisfied before sending a notification.
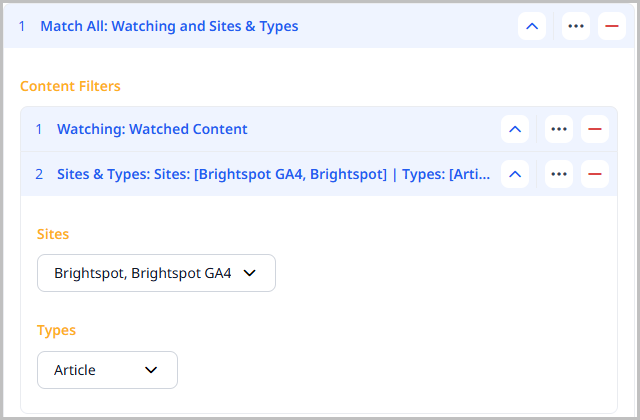
Referring to the previous illustration, Brightspot sends a notification when all of the following are true:
- The editor is watching the asset.
- The asset is published simultaneously to the sites Inspire Confidence and Inspire Innovation.
- The asset is an article.
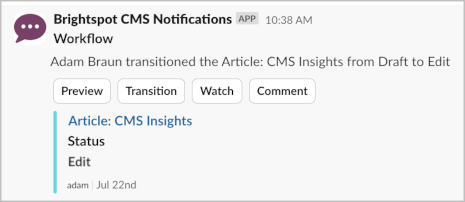
Actionable notifications
Actionable notifications enable editors to take an action on an asset directly from a notification.
Brightspot provides four standard actions with notifications: opening a shared preview, watching/unwatching an asset, transitioning an asset throughout a workflow, and commenting/replying on an asset. Customers can develop additional actions for notifications; for details, see Customizing notification actions.
To preview, transition, comment, or watch from a CMS notification:
-
Open the notification.
-
In the header, click .

-
You can similarly open the notification in Slack, email, or other configured delivery method.
-
-
Do any of the following:
- To preview the asset, click Open Preview.
- To advance the asset in a workflow, click Transition.
- To add a comment to the asset, click > Comment.
- To start or stop watching the asset, click > Watch or Unwatch.
See also:
Enabling and configuring actionable notifications
Actionable notifications enable editors to take an action on an asset directly from a notification. You enable this feature and configure associated settings at the global level.
Globally configuring actionable notifications
To enable, disable, and configure actionable notifications:
- From the left navigation, under Admin, click Sites & Settings, then select the Global site.
-
Expand CMS > Notifications.
-
Under Action Settings, do the following:
- To enable or disable actionable notifications, from the Enable Actions list, select Enabled or Disabled.
- To open a corresponding content edit page in the same browser tab as the notification or in a different tab, from the Result URL Target list, select Same Window or New Tab.
- To add a delay before opening the associated content edit page, in the Result URL Auto Redirect Delay, enter a value up to 30 seconds.
-
Click Save.
Customizing notification actions
An action is something that can be used to interact with notifications from within the context of where the notification was received. While Brightspot already provides users with some action options without any additional development, the following APIs can be leveraged in order to further customize what actions can be available for specific notifications. These implementations are not specific to the context of the CMS, as other delivery methods, such as Slack and email, will also leverage the same code.
Action
The Action class represents the actual behavior that will execute when a user interacts with a notification. Create an implementation of Action<D extends ActionInput>, where ActionInput is the form that appears when a user clicks an action and contains any additional action input data. (If no form appears and no data needs to be passed with the action, then the ActionInput implementation can simply be empty — see WatcherActionInput).
1①public abstract class Action<D extends ActionInput> extends Record {23②public int getPosition() {4return 0;5}67③public String getSubmitLabel() {8return ToolLocalization.text(this, "label.submit", "Execute");9}1011④public abstract ActionResult execute(D actionInput) throws ActionExecutionException;12}
- ①
ActionInputis the form that appears when a user clicks an action. The form contains additional action input data as necessary. (If no form appears and no data needs to be passed with the action, then theActionInputimplementation can be empty.). - ②Override this method to customize the position the action in the list of actions.
- ③Gets the call to action label for the action. Overriding the action class's localization value for
label.submitwill change the submit button's label. - ④This implementation determines what happens when the user clicks the submit button and what the result is.
Usage Example
1public class WorkflowAction extends Action<WorkflowActionInput> {23private WorkflowLog workflowLog;45// Constructors ommitted67// Getters & Setters ommitted89@Override10public ActionResult execute(WorkflowActionInput actionInput) throws ActionExecutionException {11①transitionWorkflow(actionInput);1213②return ActionResult.newSuccess(ToolLocalization.text(this, "message.success",14"Workflow Transition Successful!"));15}1617private void transitionWorkflow(WorkflowActionInput input) {18// Transition content here...19}20}2122public class WorkflowActionInput extends ActionInput {2324@ToolUi.ValueGeneratorClass(WorkflowNameValueGenerator.class)25@Recordable.Required26private String transition;2728private String comment;2930// Getters & Setters ommitted31}
- ①Given the
WorkflowActionInputandworkflowLog, transition the asset to the correct status. - ②Return a successful result if the execution was successful, otherwise throw an exception or handle appropriately.
Action Provider
The ActionProvider interface determines which actions should be included in the action bar for a specific notification type.
1public interface ActionProvider {23①<T extends Topic<P>, P extends Recordable> List<Action<?>> getActions(MessageContext<T, P> messageContext);45}
- ①Given the
messageContext, return the actions that should display in the action bar.
Usage Example
1public class WorkflowActionProvider implements ActionProvider {23@Override4public <T extends Topic<P>, P extends Recordable> List<Action<?>> getActions(MessageContext<T, P> messageContext) {56①P payload = messageContext.getPayload();78if (payload instanceof WorkflowLog) {9WorkflowLog workflowLog = (WorkflowLog) payload;10②return List.of(new WorkflowAction((WorkflowLog) payload));11}1213③return List.of();14}15}
- ①The
payloadcontains the information relevant to the current notification. - ②Only show the action if the notification's payload is a
WorkflowLog, indicating that this is a Workflow-specific notification. - ③If the current notification should include this workflow action, then return an empty list of actions.
Additional APIs
- The
ActionResultclass represents the result of executing an action. This class contains amessagestring, which can be used to describe the action's success, and aresultUrlstring if the action will result in a callback URL. - The
ActionExecutionExceptionclass represents an expected error that occurs as the result ofAction#executeexecuting an action. Throwing anActionExecutionExceptionwhen error handling helps to properly display errors to the user.
Configuring actions in email notifications
You can add actions to notifications editors receive via email.
Before starting the following procedure, ensure Brightspot is configured to send notifications over email. For details, see Sending messages to external services.
To configure actions for email notifications:
- From the left navigation, under Admin, click Sites & Settings, then select the Global site.
-
Expand CMS > Notifications.
-
Under Email Settings, do the following:
- In the Default From Email field, enter the address appearing as the sender in the email notifications.
- In the Mail Provider Settings Key field, enter a key as required by the email provider.
- In the Additional Notification Emails field, enter email addresses for those users who should receive notifications (beyond the editors already subscribed for email notifications).
- To enable or disable actionable email notifications, from the Enable Actions list, select Enabled or Disabled. (In addition, ensure actions are enabled as described in "Globally configuring actionable notifications," above.)
- From the Message Formatters list, select one or more of the available message formatters. The standard formatter includes links for preview, watch, comment and workflow transition.
-
Click Save.
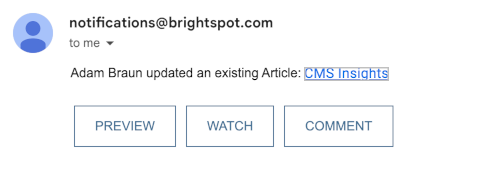
The following image is an example of an actionable email notification.
Configuring actions in Slack notifications
Before starting the following procedure, ensure Brightspot is configured to send notifications over Slack. For details, see Sending messages to external services.
To configure actions for Slack notifications:
-
In your Slack API Console, do the following:
-
Under Interactivity & Shortcuts, toggle on Interactivity, and enter a Request URL. The URL is your CMS's URL and must end in
/cms/slack-notification-response(see example in following screen shot). For details, see Preparing your app for user interactions.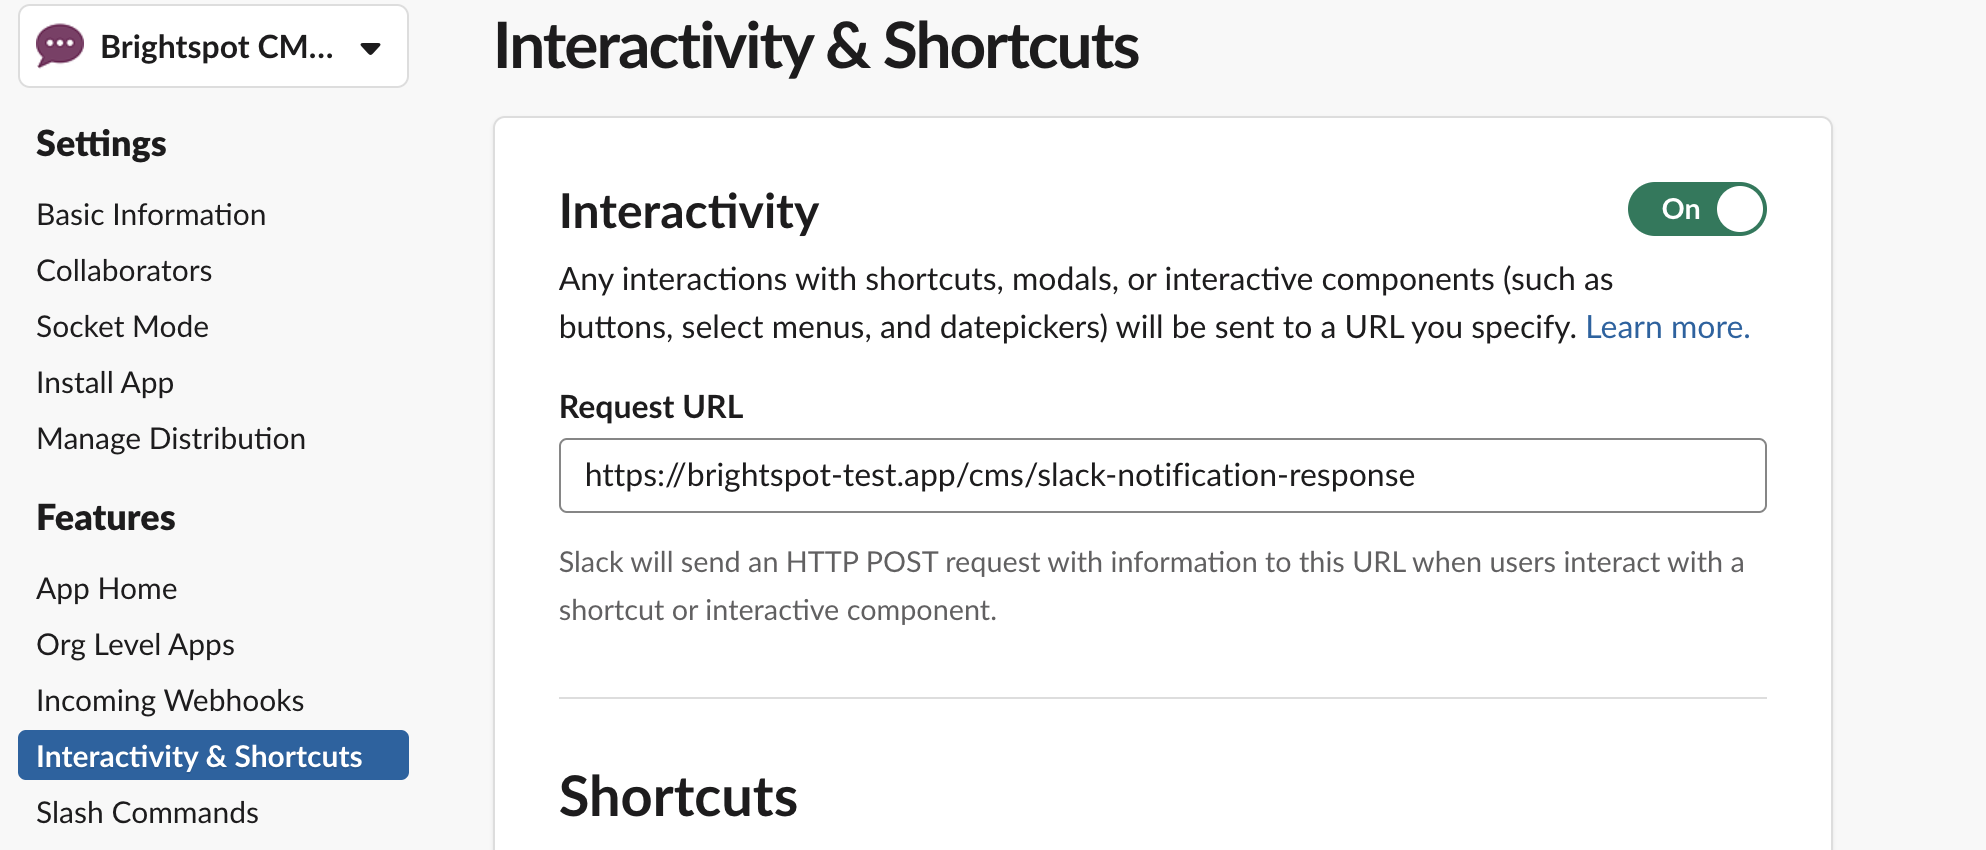
-
Under Basic Information > App Credentials, copy your workspace's signing secret into a text editor. (For details, see App management updates.) You'll paste the secret into Brightspot in the following step.
-
-
In Brightspot, do the following:
- From the left navigation, under Admin, click Sites & Settings, then select the Global site.
- Expand Integrations > Slack.
- Under Workspaces, click for an existing workspace.
- In the Signing Secret field, paste the Slack signing secret from step 1b.
- Click Save.
The following image is an example of an actionable Slack notification.
See also:
Customizing email or phone notifications
This section describes how to configure the URLs that Brightspot sends in messages, as well as defaults for email address and phone number.
Base URL for delivery options
Some delivery methods (such as email and Slack) include a hyperlink. Before Brightspot can send hyperlinks correctly, you need to configure the default tool URL. For details, see Configuring base URLs.
Configuring email messages
You can configure the "from" address and other settings in email messages.
To configure email messages:
- From the left navigation, under Admin, click Sites & Settings, then select the Global site.
- Click , and in the search field type
Default From Email. - In the Default From Email field, enter the email address that appears as the sender of email notifications.
- In the Mail Provider Setting Key and Additional Notification Emails fields, enter settings as required.
- Click Save.
Configuring text message notifications
You can configure the "from" phone number and other settings in text-message notifications.
To configure text-message notifications:
- From the left navigation, under Admin, click Sites & Settings, then select the Global site.
- Click , and in the search field type
Default From Phone Number. - In the Default From Phone Number field, enter a phone number that appears as the sender of text notifications.
- In the Sms Provider Setting Key, enter the setting as required.
- Click Save.
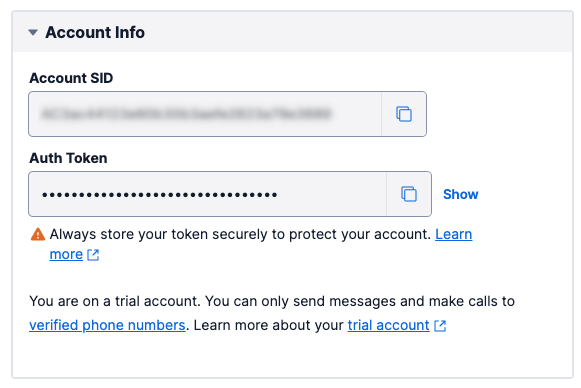
Integrating a text messaging service
Some editors may want to receive notifications via text messaging. This section describes integrating Twilio as the text messaging service. Integration for other services is similar.
To integrate a text messaging service:
-
Log in to your Twilio console, and select the account from which you want to send text messages. The account's dashboard appears.
-
Under Account Info, copy the values for Account SID and Auth Token into a text editor.
-
In a text editor, open the Tomcat configuration file
context.xml. -
Add lines similar to the following:
1<!-- SMS -->2# !ref Specifies the default text messaging configuration as `twilio`. This configuration appears by default in the Sms Provider Setting Key field in step 8.3<Environment name="dari/defaultSmsProvider" type="java.lang.String" value="twilio" />4# !ref Specifies the fully qualified class name implementing the text messaging service.5<Environment name="dari/smsProvider/twilio/class" type="java.lang.String" value="notifications.TwilioSmsProvider" />6# !ref Value for the account ID that you copied in step 2.7<Environment name="dari/smsProvider/twilio/accountSid" type="java.lang.String" value="putYourAccountIDHere" />8# !ref Value for the authentication token that you copied in step 2.9<Environment name="dari/smsProvider/twilio/authToken" type="java.lang.String" value="putYourAuthTokenHere" />10# !ref Default from number that appears in the recipient's text message. This number must be one that the SMS service recognizes as authorized to send text messages.11<Environment name="dari/smsProvider/twilio/defaultFromNumber" type="java.lang.String" value="+12028164833" /> -
Save and close the configuration file.
-
Restart the Tomcat server.
-
In Brightspot, From the left navigation, under Admin, click Sites & Settings, then select the Global site.
-
Under CMS > Notifications > SMS Settings, do the following:
- In the Default From Phone Number field, enter what appears as the "from" number in text messages.
- In the Sms Provider Setting Key field, keep the default configuration (
twilioas in the above snippet), or enter one of the other configurations.
-
Click Save.
Sending messages to external services
Brightspot can send messages to external services, such as a listserv or Slack channel. Editors subscribed to those services receive the corresponding messages.
To send messages to external services:
- From the left navigation, under Admin, click Sites & Settings, then select the Global site.
-
Click , located to the left of , and type
System Notifications. A form appears. -
Under System Notifications, click . A form appears.
-
Under Delivery Methods, click and select one of the following:
- Email—In the form that appears, enter the email for the messaging service (such as a listserv address), or create a new one.
- Microsoft Teams—In the form that appears, select the team and channel.
- Slack—In the form that appears, select the workspace and channel, or create new ones. Brightspot sends a verification message to the destination.
- Text—In the form that appears, enter the phone number for the messaging service, or create a new one.
Repeat to add additional delivery methods.
-
Under Subscriptions, click . A form appears.
-
From the Topic list, select one of the available topics.
-
Complete the subscription for the selected topic.
-
Click Save.