Brightspot search
Brightspot includes a very powerful search feature to allow you to easily find the exact asset you are looking for. The robust full-text search capabilities within Brightspot allow you to find the correct asset with your first search attempt (or similar). You can also create an advanced query search to provide more granular search data. Once you set up and perform a search, you can also save those search settings to use again in the future, and Brightspot will remember the combination of search view and search filters you selected, saving you time as you navigate the results in the future.
Brightspot search features save time for editors by providing several easy-to-use filters to narrow down the search results, multiple search results views to better organize content, as well as integrated search options that allow editors to search in third-party libraries for the right piece of media.
This section covers everything you need to know about using Brightspot search to its fullest.
Search types
There are three types of searches available to you directly from the search bar in the header.
Full-text search
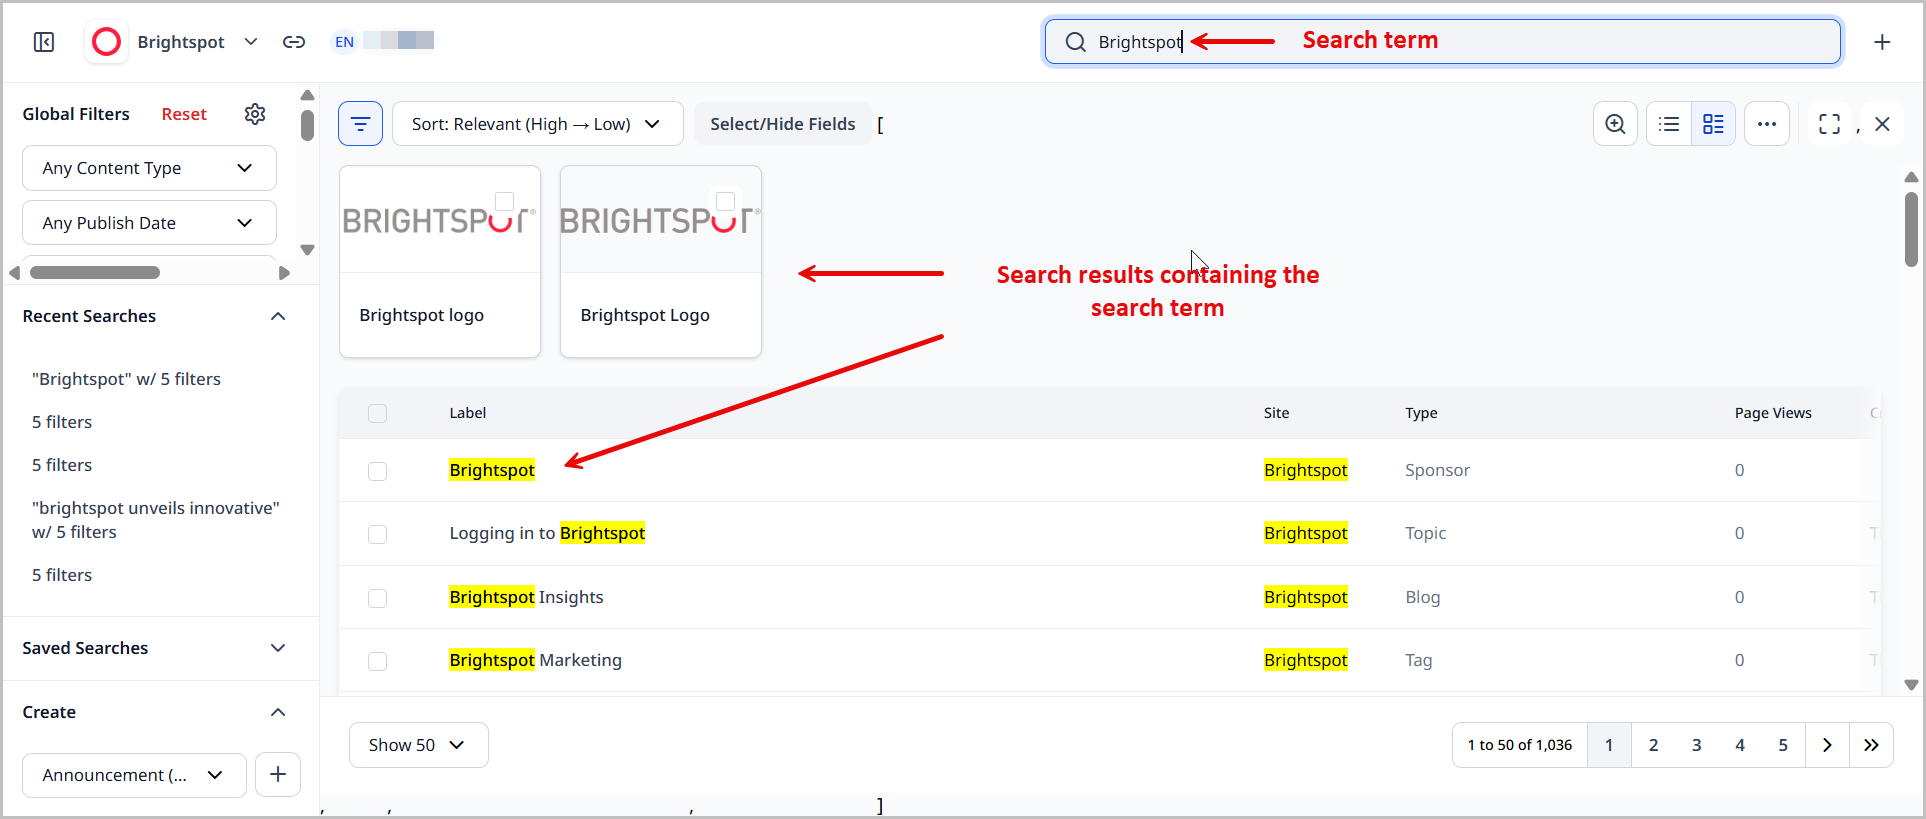
The easiest way to search for assets is to type words you remember from the asset in the Search field in the header. Starting with the second character you type, Brightspot uses full-text search to display all assets having words with the characters you typed so far.
For example, after you type play, Brightspot displays all assets having words that contain play, such as plays, playing, and play.
Every time you perform a full-text search, Brightspot saves the search term in the Recent Searches widget.
Wildcard search
You can enter wildcard symbols # and * to perform a search with patterns.

-
The
#symbol can be added to a search string to search a single character. Consider the following example:- The search string
te#tresults in bothtestandtext.
- The search string
-
The
*symbol can be added to a search string to search multiple characters. Consider the following examples:- The search string
tes*results intest,testing, andtester. - The search string
te*tresults intestandtempest. - The search string
*estresults intestandsimplest.
- The search string
Operator search
You can search for an exact match using search operators by placing quotation marks around a search string.
-
You can search for an exact keyword that occurs in a search result. Consider the following example:
- A search string
"hello world"returns results containing an exact match ofhello world. The result is not case-sensitive.
- A search string
-
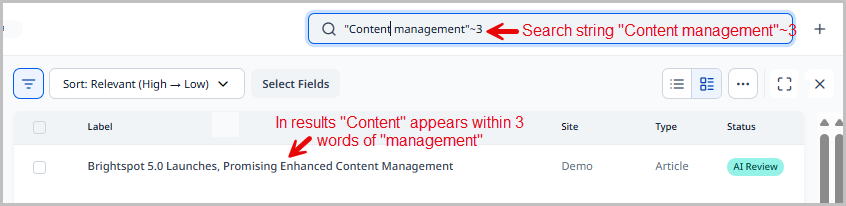
You can search for two or more keywords that occur within a designated number of words from each other by placing the keywords inside quotation marks and specifying the proximity using
~##. Consider the following example:- A search string
"hello world"~3only returns results in whichhelloappears within three words ofworld. The result is not case-sensitive.
- A search string
-
You can search for a keyword for which results have a minimum occurrence of the given keyword. Consider the following example:
- A search string
"brightspot">4only returns results in which the keywordbrightspotappears at least four times. The result is not case-sensitive.
- A search string
Advanced query search
Using the advanced query builder, you can compose retrievals to almost any level of complexity. For example, the advanced query builder can construct queries in the following MySQL patterns:
1SELECT fieldnames WHERE field1 = A;2SELECT fieldnames WHERE field1 = A AND field2 = B;3SELECT fieldnames WHERE field1 = A AND field2 B;4SELECT fieldnames WHERE (field1 = A AND field2 = B) OR (field3 LIKE '%philosop%' AND field4 D);
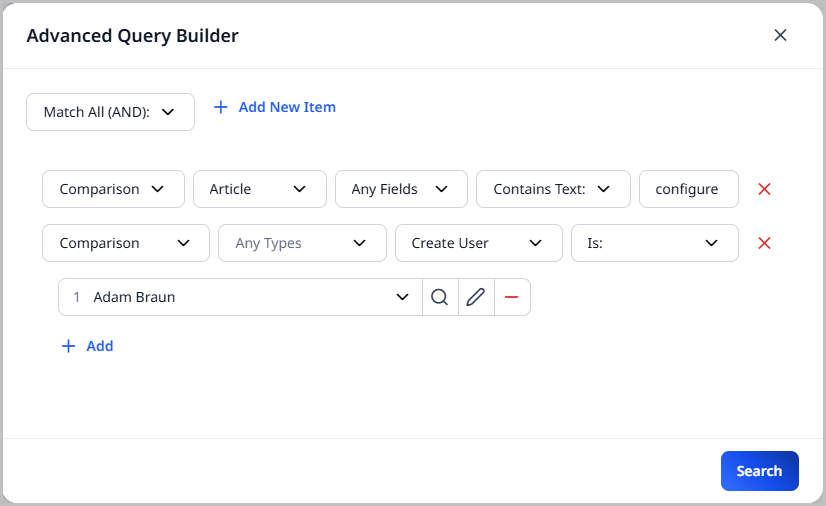
The following procedure describes how to build a query that retrieves all articles containing the word Critique and authored by Immanuel Kant.
To perform an advanced query search:
-
In the search panel, in the Filters widget, in the Advanced Query field, click . The Advanced Query Builder widget appears.
-
From the drop-down list, select
Match All (AND). This selection ensures Brightspot retrieves items that match all of the criteria you enter. -
Click Add Another Match All (And). A set of fields appears.
-
Do the following:
- From the top drop-down list, select
Comparison. - From the next list, select
Article. - From the next list, select
Any Fields. - From the next list, select
Contains Text. - From the next list, enter
Critique.
- From the top drop-down list, select
-
Click
Add Another Match All (AND). A new set of fields appears. -
Do the following:
- From the top list, select
Comparison. - From the next list, select
Article. - From the next list, select
Author(s). - From the next list, select
Is:. - Click the selection field, and select
Immanuel Kant.
- From the top list, select
-
Click Search.
The Advanced Query Builder widget closes, and the matching items appear in the search panel.
Integrated search
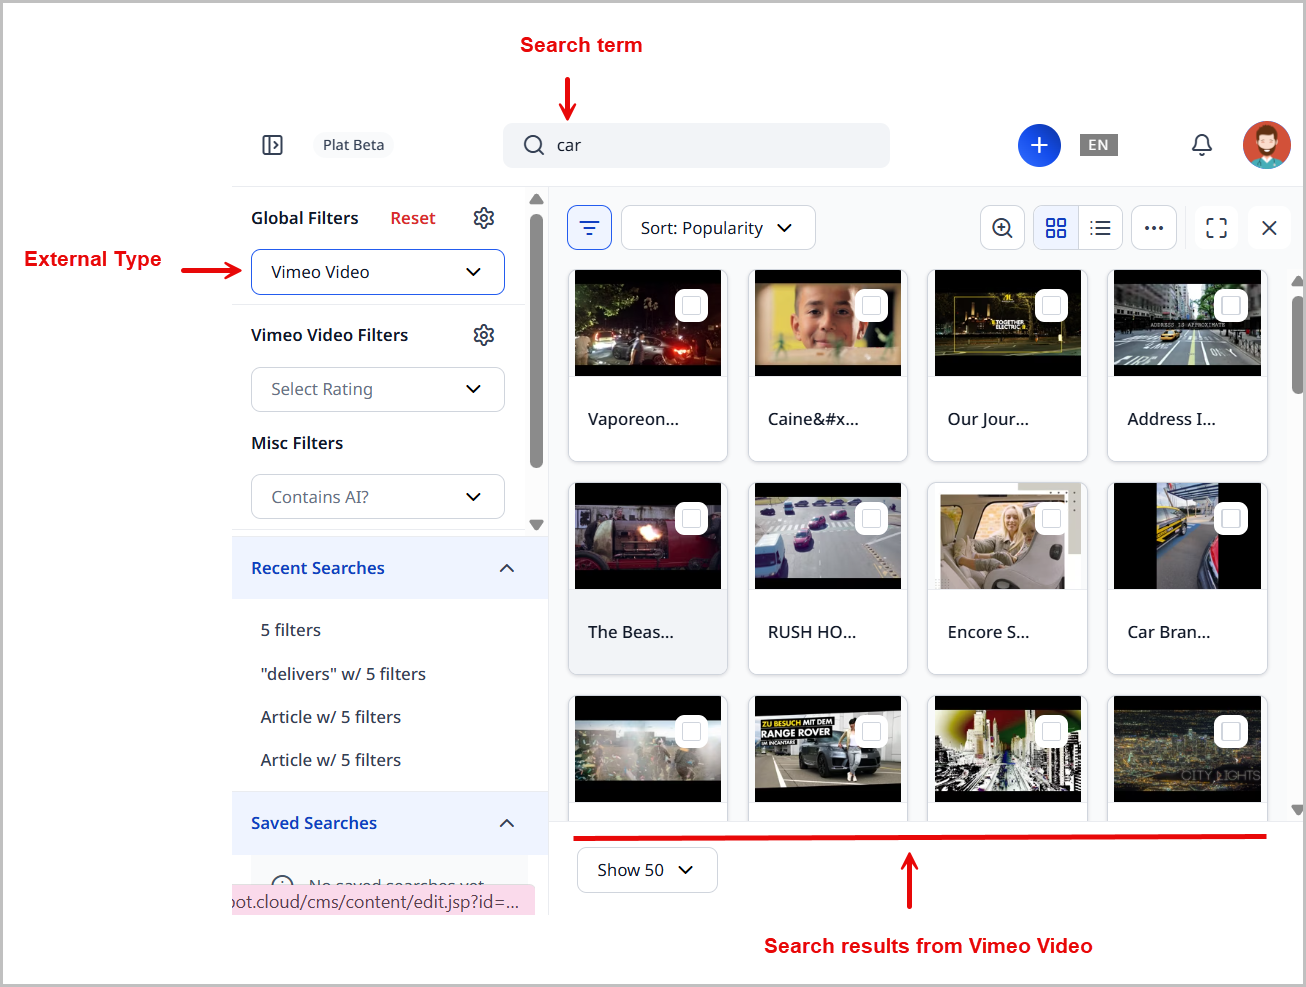
In addition to searching for items in Brightspot, you can perform an integrated search for items from services such as Vimeo and YouTube. Items you discover through integrated searches are read-only. If you want to modify them, you need to import the items into Brightspot.
To perform an integrated search:
-
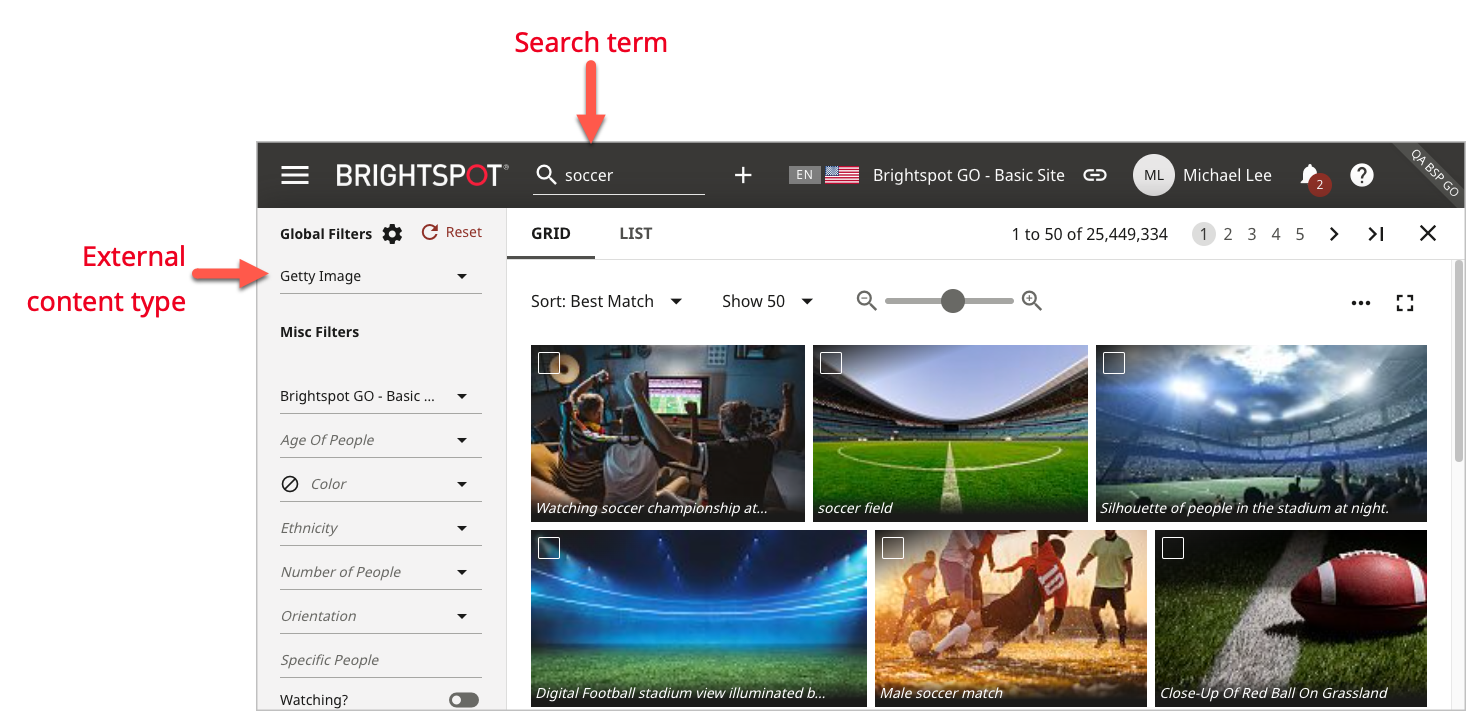
In the search panel, enter a search term, and from the content-type filter, under External Types, select an external content type. Brightspot displays matching items.
-
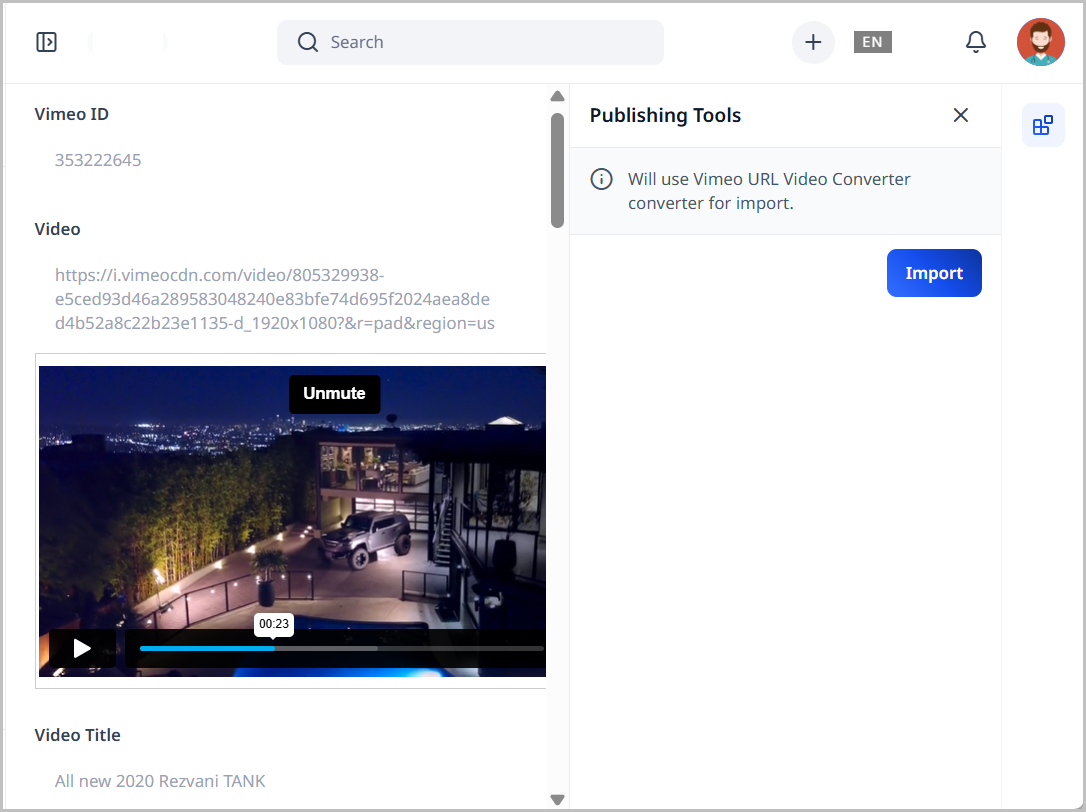
Click an item. Brightspot displays the item in the content edit form along with associated metadata.
-
If you want to modify the item, import it into Brightspot by clicking Import.
Integrated search providers must be configured before they work in your instance of Brightspot. For more information on these configurations, see the Brightspot Integrations Guide.
Importing external videos
When you import a video, you typically retrieve the title, description, and other metadata as available. You do not retrieve the actual video. There are two implications to this architecture:
- The metadata (such as title and description) are now local to Brightspot. You can modify the metadata in Brightspot, and those changes are not sent to the video provider. Similarly, a change to the metadata on the service provider is not automatically imported into Brightspot.
- Brightspot renders the video from the service provider's server. If someone updates the video, Brightspot uses the new copy.
Example
Olivia is creating an article about filing for a patent. For the article's lead, she found a nice video on YouTube.
When Olivia clicks Import, Brightspot retrieves the video's title, description, thumbnail, ID number, and other metadata. At this point, Olivia can modify some of the metadata within Brightspot; those changes do not carry back to YouTube. Furthermore, any changes to the metadata within YouTube are not automatically imported into Brightspot.
Olivia then completes her article about patents, adds the lead video, and publishes. A visitor to the article sees content rendered from two sources: Brightspot and YouTube.

Syncing with external images
When you import an external image, you retrieve the title, caption, other metadata as available, and the image itself. After you import the image, you can modify any part of it (title, caption, image, and any other field in an image). These modifications are local to Brightspot, and are not communicated back to the image provider. Similarly, a change to the image on the service provider is not automatically imported into Brightspot.
Example
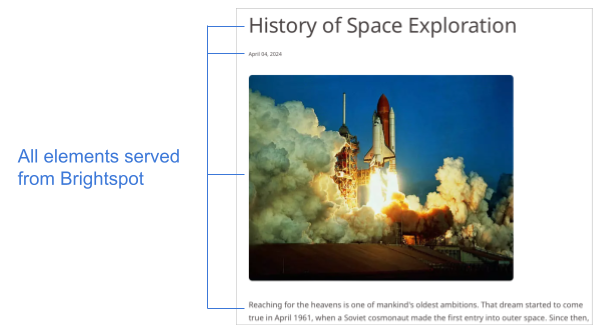
Adam is creating an article about space exploration. For the article's lead, he found a nice image of a space shuttle launch on Getty Images.
When Adam clicks Import, Brightspot retrieves the image and associated metadata. At this point, Adam can modify any part of the image; those changes do not carry back to Getty Images. Furthermore, any changes to the image within Getty Images are not imported into Brightspot.
Adam then completes his article about space exploration, adds the lead image, and publishes. A visitor to the article sees content rendered from Brightspot.
Search views
The search panel provides different views of search results depending on the retrieved content types. This section provides an overview of the different types of views and how they can be used.
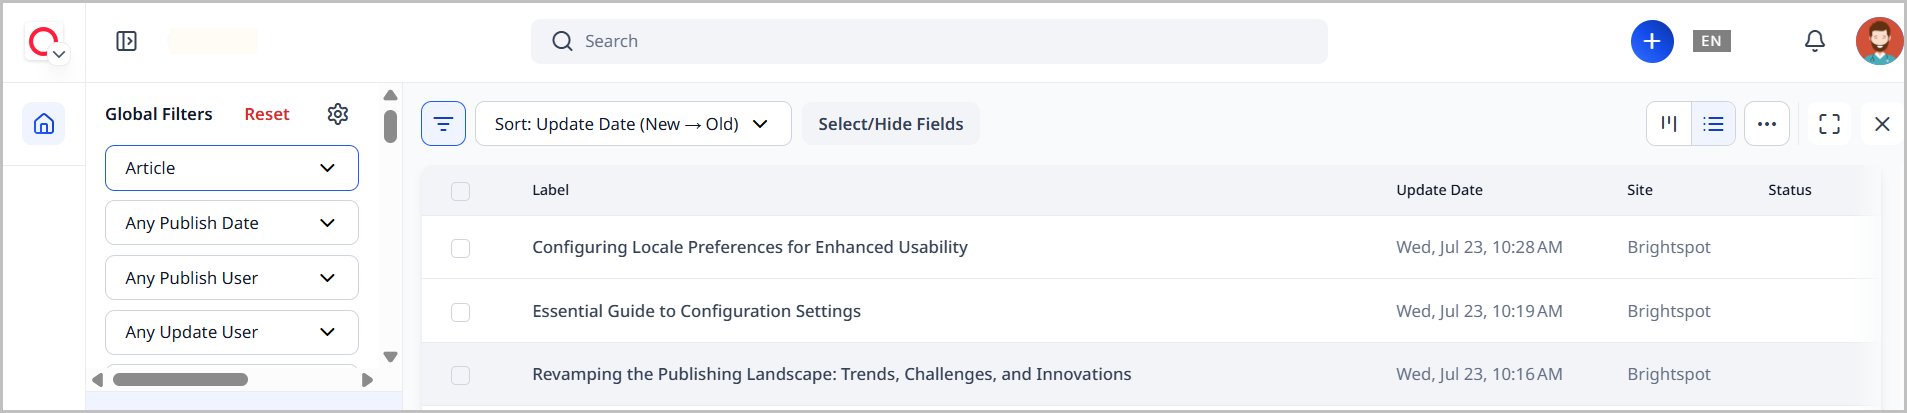
List view
List view displays the retrieved assets as a list with columns of fields. This view is available for all content types. The following illustration is an example of list view.
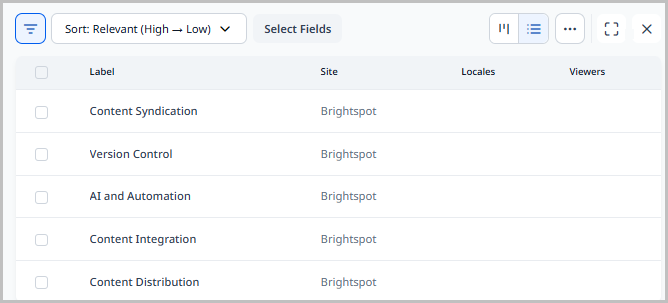
You can customize the columns appearing in list view. For details, see Customizing search results.
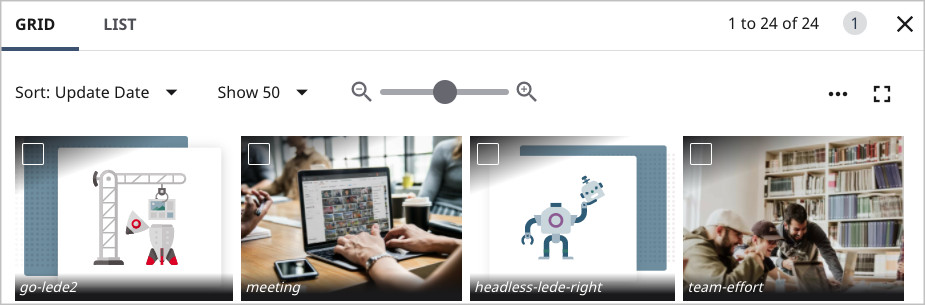
Grid view
Grid view displays previews of the retrieved assets. This view is available for content types that have a preview image, such as images and attachments. The following illustration is an example of grid view.
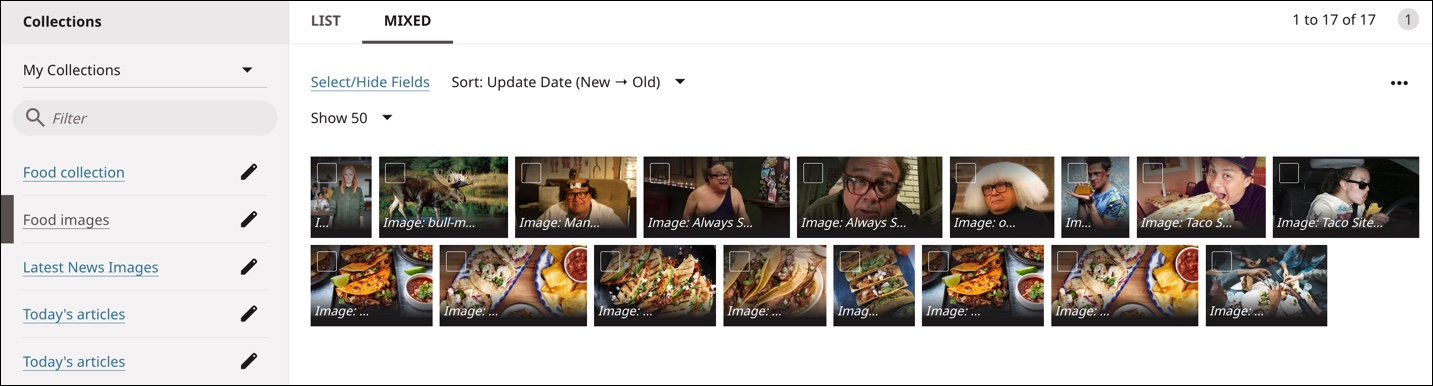
Mixed view
Mixed view is a combination of list and grid views. The assets with a preview appear in the grid, and other assets appear in the list. The following illustration is an example of a mixed view with images in a grid and authors in a list.

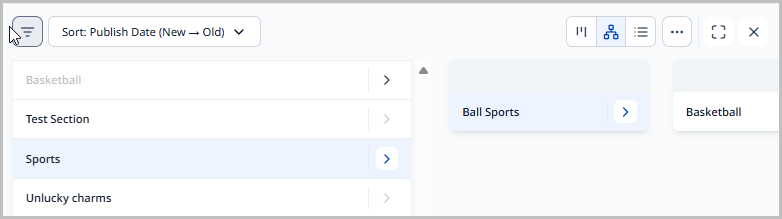
Hierarchy view
Hierarchy view is a view that makes it easier to view a large number of tags or sections. As the name suggests, assets appear in a hierarchical view, allowing you to dig further down and understand any relationships.
To access Hierarchy view:
-
In the header, click the search bar.
-
In the Global Filters widget, select either Tag or Section.
-
Click the Taxonomy tab.
-
Click for a tag or section to view its children.
Only those tags or sections that have children will have the .

Referring to the previous image, the search panel shows the hierarchy corresponding to the illustration found in the Explanation of tag hierarchies topic.
The following illustration is an example of a hierarchy view with tags:
Board view
Board view groups results by field and includes grouping options for default statuses and workflow statuses. With additional development work, you can group content by any field and enable drag and drop functionality so those fields can be updated directly from search. The following illustration is an example of board view with articles grouped by section.
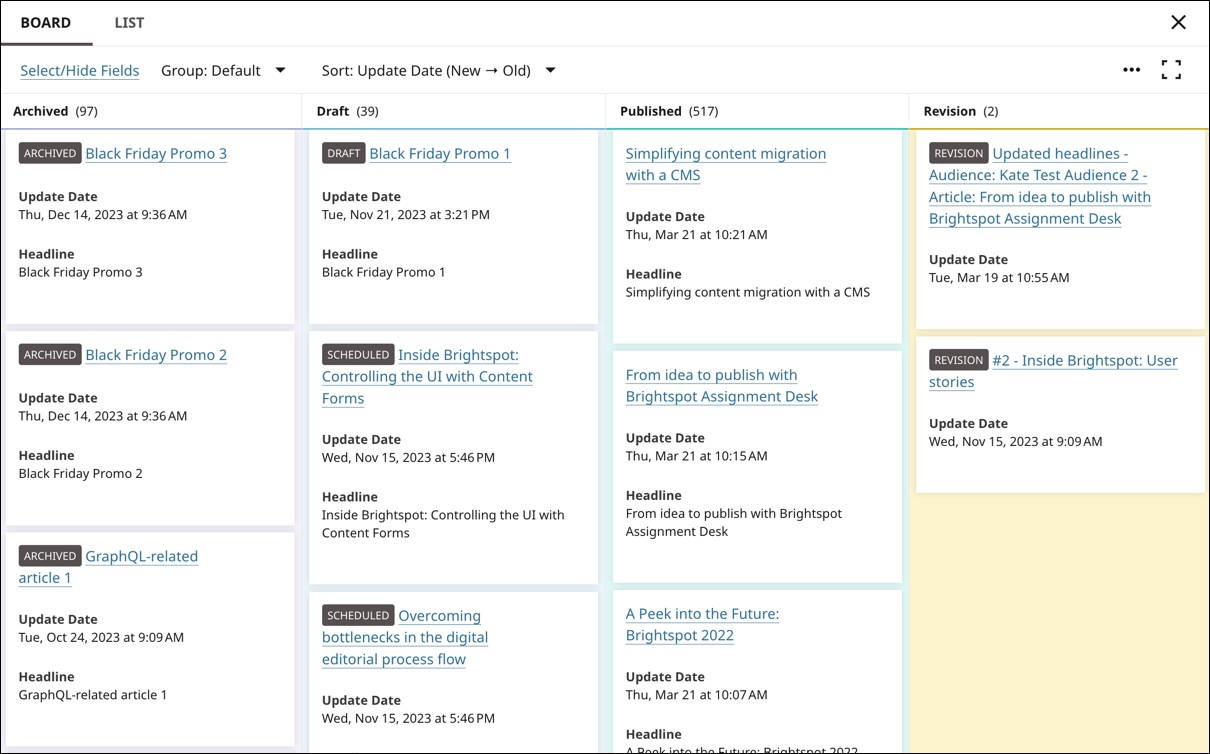
You can update assets in board view by dragging and dropping them between columns.
Display options
The search panel includes a variety of controls you can use to modify the listing of retrieved items.
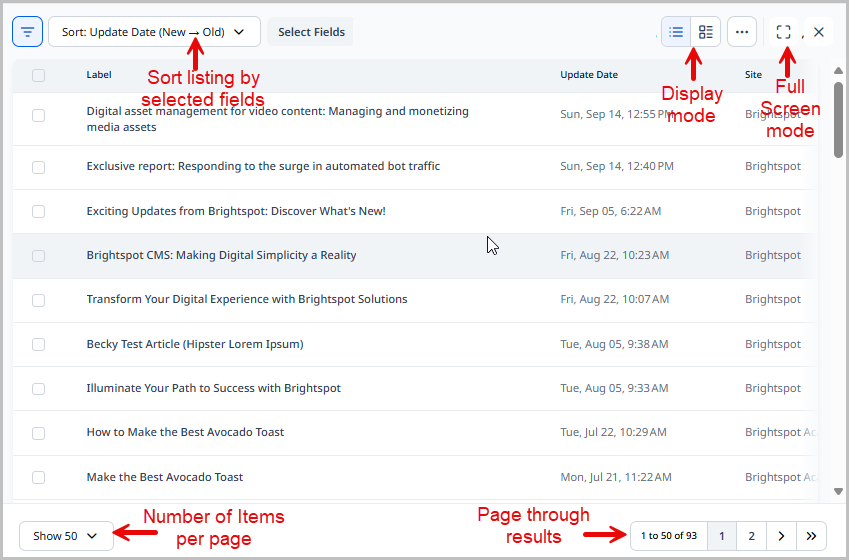
For more information on the available controls in the image above, see below:
- Display Mode—Allows you to view search results in different views depending on preference. For details, see Search views.
- Select Fields—Allows you to show or hide search result column fields like publish user, workflow state, status, and more. For details, see Customizing search results.
- Sort—Allows you to sort search results by a number of different criteria, like publish date, update date, and more.
- Show—Allows you to set the number of results that appear on each search result page.
- Zoom—Allows you to increase or decrease the size of search results for visibility.
- Pagination—Allows you to quickly jump to another page of search results.
- Actions—Allows you to take additional actions on search results, like printing or saving. For details, see Printing search results, Exporting search results, and Saved searches.
- Full-screen—Opens the search results panel in a full-screen mode for better visibility.
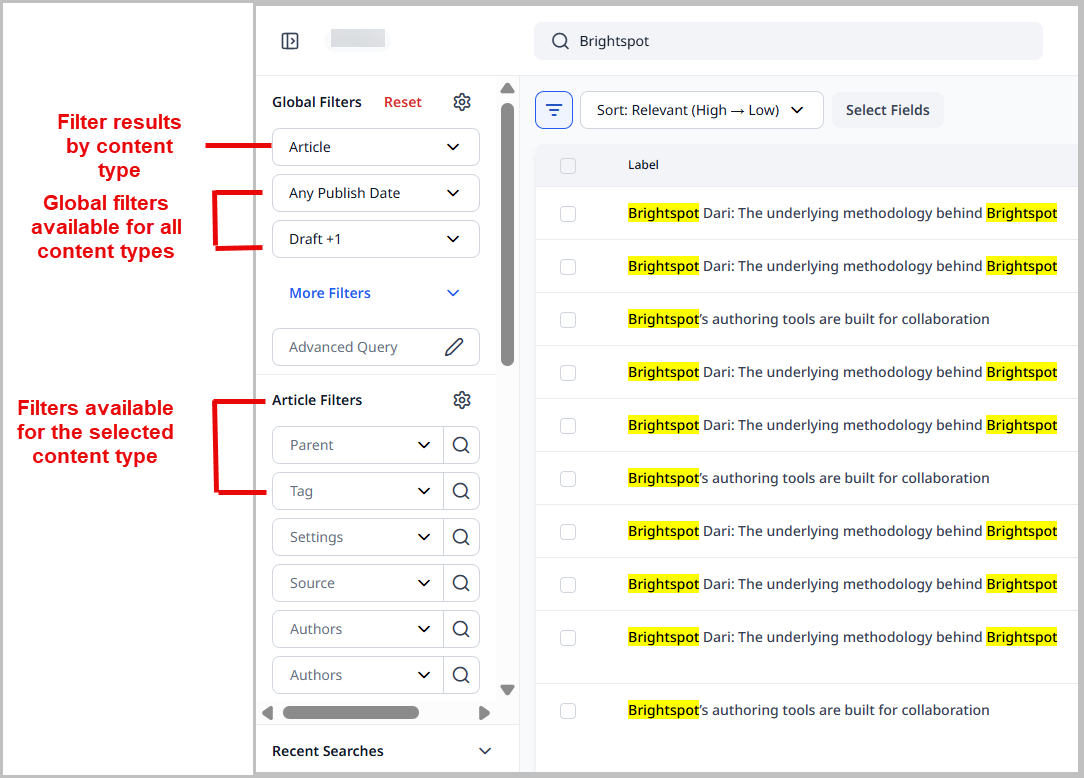
Search filters
Brightspot search provides a robust search filtering feature to allow you to narrow down the results returned to you when you perform a search. You have the options to search on asset type, asset status, and even the ability to perform an integrated search for content outside of Brightspot.
To filter search results:
-
In the header, click in the search field.
-
Type text in the Search field to perform a full-text search.
-
From the topmost list, select the type of content for which you are searching. Making a selection from this list displays additional filter fields relevant to the content type. For example, if you select
Article, Brightspot displays filter fields forAuthor,Section, andTagin the Article Filters section. This section changes based on the content type you choose. -
To search for an asset based on a date range, expand the date range list and select from the following choices:
- Any Publish Date—Returns assets of the selected status regardless of date.
- Publish Date: Today—Returns assets of the selected status for today only.
- Publish Date: Yesterday—Returns assets of the selected status for yesterday only.
- Publish Date: Past 7 Days—Returns assets of the selected status from within the past seven days.
- Publish Date: Past 30 Days—Returns assets of the selected status from within the past 30 days.
- Publish Date: Custom—Opens a date range picker that allows you to choose the start and end date of the date range you want to search for assets of the selected status.
-
To search by an asset's status, open the status list and select one or more of the following statuses:
- Published
- Archived
- Draft
- Revision
-
To reset the search criteria, filters, and search results, click Reset at the top of the search panel.
Every time you apply a filter, Brightspot saves it along with the search criteria under the Recent Searches list.
Brightspot resets the global filters when you change the content type. For example, if you first search for articles with status Draft, and then search for images, Brightspot resets the status to Published. You can retain the values for global filters and content type filters as you change content types by setting a Sticky Search setting. For details, see Sites and settings.
Customizing search results
Brightspot lists the retrieved assets with a standard set of fields. You can add or remove fields from the listing.
To customize search results:
-
Select the content type from the Global Filters widget for which you would like to configure the search results page.

-
In the search panel, click Select Fields. The Show/Hide Fields pop-up displays.
-
Click to drag and drop the desired fields from Hidden Fields to Selected Fields for them to show up in the search panel, and vice versa. You may use the search bar to filter for hidden fields.
-
(Optional) Click to arrange the order of the fields.
-
Click Update.
The search panel now reflects your changes.
Certain fields are shown by default based on the action you are performing. For instance, if you are searching on multiple content types, the Type field automatically shows. These fields do not show in the Show/Hide Fields > Selected Fields list, but are visible on the search results page. For example, in the image above, the Update Date and Label fields are shown, but not present in the Selected Fields list.
Once you have the fields set for your search results, you can sort by whichever field you would like.
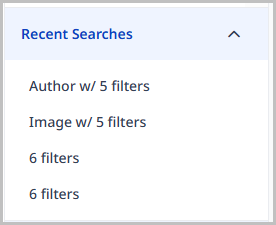
Recent searches
In the search panel, from the Recent Searches list, you can quickly access the five most recent searches you performed.
To use a recent search:
- In the header, click the search field to open the search panel.
- In the left rail, expand the Recent Searches list.
- Click on a recent search to view its search results.
Saved searches
If you repeat the same search often, you can save the search criteria in the search panel. You can then run the saved search without re-entering the criteria, and Brightspot remembers the combination of search view and search filters you selected before saving the search query, saving you time when you decide to view the saved search in the future.
To save a search:
- In the search panel, create search criteria and filtering options as described in Search filters.
- Click , then select Save Search.
- In the Name field, type a name for the search.
- Click Save.
The Save Search widget closes, and the saved search appears in the Saved Searches list in the left pane.

Renaming a saved search
You can rename a saved search if you determine a different name is more applicable.
-
In the search panel, create search criteria and filtering options as described in Search filters.
-
In the Saved Searches widget, click to open a list of options.
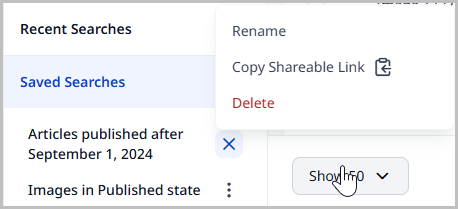
-
Click Rename.
-
In the Rename Search widget, enter a new name for the saved search.
-
Click Save.
Deleting a saved search
You can delete a saved search if you determine it is no longer relevant to you.
-
In the search panel, create search criteria and filtering options as described in Search filters.
-
In the Saved Searches widget, click to open a list of options.
-
Click Delete. Brightspot deletes the saved search.
Sharing a saved search
You can share a saved search with another editor who has Brightspot access.
To share a saved search:
-
In the search panel, create search criteria and filtering options as described in Search filters.
-
In the Saved Searches widget, click to open a list of options.
-
Click Copy Shareable Link. Brightspot copies the link to your clipboard so that you may paste in an email, a message, or any other means.
-
Send the copied link to the recipient.
Printing search results
You can print search results to any destination available from your browser.
To print search results:
- In the search panel, search for and filter the required items.
- Click > Print Search.
Brightspot displays a print-friendly page and your browser's print dialog box for configuring the output. The output includes only those search results visible in the search panel.
Exporting search results
You can export the search results as a CSV file. This feature is available only if you filter by a particular content type.
To export search results:
-
In the search panel, search for and filter the required items. Include a filter for content type.
-
Do one of the following:
- Mark the checkboxes for found items you want to export.
- Clear all the checkboxes to export all found items.
-
Click , then select Export or Export All.
Your browser downloads a CSV file. The file contains a column for each column in the search results except Update Date and Viewers.
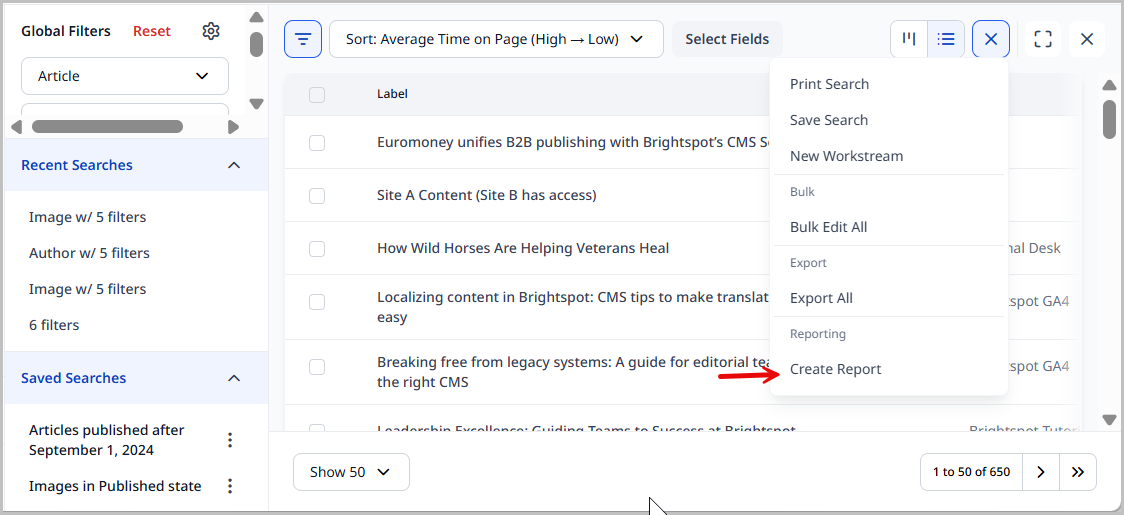
Creating reports from search results
Users with the appropriate permissions to create editorial content reports can also create them from search results.
To create an editorial content report from search results:
-
In the search panel, search for and filter the required items.
-
Click > Create Report.
-
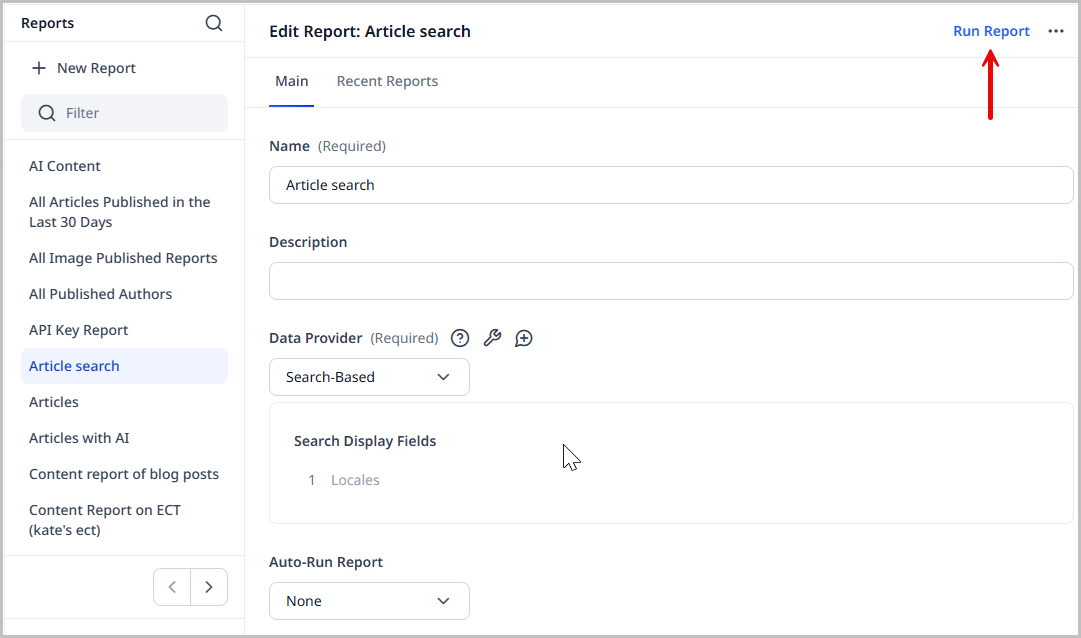
Click Report configuration saved, click here to view on the New Report pop-up.
This opens the Edit Report page for this report. Here, you can modify the configuration if needed, and also run the report by clicking Run Report in the upper-right corner of the page.
Collections
Brightspot gives you the ability to create collections from some or all of the assets in a set of search results. This allows you to quickly access a group of assets to perform actions such as editing, opening workstreams, or archiving.
This section covers how to successfully use collections in Brightspot.
Creating a collection
This topic explains how to create a collection from search results.
To create a collection from search results:
-
In the search panel, search for and filter the assets you want to add to a collection.
-
Mark the checkboxes for the assets you want to add to the collection.
-
Click > New Collection.
-
In the New Collection pop-up, type a name for the collection.
-
If you would like to share this collection with other users, expand the Share Collection field and select either:
- All Users—shares this collection with all users on your site.
- Some Users—expand the users drop-down, and select the users with whom you would like to share this collection.
-
Click Save.
Viewing assets in a collection
This topic explains how to view assets in an existing collection.
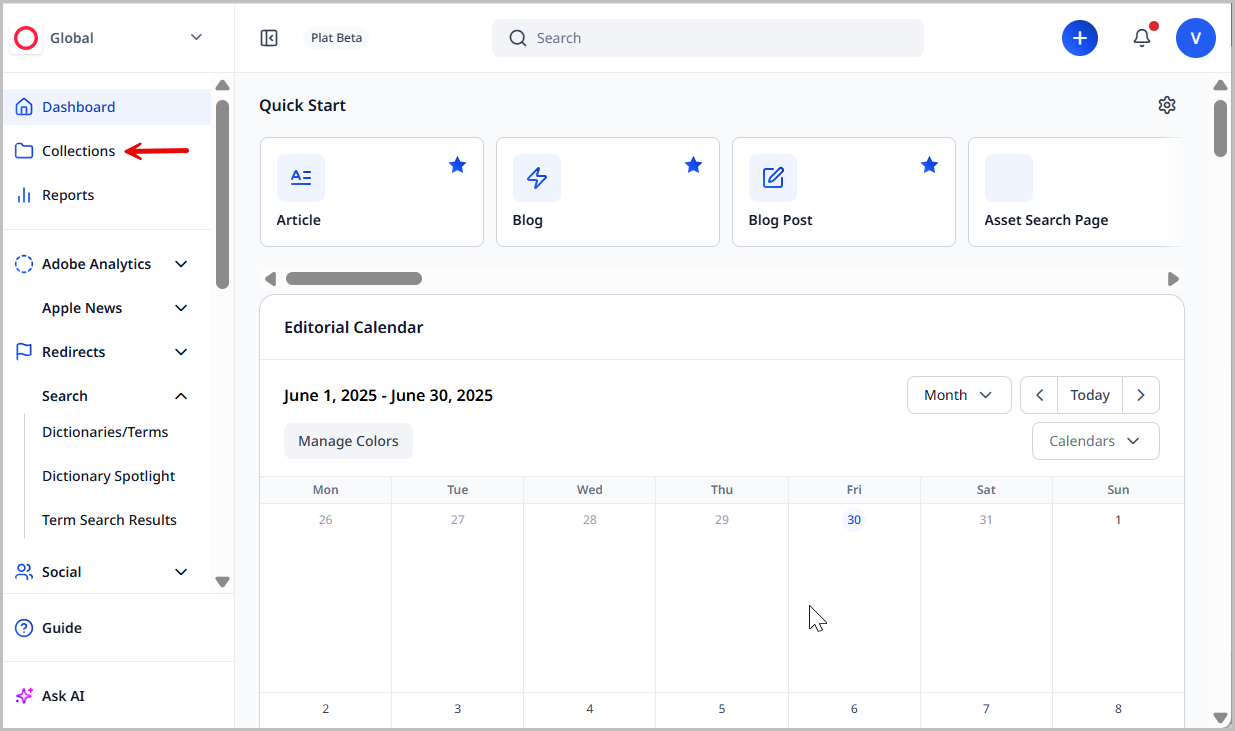
To view the assets in a collection:
-
Click > Collections.
-
Do one of the following:
-
Click the name of the collection you want to view.
-
Enter search criteria in the Filter field to narrow down the list of visible collections, then click the collection to view.
-
Expand All Collections and choose:
- All Collections to see all of the collections available to you. Click the collection you want to view.
- My Collections to only see collections that you have created. Click the collection you want to view.
- Shared with Me to only see collections that have been shared with you by other editors. Click the collection you want to view.
 note
noteCollections with the next to their name are collections you have the access to edit.
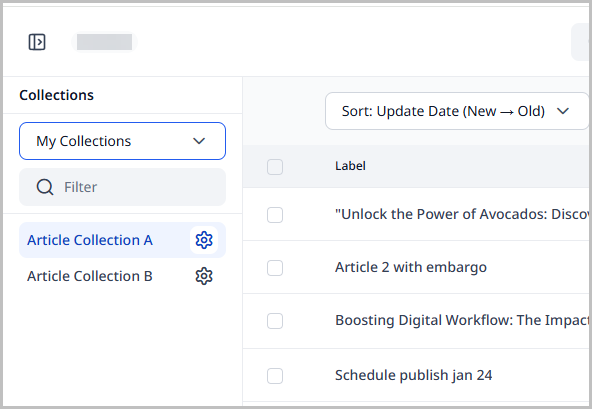
After clicking the collection's name, Brightspot lists the assets in the collection.
-
Adding assets to a collection
Assets can be added to existing collections from the search panel as well as from their content edit page.
To add assets to an existing collection from the search panel:
- Open the search panel and search for the assets you would like to add to an existing collection.
- Click the checkbox next to the assets to add to a collection.
- In the search panel, click , and select Add to Collection.
- Expand the Collections field and select the collection to which you would like to add the selected assets.
- Click Save.
To add an asset to a collection from the content edit page:
-
Navigate to the content edit page of the asset you want to add to a collection.
-
Click , located in the upper-right corner of the page.
-
Select Add to Collection.
-
Expand the Collections field, and select the collection to which you are adding the asset.
tipAny collections this asset currently belongs to, are listed on the Add to Collection pop-up. Clicking the collection link opens that collection to allow you to view its assets.
-
Click Save.
Removing assets from a collection
This topic explains how to remove assets from an existing collection.
To remove assets from a collection:
- Click > Collections.
-
Do one of the following:
-
Click the name of the collection you want to view.
-
Enter search criteria in the Filter field to narrow down the list of visible collections, then click the collection to view.
-
Expand All Collections and choose:
- All Collections to see all of the collections available to you. Click the collection you want to view.
- My Collections to only see collections that you have created. Click the collection you want to view.
- Shared with Me to only see collections that have been shared with you by other users. Click the collection you want to view.
-
-
Once you have the collection opened, select the assets you would like to remove from the collection.
-
Click in the upper-right corner of the search panel and select Remove from Collection.
-
Confirm that the collection you selected earlier is displayed in the Collections field on the Remove from Collection pop-up. If it is not, select the desired collection.
-
Click Save.
The selected assets are removed from the collection.
noteYou will not instantly see the assets removed from the collection once you click Save. You must reload the collection view to refresh the list of assets still contained in the collection. Then, you will see the assets you removed are no longer in the collection.
Renaming or deleting collections
This topic explains how to rename or delete an existing collection.
To rename or delete a collection:
-
Click > Collections.
-
Do one of the following:
-
Click the name of the collection you want to view.
-
Enter search criteria in the Filter field to narrow down the list of visible collections, then click the collection to view.
-
Expand All Collections and choose:
- All Collections to see all of the collections available to you. Click the collection you want to rename or delete.
- My Collections to only see collections that you have created. Click the collection you want to rename or delete.
- Shared with Me to only see collections that have been shared with you by other editors. Click the collection you want to rename or delete.
-
-
Click next to the collection you would like to rename or delete.
-
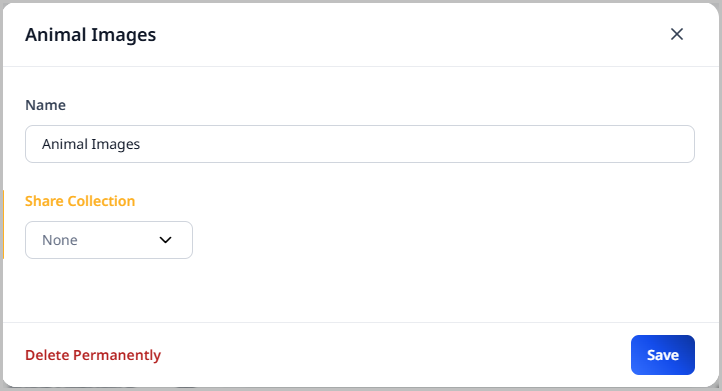
From the edit form, you can perform a number of actions:
-
Rename the collection by modifying the Name field.
-
Modify the Share Collection setting by expanding the menu and selecting:
- None—this collection is shared with no other users.
- All Users—this collection is shared with all users on the site.
- Some Users—this collection can be shared with selected users. Clicking this option provides the option to select the specific users with whom to share this collection.
-
Delete the collection from the site by clicking Delete Permanently.
warningThere is no confirmation pop-up when you click Delete Permanently. As soon as you click this button, the collection is deleted from the site. Reload the Collection page to see the updated list of collections.
-
-
Click Save.
If you chose to delete the collection, there is no need to click Save. The edit form closes automatically after deletion.
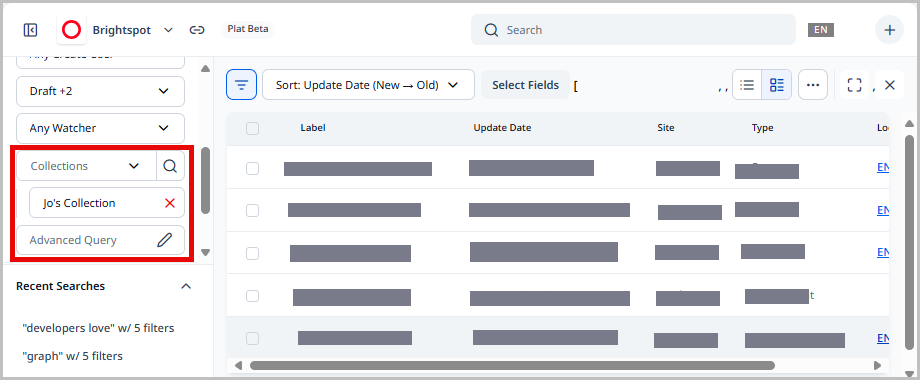
Using collections as a search filter
Collections can be used as a search filter. You must have created the collections, or have access to shared collections, to use this filter.
To use collections as a search filter:
-
In the header, click the search field to open the search panel.
-
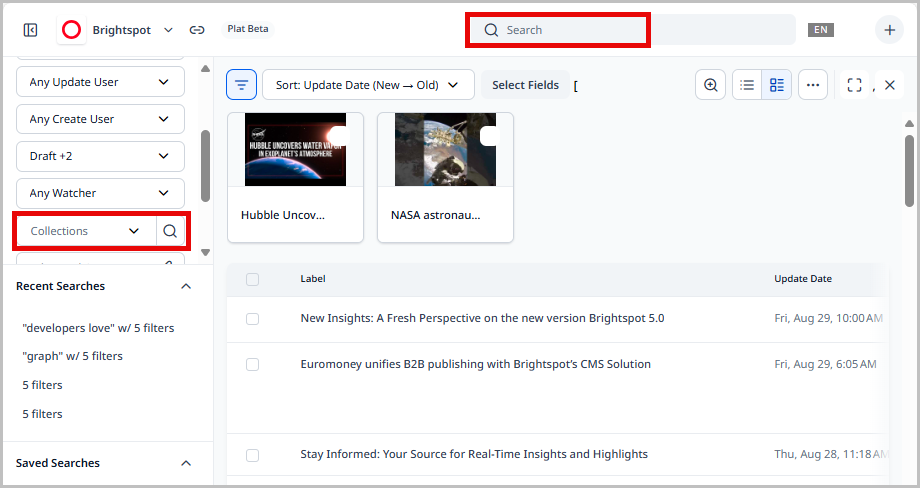
Expand Collections in the Global Filters widget in the left navigation bar.
Here, you see a list of all of the collections to which you have access. This includes the collections you have created and those that have been shared.
-
Select the collections you want to set as a search filter.
Multiple collections can be selected at the same time in order to filter their results simultaneously.
The contents of the selected collections are displayed in the search results area.
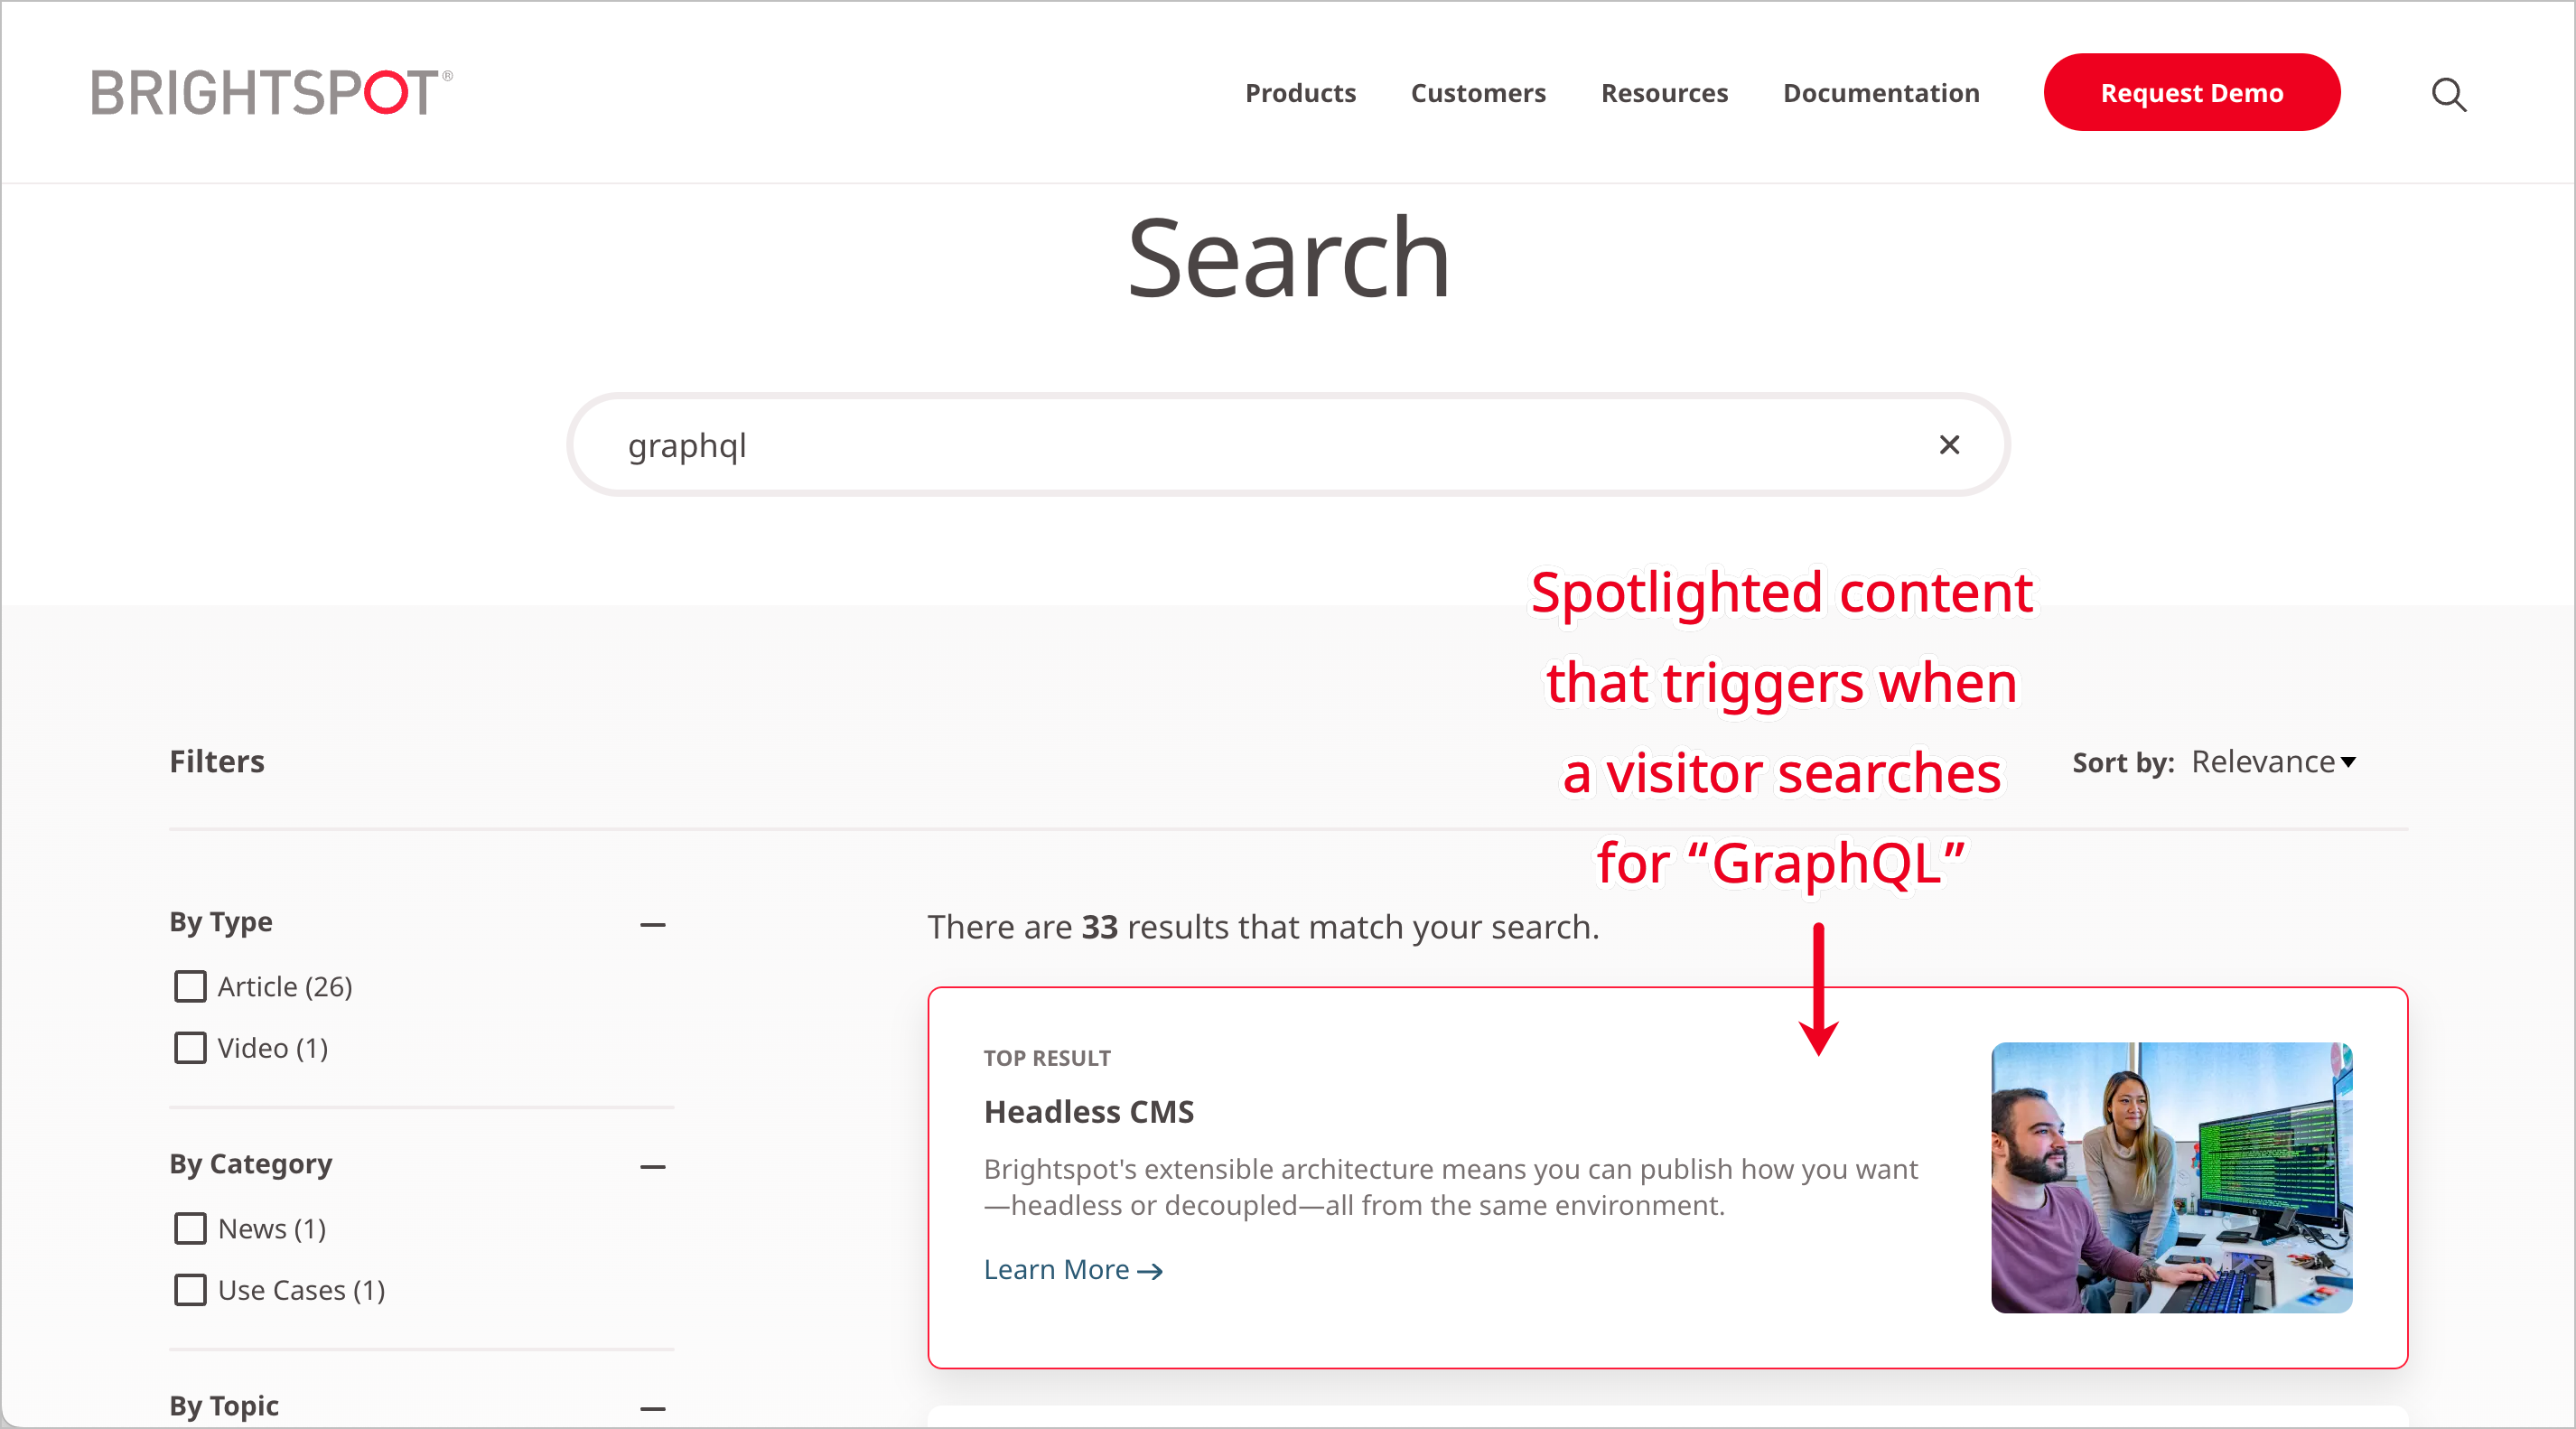
Dictionaries, terms, and spotlights
By configuring dictionaries, terms, and spotlights, you can highlight assets on your site when visitors use search. For example, if you have a dictionary named Holiday sale that includes the term gift, you can create a spotlight that highlights an article called Top 10 holiday gifts whenever a visitor's search query includes the term gift.
- Dictionary—An organization of terms around a common idea or purpose (for example, Holiday sale, GraphQL, or Advertising). Dictionaries can be created and saved in Brightspot.
- Term—A component of a dictionary that returns a spotlight in search results (for example, gift, API, or demo).
- Spotlight—A highlighted asset that Brightspot returns after you map it to a term (for example,
Top 10 holiday gifts,Inside Brightspot's GraphQL API, orTop 10 reasons why editors love Brightspot). Spotlights appear as promos in search results.
Creating dictionaries
A dictionary is a group of terms and associated variants and misspellings. When a visitor searches for a term in the dictionary, Brightspot includes the associated spotlight in the search results.
To create a dictionary:
- Click > Search > Dictionaries/Terms.
- In the left rail, under Dictionary, click New Dictionary.
- In the Name field, type a name for the dictionary.
- Click Save.
Adding terms to dictionaries
Terms are individual entries in a dictionary. As you add terms to a dictionary, you typically include synonyms, misspellings, and other variants associated with the term.
To add terms to a dictionary:
- Click > Search > Dictionaries/Terms.
- In the left rail, under Term, click New Term.
- In the Primary Phrase field, type a term or a phrase. Do not enclose phrases in quotes.
- In the Variants field, add synonyms or variants of the term or phrase.
- In the Misspellings field, add misspellings associated with the term or phrase.
- In the Dictionaries field, click to select dictionaries to which you want to add this term.
- Click Save.
Spelling and locales
With the introduction of word processors in the 1980s, spelling has become quite a bit easier, particularly with hard-to-spell languages such as English. Today, almost any app in which you type also includes a dictionary with standard words. As you type, the app shows misspelled words with a red underline.
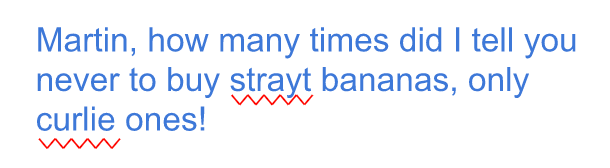
If you work in a technical field with a specialized vocabulary, the chances are that some of the words you use are not in the app’s dictionary, so those words are marked as misspelled.
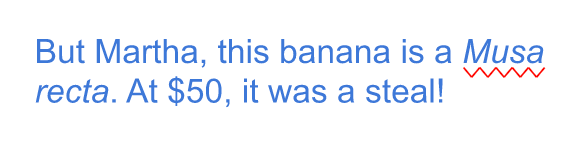
In the previous example, Musa is a technical term not in the standard English dictionary, but it is not misspelled. You can add technical words such as Musa to an auxiliary dictionary so that they are not marked as misspelled.
In addition, apps provide dictionaries for almost every language. If you are typing an article in Spanish, you can use the app’s Spanish dictionary, and add technical words to that dictionary as well.
Locales
In different parts of the world, there are differences in written communication—even within the same language. A date, number, or spelling may be different in one region compared to another.
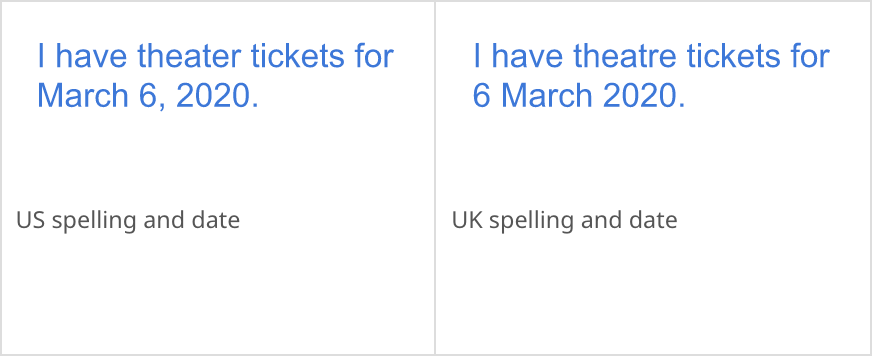
Apps group customary presentations for spellings, numbers, dates, and currency symbols into locales—a language-country pair. In Brightspot, you can see all the available locales in your profile widget.
When you change the locale, Brightspot's widgets change to match the locale’s settings. In particular, Brightspot uses the locale’s dictionary for text you type.
Dictionary selection
The following diagram illustrates how Brightspot determines which dictionary to use as you type in the content edit form.

For example, if your locale is English (United Kingdom), Brightspot assumes that all the words you type are in the UK dictionary. If that dictionary is installed in Brightspot, spelling errors are caught accordingly. If that dictionary is not installed in Brightspot, your browser checks for spelling errors using its own dictionary.
(Dictionaries and spelling in browsers is a very complicated topic. Some browsers have dictionaries installed for several languages. Those browsers automatically detect in which language you are typing, and use the corresponding dictionary for spelling. If the browser cannot detect the language you are using, it may assume you are using a default dictionary and mark every word as misspelled, or it may not perform spell check at all. See your browser’s user guide for information about how it checks spelling.)
Detecting misspelled words
Your version of Brightspot may have several language dictionaries installed as well as auxiliary dictionaries with technical terms for those languages. The following diagram illustrates the logic Brightspot uses to detect misspelled words among all those dictionaries.
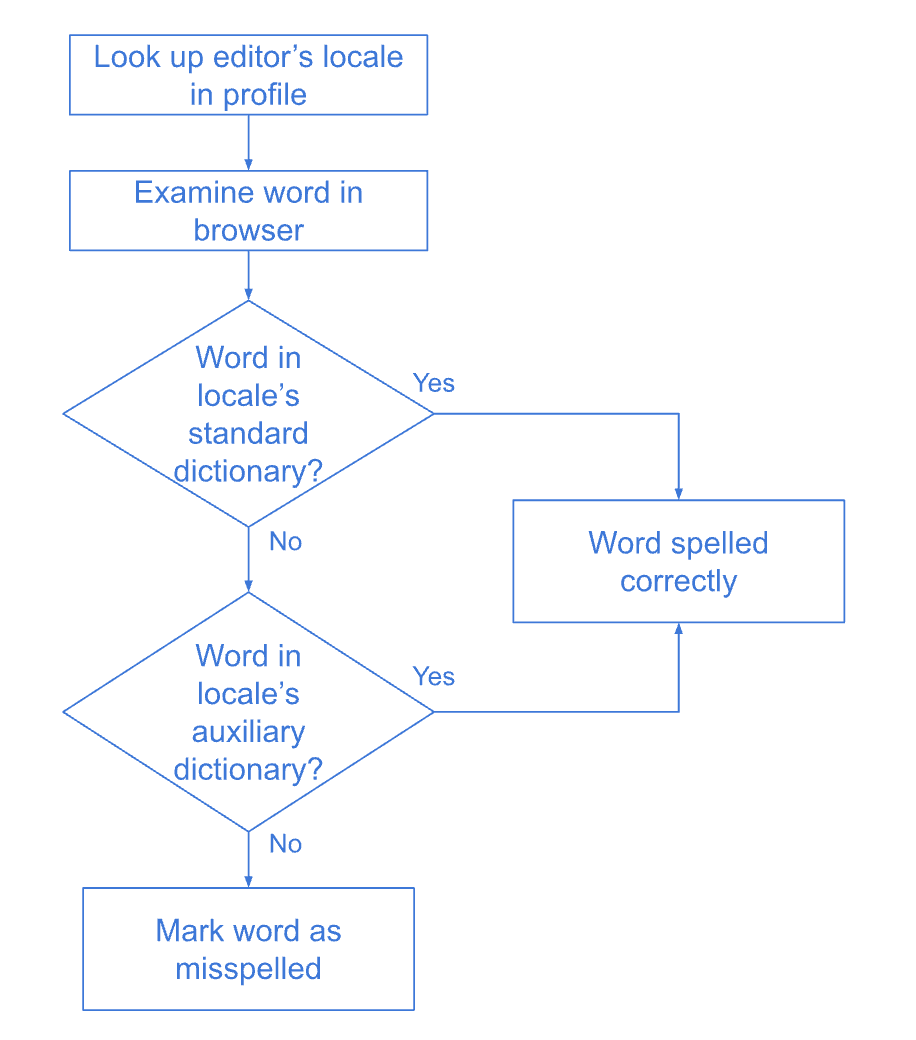
For example, you are working in the English-Australia locale, and you type I saw the movie Breaker Morant.
- Brightspot looks in the standard English-Australia dictionary, and does not find the word
Morant. - Brightspot then looks in the auxiliary dictionary for English-Australia (if you created one), and again does not find the word
Morant.
In this case, Brightspot marks the word Morant as misspelled.
Auxiliary dictionaries
Brightspot comes with spell-check dictionaries for English and Spanish. (Your Brightspot developer can add additional languages.) These dictionaries contain standard words, and Brightspot checks your text against those dictionaries. Words not in those dictionaries are marked as misspelled.
If you use non-standard terminology, such as technical terms or product names, Brightspot marks those terms as misspelled. If you add such terms to an auxiliary dictionary, Brightspot recognizes them as spelled correctly.
Auxiliary dictionaries are specific to your profile’s locale. If you are creating content in US English, you add terms to that locale’s auxiliary dictionary; if you are creating content in Mexican Spanish, you add terms that locale’s auxiliary directory.
This topic describes the in-CMS process of creating an auxiliary dictionary in Brightspot; however, you must also perform a development task to achieve this end. For details on this task, see Installing additional dictionaries.
To create an auxiliary dictionary:
- Click > Admin > Sites & Settings > Sites > Global.
- From the CMS tab, expand the Hunspell cluster.
- Under Dictionaries, click , and select Create New.
- In the Name field, type a name for the dictionary.
- From the Locale list, select the language for which the dictionary is applicable.
- In the Additional Words list, type a word. Click to add additional words.
- Click Save.
- Click Back.
- In the content picker, select the name of the dictionary you created.
- Close the content picker.
- Click Save.
As you type text in various Brightspot fields, words appearing in the dictionaries are not marked as misspelled.
Spotlights
A spotlight is a dictionary associated with a promo, and you can list spotlights at the top of site searches. For example, if you have a dictionary Environment that contains the word green, and you associate that dictionary with a promo for the article "Measuring Your Environmental Footprint." When a visitor searches on the term green, Brightspot lists the promo at the top of the search results. Depending on your version of Brightspot, the spotlight may also include a flag above it that says Featured Result.
To create a spotlight:
-
Open the required dictionary in the content edit page, or create a new one. Ensure the dictionary contains the terms with which you want to associate the promo. For details, see Adding terms to a dictionary.
- Click > Search > Dictionary Spotlight.
-
In the Create widget, click New Page Promo Dictionary Spotlight.
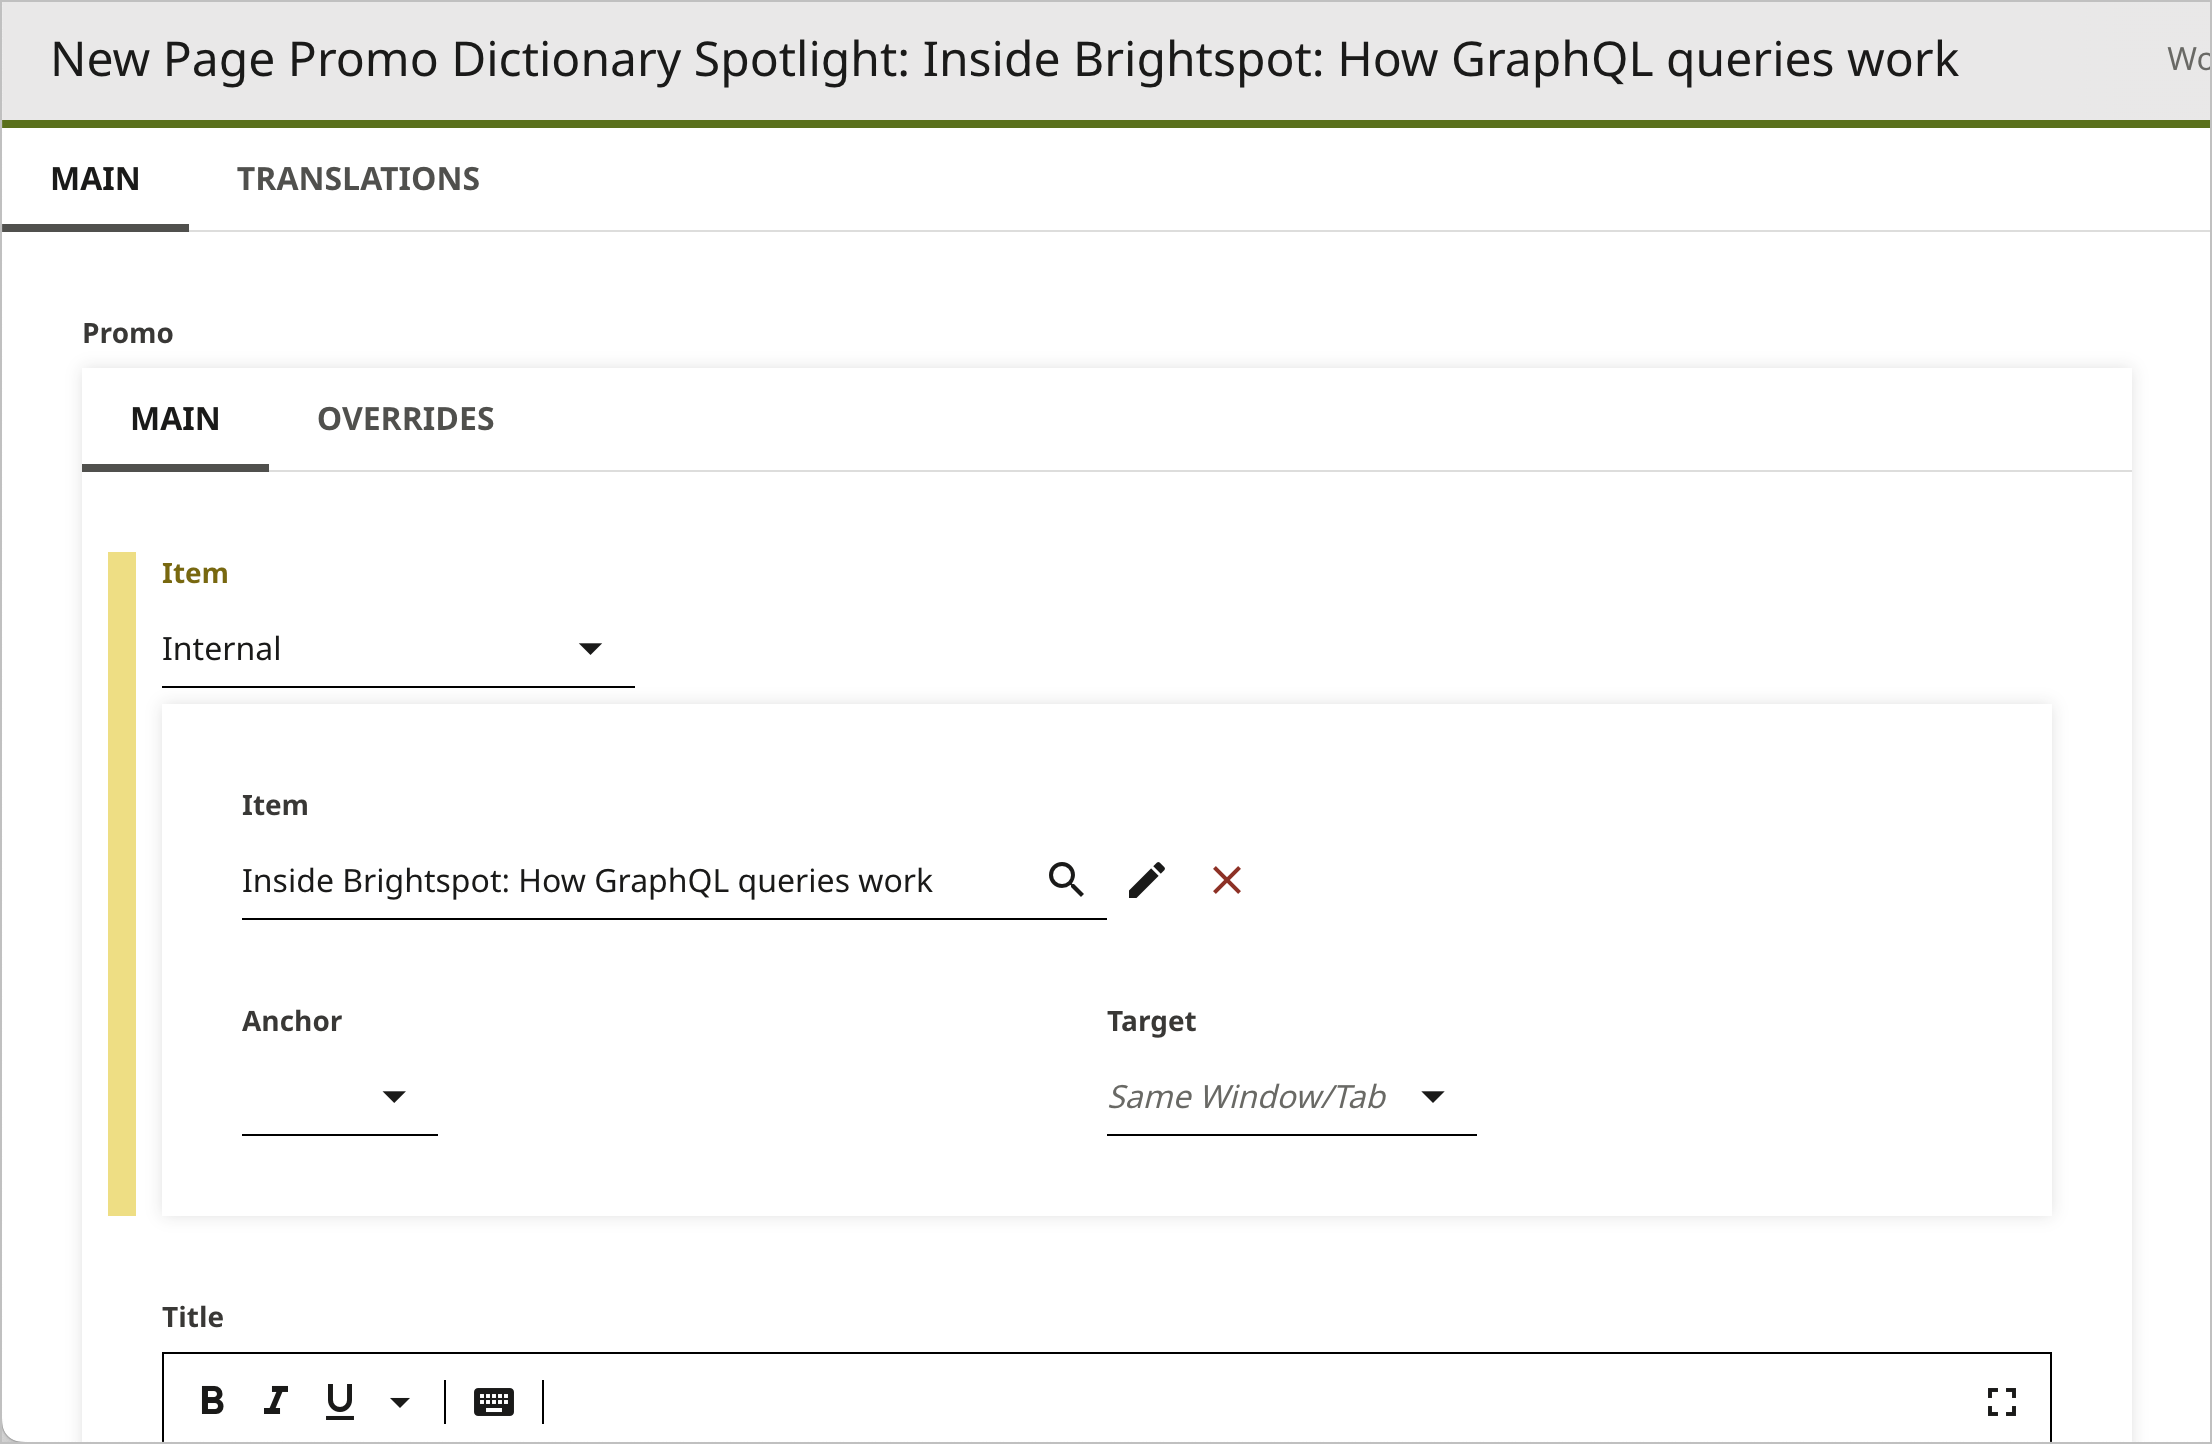
-
Under Promo, complete the fields as necessary. This is the promo that will be associated with the term and serve as the spotlight in search. For details, see Page Promo.
-
From the Term list, select the search term with which you want to associate the promo that will appear in search.
-
From the Dictionary list, select the dictionary with which you want to associate the promo. This field is helpful in case a term applies to more than one dictionary, ensuring that the spotlight you create applies only to the intended term.
-
Click Save.
When visitors search on the term you selected in step 5, Brightspot includes the promo at the top of the search results. This includes if a visitor searches any misspellings or variants that you associated with the term. For details, see Adding terms to a dictionary.
Terms in multiple dictionaries
When visitors search for a term on your site, Brightspot lists the content associated with that term. In addition, you can include a spotlight, which appears as a promo for an asset that you explicitly associate with the search term in the search results.
You may have multiple dictionaries for different purposes, and at times the same term may be included in each. In these scenarios, Brightspot checks the site search page to which the dictionary is associated to ensure the correct spotlight is served to visitors. For information on site search pages, see Site search.
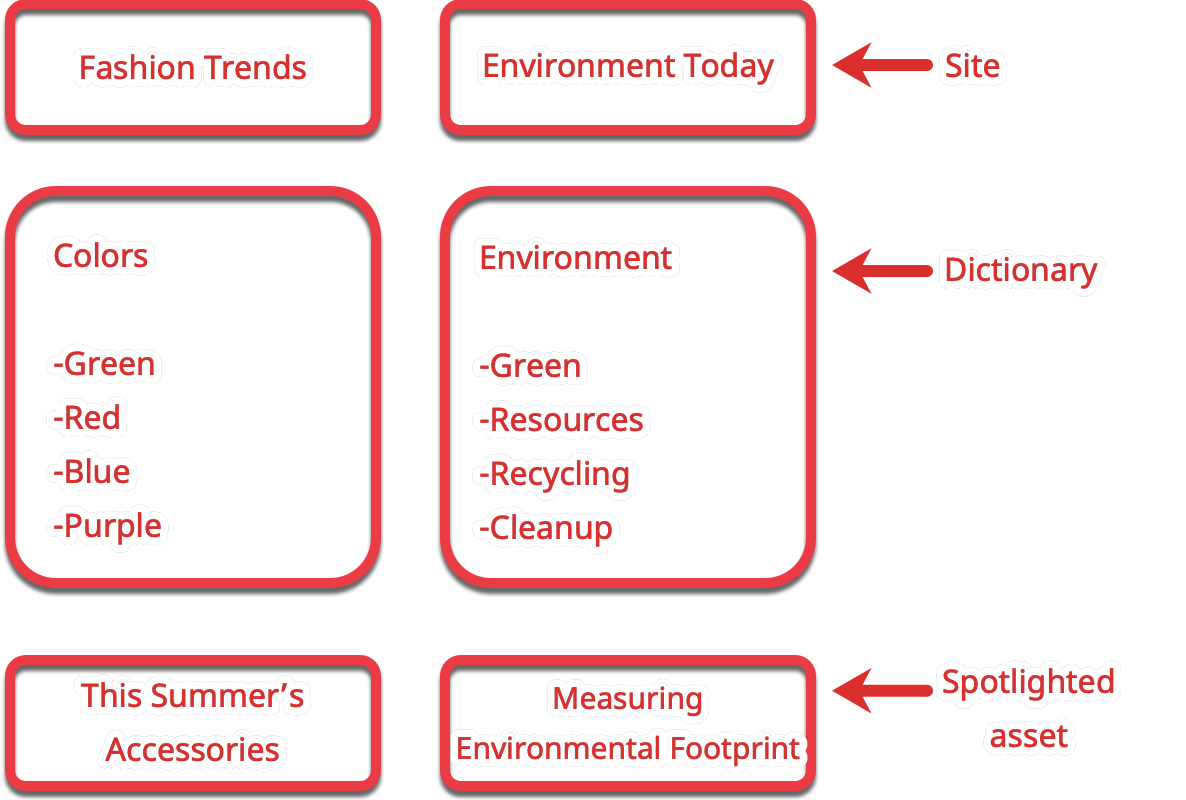
Referring to the previous illustration, a publisher operates two sites: Fashion Trends and Environment Today. Each site has an associated dictionary of spotlight terms assigned to its site search page.
Fashion Trendshas a dictionaryColorscontaining colors.Environment Todayhas a dictionaryEnvironmentcontaining related terms.
Each dictionary has the term green. If a visitor searches for green on Fashion Today, with which the Colors dictionary is associated, Brightspot includes in the search results a spotlight to the article "This Summer's Accessories." If a visitor searches for green on Environment Today, with which the Environment dictionary is associated, Brightspot includes in the search results a spotlight to the article "Measuring Environmental Footprint."
Pinning assets in search results
In a typical search scenario, visitors enter keywords in a search field, and Brightspot retrieves the assets that best match the keywords. You can customize the order in which the search results display for visitors by pinning specific assets into specific positions.
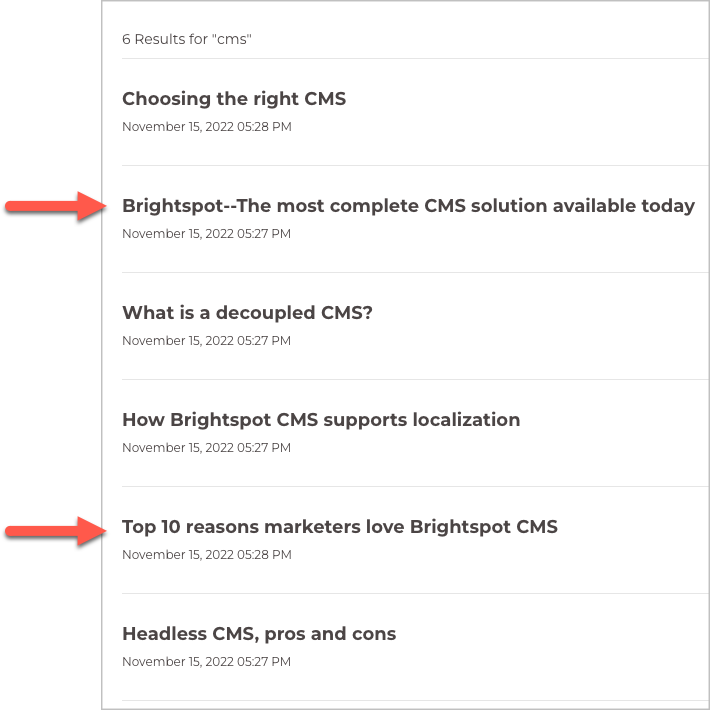
Referring to the previous illustration, Brightspot returns six assets matching the search term CMS. After pinning, the assets in positions two and five will always appear in those positions when a visitor searches on CMS.
To pin assets in search results:
-
Ensure you already created the following:
- A dictionary with search terms. For details, see Creating a dictionary and Adding terms to a dictionary.
- A site search page. For details, see Site search.
- Click > Search > Term Search Results.
-
In the Create widget, click New Term Search Results.
-
From the Term list, select one of the available terms.
-
From the Search list, select the site search page to which the pinned assets apply.
-
In the editorial toolbar, click Save. Under Results, Brightspot lists the assets that naturally match the selected term.
-
Under Results, in each of the available positions, do the following:
-
Click to open the cluster.
-
From the Item list, select one of the following:
- Dynamic Search Result (Placeholder)—The result in this position is the natural result based on Brightspot's search algorithm, accounting for any pinned results above it.
- Referenced Search Result Item—The result in this position is an asset you select.
-
-
Click Save.
Brightspot adjusts the retrieval listing.
- The natural position of an asset is changed accounting for pinned assets above it. For example, if Asset A naturally appears in the third position, and there is one pinned asset above it, then Asset A appears in the fourth position.
- Pinned assets are removed from the natural listing. For example, if Asset B naturally appears in position five, but you pinned it in position four, then Asset B does not appear in the natural listing.
Removing pinned search results
You can remove all pinned assets from search results by archiving the corresponding term search results.
To remove all pinned search results:
- Click > Search > Term Search Results.
- In the search panel, click the term search results you want to remove.
- In the editorial toolbar, click > Archive.
- In the confirmation prompt, click OK.
Downloading images from search
You can download images from the search panel.
To download assets:
- In the header, click the search bar to open the search panel.
- Use full-text search or filtering to find assets whose images you want to download.
Brightspot will allow downloads of any image assets within the assets you search, regardless of content type.
- Click the checkboxes of the assets whose images you want to download.
- Click > Download.
Viewing your downloads:
- Click on your username or user icon.
- Click Downloads.