Editorial content types
Brightspot comes with many dozens of pre-built content types that fit many use cases; however, you can also create your own editorial content types to fit exactly your business needs.
Editorial content types are helpful in the following situations:
- Creating abbreviated content edit forms that require just a few fields.
- Re-ordering content edit forms to better match an editorial workflow.
- Creating customized content types for specialized applications.
Editorial content types can be created either globally and apply to all sites, or they can be created for specific sites.
Creating an editorial content type
This topic explains how to create an editorial content type in Brightspot.
To create an editorial content type:
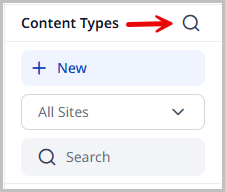
- Click > Admin > Content Types.
-
In the Content Types widget, click New.
-
In the Name field, enter a name for this content type.
-
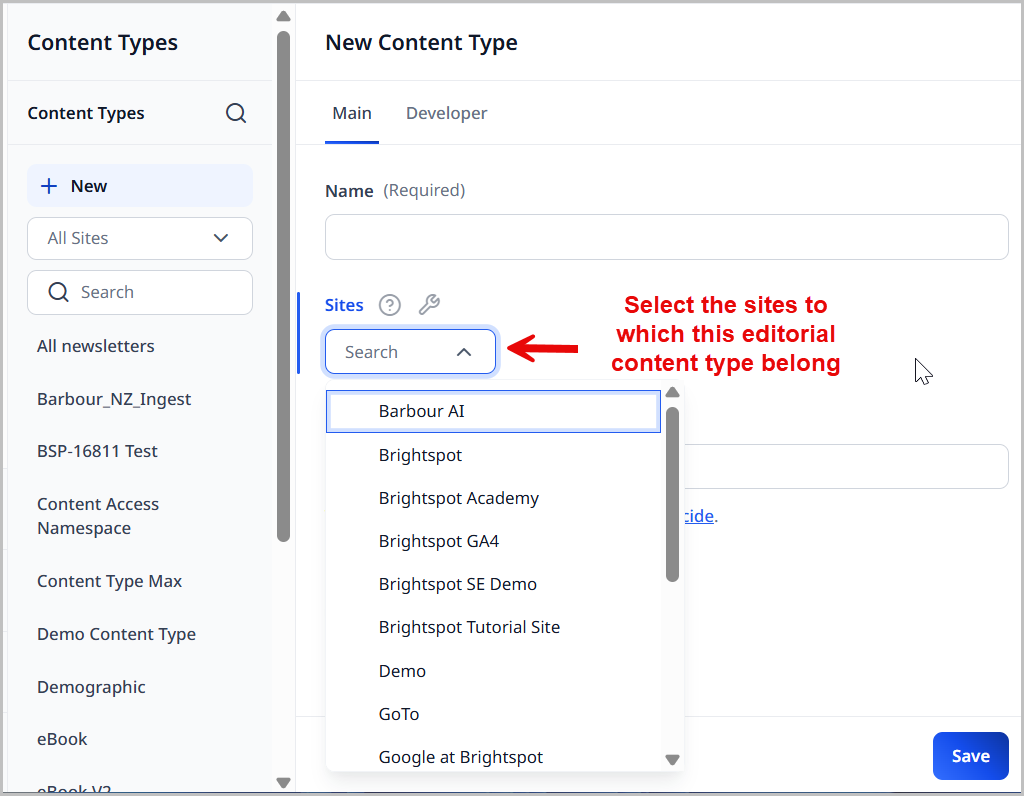
From the Sites list, select the site to which this content type applies, or leave blank to apply it to all sites.
-
Assign an icon to the content type by doing the following (if you do not assign an icon, Brightspot uses ):
-
Identify the icon you want to use.
-
In the Icon field, enter the name of the icon you selected. Use only lower-case letters, and replace any spaces with an underscore. Brightspot provides a preview of the icon, indicating you entered the icon name correctly. See the following example.
-
-
Toggle Embedded to allow this editorial content type to be embedded in other content types.
-
Under Items, click , and select one of the field types.
-
Complete the form for the selected field type. (The following sections describe how to configure the available field types.)
-
Repeat steps 6–7 to add additional fields.
-
Rearrange the fields by dragging them into the order you want them to appear in the content edit form.
-
Click Save.
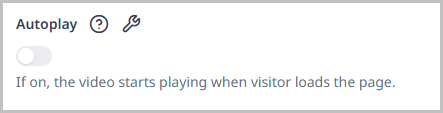
Adding a Boolean field
Boolean fields provide a yes/no or on/off indication.
To add a Boolean field:
- Search for and open the editorial content type that you want to edit, or create a new editorial content type.
- From the Items list, select Boolean Field.
- Under Main, in the Name field, enter a name for this field.
- (Optional) Under Advanced, in the Note field, enter a short explanatory note that appears in the content edit form.
 |  |
|---|
Adding a text field
Text fields contain plain text with no formatting.
To add a text field:
-
Search for and open the editorial content type that you want to edit, or create a new editorial content type.
-
From the Items list, select Text Field.
-
Under Main, in the Name field, enter a name for this field.
-
(Optional) Under Advanced, do the following:
- In the Note field, enter a short explanatory note that appears underneath the field name in the content edit form.
- In the Character Count Minimum and Character Count Maximum fields, enter the minimal and maximal number of characters allowed in this field. Brightspot displays an error message in the content edit form if an editor enters text with length outside of this range.
- In the Suggested Minimum and Suggested Maximum fields, enter the recommended minimal and maximal number of characters for this field. Brightspot accepts the text even if it is shorter or longer than these values.
- Toggle on Unique if the text entered must be different from text entered in this field in other items. For example, an editor entered
Crystal Gobletin this field; editors cannot enterCrystal Gobletin this field when creating other items of this content type. - Toggle on Search Filter to index this field, making it usable as a query predicate. This allows you to filter results based on this field when querying through the CMS search, the GraphQL Content API (GCA), or any other API that relies on Dari queries.
- Toggle on Required if this is a required field.
Adding a date field
Date fields provide a calendar that editors use to select a date.
To add a date field:
-
Search for and open the editorial content type that you want to edit, or create a new editorial content type.
-
From the Items list, select Date Field.
-
Under Main, in the Name field, enter a name for this field.
-
(Optional) Under Advanced, do the following:
- In the Note field, enter a short explanatory note that appears underneath the field in the content edit form.
- Toggle on Search Filter to index this field, making it usable as a query predicate. This allows you to filter results based on this field when querying through the CMS search, the GraphQL Content API (GCA), or any other API that relies on Dari queries.
- Toggle on Required if this is a required field.
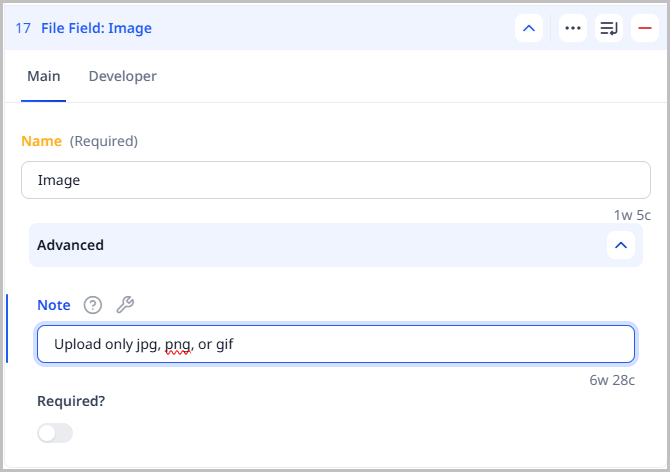
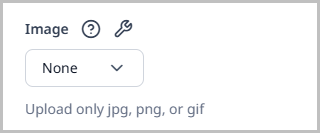
Adding a file field
File fields enable editors to upload images, videos, attachments, and other types of files.
To add a file field:
-
Search for and open the editorial content type that you want to edit, or create a new editorial content type.
-
From the Items list, select File Field.
-
Under Main, in the Name field, enter a name for this field.
-
(Optional) Under Advanced, do the following:
- In the Note field, enter a short explanatory note that appears in the content edit form.
- Toggle on Required if this is a required field.
 |  |
|---|
Adding a select field
A select field enables editors to select from a specific set of choices.
To add a select field:
-
Search for and open the editorial content type that you want to edit, or create a new editorial content type.
-
From the Items list, select Select Field.
-
Under Main, in the Name field, enter a name for this field.
-
From the Count field, select one of the following:
- One—Editor can select only one item.
- Many—Editor can select more than one item.
- Many (Sortable)—Editor can select more than one item, and then rearrange the selections into a desired order.
-
In the Choices field, add the choices available for this field.
-
(Optional) Under Advanced, do the following:
- In the Note field, enter a short explanatory note that appears underneath the field in the content edit form.
- Toggle on Search Filter to index this field, making it usable as a query predicate. This allows you to filter results based on this field when querying through the CMS search, the GraphQL Content API (GCA), or any other API that relies on Dari queries.
- Toggle on Required if this is a required field.
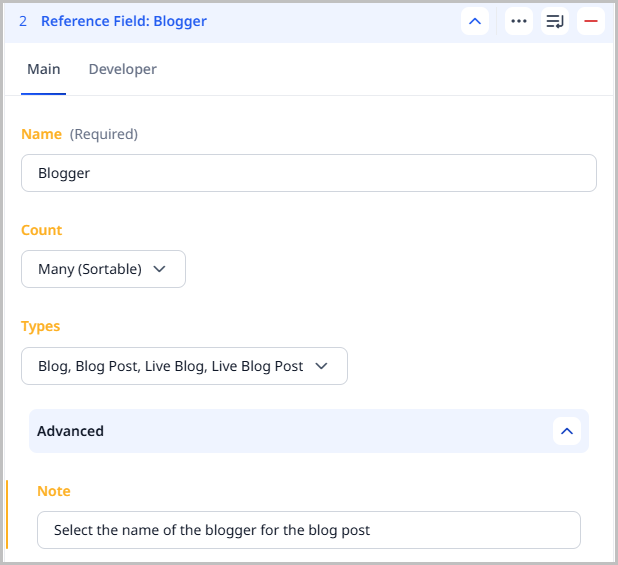
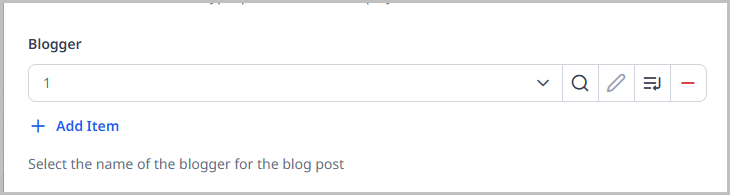
Adding a reference field
A reference field enables editors to select an item existing in Brightspot. A common example of a reference field is selecting an author for an article or a blogger for a blog post.
To add a reference field:
-
Search for and open the editorial content type that you want to edit, or create a new editorial content type.
-
From the Items list, select Reference Field.
-
Under Main, in the Name field, enter a name for this field.
-
From the Count field, select one of the following:
- One—Editor can select only one item.
- Many—Editor can select more than one item.
- Many (Sortable)—Editor can select more than one item, and then rearrange the selections into a desired order.
-
From the Types list, select the content types used to populate the reference field. For example, if you want editors to be able to select an author, select the Author content type.
-
(Optional) Under Advanced, do the following:
- In the Note field, enter a short explanatory note that appears underneath the field in the content edit form.
- Toggle on Search Filter to index this field, making it usable as a query predicate. This allows you to filter results based on this field when querying through the CMS search, the GraphQL Content API (GCA), or any other API that relies on Dari queries.
- Toggle on Required if this is a required field.
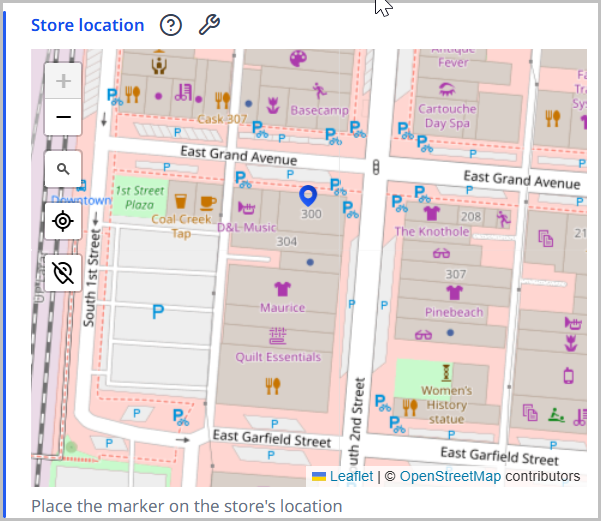
Adding a location field
Location fields show a location on a map. (For information about how editors use location fields, see Specifying a location.)
To add a location field:
-
Search for and open the editorial content type that you want to edit, or create a new editorial content type.
-
From the Items list, select Location Field.
-
Under Main, in the Name field, enter a name for this field.
-
(Optional) Under Advanced, do the following:
- In the Note field, enter a short explanatory note that appears in the content edit form.
- Toggle on Required if this is a required field.
 |  |
|---|
Adding a number field
A number field requires an editor to enter only integers (numbers without a decimal point).
To add a number field:
-
Search for and open the editorial content type that you want to edit, or create a new editorial content type.
-
From the Items list, select Number Field.
-
Under Main, in the Name field, enter a name for this field.
-
(Optional) Under Advanced, do the following:
- In the Note field, enter a short explanatory note that appears in the content edit form.
- Enter minimal and maximal values. Brightspot displays an error message in the content edit form if an editor enters a number outside of this range.
- Toggle on Required if this is a required field.
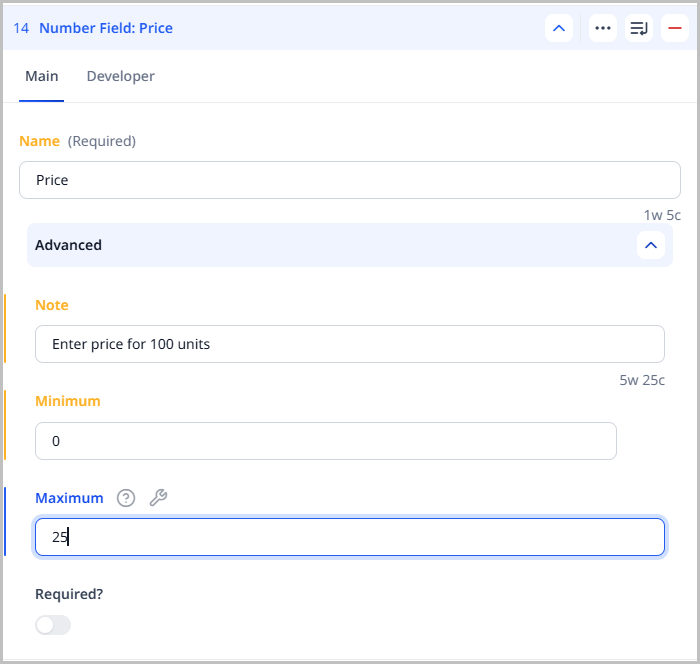 | 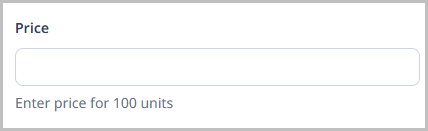 |
|---|
Adding a region field
Region fields show a region on a map.
To add a region field:
-
Search for and open the editorial content type that you want to edit, or create a new editorial content type.
-
From the Items list, select Region Field.
-
Under Main, in the Name field, enter a name for this field.
-
(Optional) Under Advanced, do the following:
- In the Note field, enter a short explanatory note that appears in the content edit form.
- Toggle on Required if this is a required field.
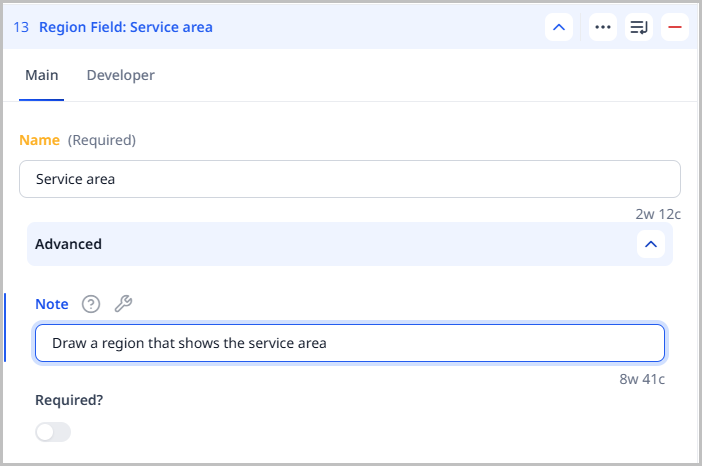 | 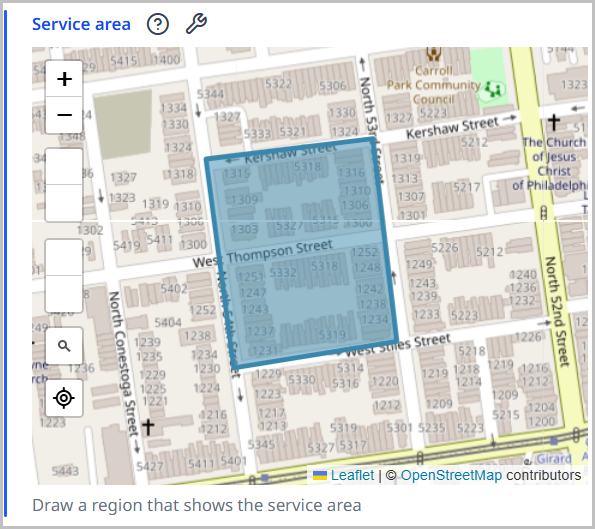 |
|---|
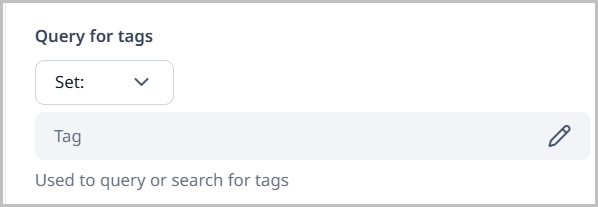
Adding a query field
Query fields help developers design their GraphQL objects.
To add a query field:
- Search for and open the editorial content type that you want to edit, or create a new editorial content type.
- From the Items list, select Query Field.
- Under Main, in the Name field, enter a name for the new query field.
- From the Types list, select one content type.
- (Optional) Under Advanced > Note, enter a short explanatory note that appears in the content edit form.
 |  |
|---|
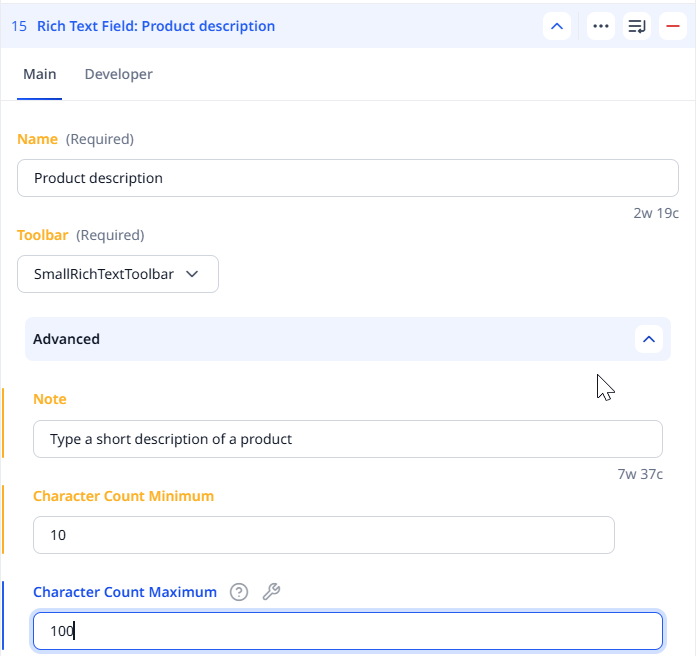
Adding a rich-text field
Editors use rich-text fields to apply formatting to text.
To add a rich-text field:
-
Search for and open the editorial content type that you want to edit, or create a new editorial content type.
-
From the Items list, select Rich Text Field.
-
Under Main, in the Name field, enter a name for this field.
-
From the Toolbar field, select one of the available toolbars.
-
(Optional) Under Advanced, do the following:
- In the Note field, enter a short explanatory note that appears in the content edit form.
- In the Character Count Minimum and Character Count Maximum fields, enter the minimal and maximal number of characters allowed in this field. Brightspot displays an error message in the content edit form if an editor enters text with length outside of this range.
- In the Suggested Minimum and Suggested Maximum fields, enter the recommended minimal and maximal number of characters for this field. Brightspot accepts the text even if it is shorter or longer than these values.
- Toggle on Required if this is a required field.
 |  |
|---|
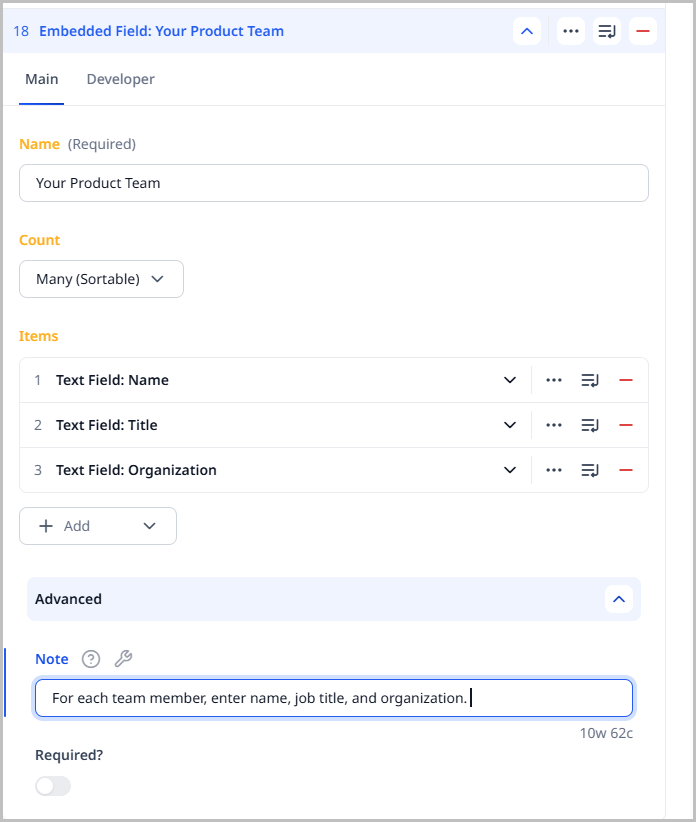
Adding an embedded field
Embedded fields are a group of fields inside an editorial content type. These groups of fields are available only in the content type in which they are defined.
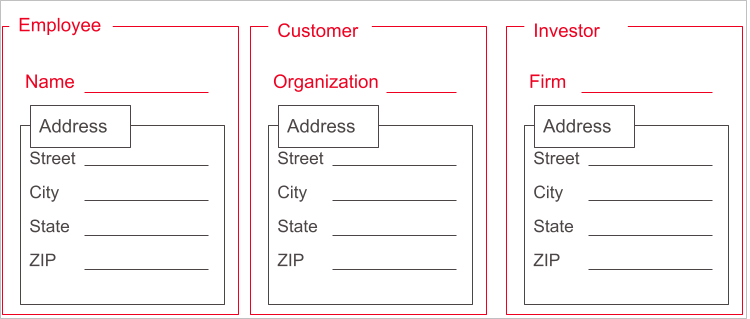
If you have the same embedded field appearing in more than one editorial content type, consider using an embedded editorial content type. For example, you have two editorial content types, Job Applicants and Sales Prospects. Each of those content types has an embedded field with three address fields Street, City, and ZIP. Instead of replicating two identical embedded fields, you can create a single Address embedded content type that contains those fields, and share Address with Job Applicants and Sales Prospects.
To add an embedded field:
-
Search for and open the editorial content type that you want to edit, or create a new editorial content type.
-
From the Items list, select Embedded Field.
-
Under Main, in the Name field, enter a name for this field.
-
From the Count list, select one of the following:
- One—Only one instance of this field appears in the content edit form.
- Many—Editors can click to add multiple instances of this field in the content edit form.
- Many (Sortable)—Editors can click to add multiple instances of this field in the content edit form, and can re-order those fields by dragging .
-
Under Items, click , and select one of the field types.
-
Complete the form for the selected field type.
-
Repeat steps 5–6 to add additional fields.
-
Under Advanced, do the following:
- In the Note field, enter a short explanatory note that appears in the content edit form.
- Toggle on Required to make this a required field.
- Depending on the field types you selected in step 5, configure other settings as required.
 |  |
|---|
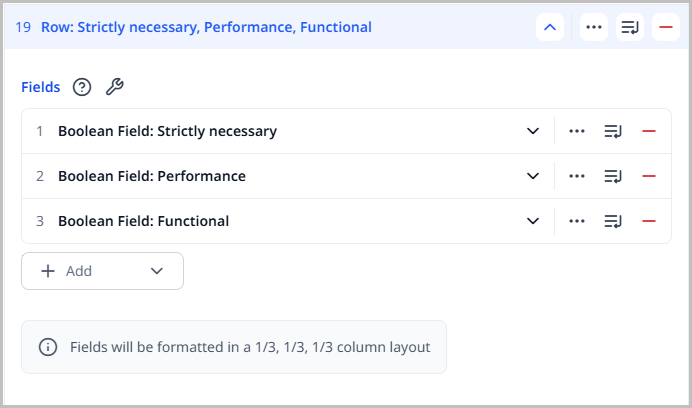
Adding a row
Rows organize fields into rows and columns. This layout can reduce the screen space required for a content edit form.
To add a row:
-
Search for and open the editorial content type that you want to edit, or create a new editorial content type.
-
From the Items list, select Row.
-
In the Name field, enter a name for the row.
-
Add fields to the row by doing the following:
- Under Fields, click , and select a field type.
- Complete the form for the field type.
- Repeat steps a–b to add additional fields.
-
Repeat steps 2–4 to add additional rows.
 |  |
|---|
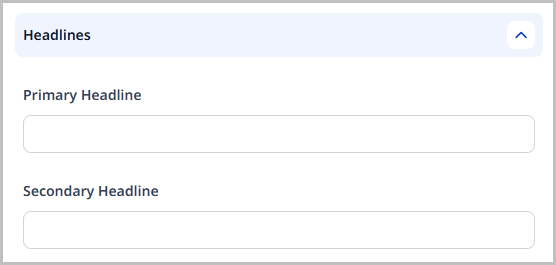
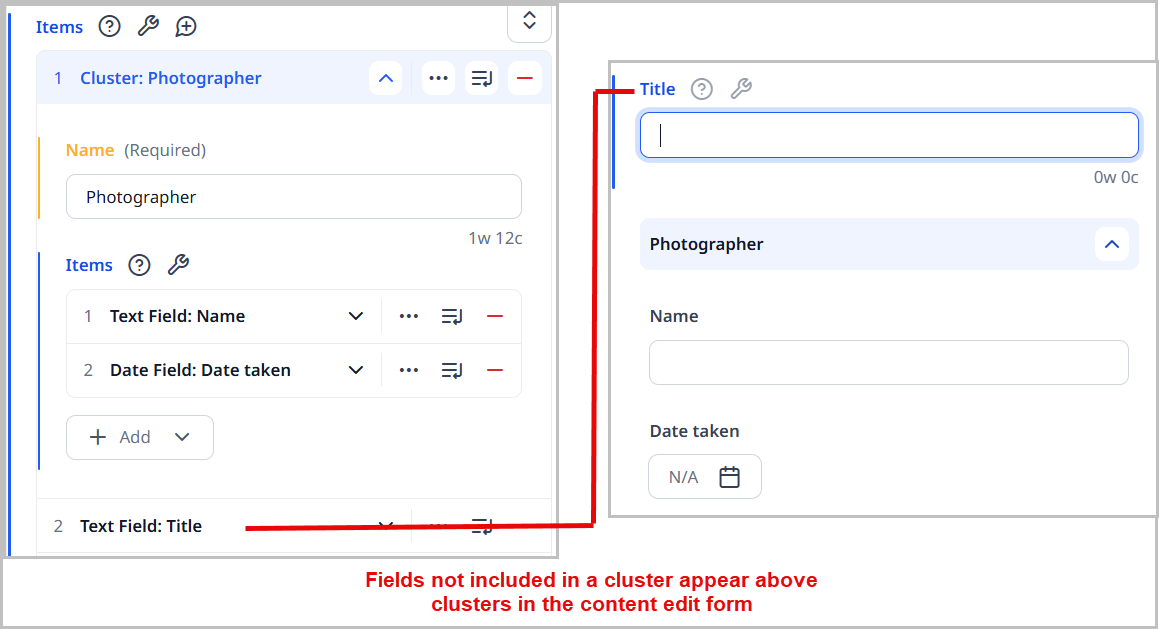
Adding a cluster
Clusters provide accordions containing groups of fields. Editors can open and close clusters.
To add a cluster:
-
Search for and open the editorial content type that you want to edit, or create a new editorial content type.
-
From the Items list, select Cluster.
-
Under Main, in the Name field, enter a name for the cluster.
-
Add fields to the cluster by doing the following:
- Under Fields, click , and select a field type.
- Complete the form for the field type.
- Repeat steps a–b to add additional fields.
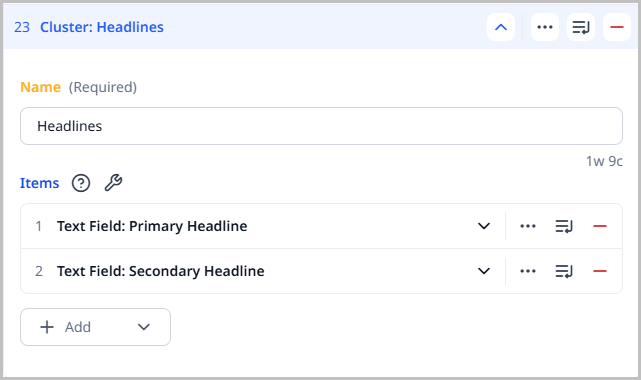 |  |
|---|
Fields not assigned to a cluster always appear above clusters in the content edit form.
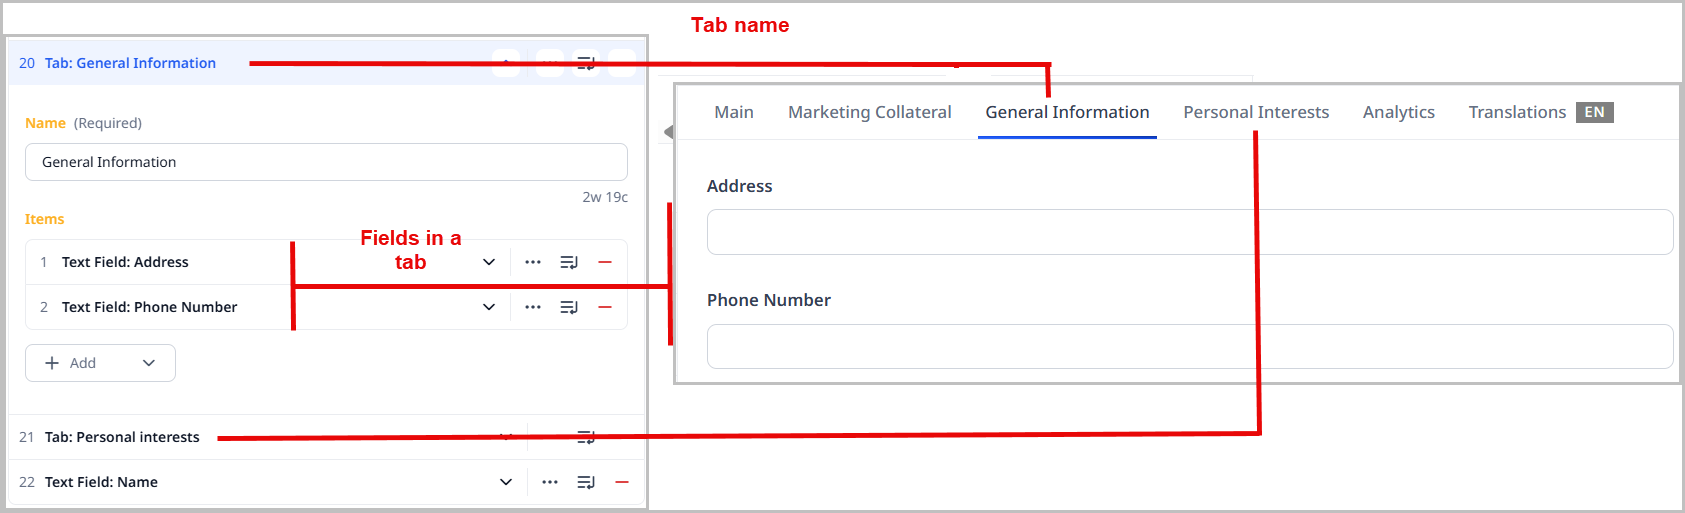
Adding a tab
Tabs provide strong visual groupings of fields.
To add a tab:
-
Search for and open the editorial content type that you want to edit, or create a new editorial content type.
-
From the Items list, select Tab.
-
In the Name field, enter a name for the tab.
-
Add fields to the tab by doing the following:
-
Under Items, click , and select a field type.
-
Complete the form for the field type.
-
Repeat steps a–b to add additional fields.
-
-
Repeat steps 1–3 to add additional tabs.
Fields not assigned to a tab appear in the content edit form's Main tab.
Editing an editorial content type
This topic explains how to edit an editorial content type in Brightspot.
Before editing an editorial content type, you should always check to see if it is in use in any assets or by other editorial content types. This ensures that any changes you make do not cause any undesirable results on existing assets.
To review an editorial content type's usage:
- Click > Admin > Content Types.
-
In the Content Types widget, located in the left navigation bar, select the editorial content type whose usage you want to check.
-
Click the References tab.

-
Under Usages, click the provided link to see a list of assets that use this editorial content type.
-
Under References, click the name of the content type to view how it is used.
Any changes you make to an editorial content type will affect all of the items listed on the References tab.
To edit an editorial content type:
- Click > Admin > Content Types.
-
In the Content Types widget, click the editorial content type you want to modify.
-
Modify the content type as desired.
warningAttempting to edit an editorial content type that is used by published content generates a warning message at the top of the page.
Continuing to remove a field from an existing editorial content type may result in lost content. For example, an editorial content type
Book Reviewshas a fieldAuthor. If you remove that field, all existing assets based onBook Reviewswill no longer include the fieldAuthor; editors do not see that field in Brightspot, and visitors no longer see that field in the live site. This may also break downstream applications. -
Click Save.
Searching for editorial content types
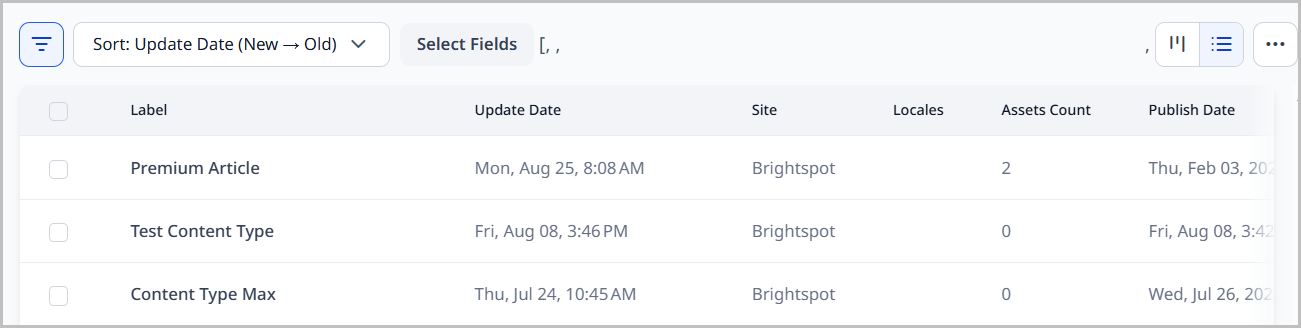
If your publication uses a large number of editorial content types, the built-in search feature makes it easy to find the one you need, as well as get some valuable information about each editorial content type you have.
To search for editorial content types:
- Click > Admin > Content Types.
-
Click located in the Content Types widget.
This displays a listing of all editorial content types currently available within Brightspot. The search results show the number of fields contained on the editorial content type, how many assets use the it, sites where it is available, and much more.
The results from this search can also be exported by clicking > Export All.
Working with embedded editorial content types
You can embed editorial content types inside your other editorial content types. For example, you have editorial content types Employee, Customer, and Director. Each content type includes address fields Street, City, State, and ZIP. You can create a single content type Address that contains the address fields, and embed Address inside Employee, Customer, and Director.
Embedded editorial content types are shared and can be included in multiple parent editorial content types. You can also simulate a one-off embedded editorial content type that is available in a single parent.
Creating an embedded editorial content type
To create an embedded editorial content type:
- Search for and open the editorial content type that you want to edit, or create a new editorial content type.
- In the Main tab, toggle on Embedded.
- Click Save.
You can now embed this editorial content type within a parent editorial content type. See the next section for details.
Embedding an editorial content type
To embed an editorial content type in a parent content type:
-
Search for and open the editorial content type that you want to edit, or create a new editorial content type.
-
Under Items, click , and select Reference Field.
-
In the Name field, enter a name for the field.
-
From the Count list, select one of the following:
- One—Only one instance of this field appears in the content edit form.
- Many—Editors can click to add multiple instances of this field in the content edit form.
- Many (Sortable)—Editors can click to add multiple instances of this field in the content edit form, and can re-order those fields by dragging .
-
From the Types list, select an embedded content type.
-
Under Advanced, in the Note field, enter a short explanatory note that appears in the content edit form.
-
Click Save.
 |  |
|---|
Site-specific editorial content types
Site-specific editorial content types pertain only to the site in which you create them and are not global across all sites.
To create a site-specific editorial content type:
- Click > Admin > Content Types.
-
Under Sites, select the sites for which you want to create a site-specific editorial content type.
-
Build the site-specific editorial content type.
-
Click Save.
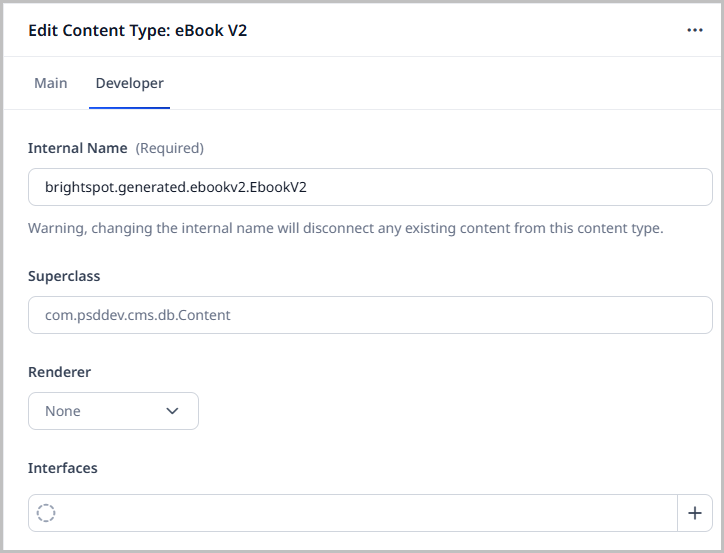
Restricting access to the Developer tab within editorial content types
To restrict users from modifying any values on the Developer tab of editorial content types (ECTs), you can create a role that makes those fields read-only. Once that role is created, you can assign it to all of the users that do not need the ability to modify the values on those fields.
To set these permissions, you must create a custom form, create a role that implements the custom form, and assign that role to users.
Expand each task below for more information.
Creating the custom form
The first step in making the fields on the Developer tab read-only is to create a custom form with read-only attributes.
To create a custom form with read-only attributes:
- Click > Admin > Users & Roles.
-
Scroll down to the Content Forms widget (located at the bottom of the left navigation rail) and select Content Type in the drop-down.
-
Click New.
-
Enter a Name for the new form.
-
Expand Accesses and select Write.
-
In the Visible Items area, expand the Developer cluster.
-
Expand Access and select Read Only.
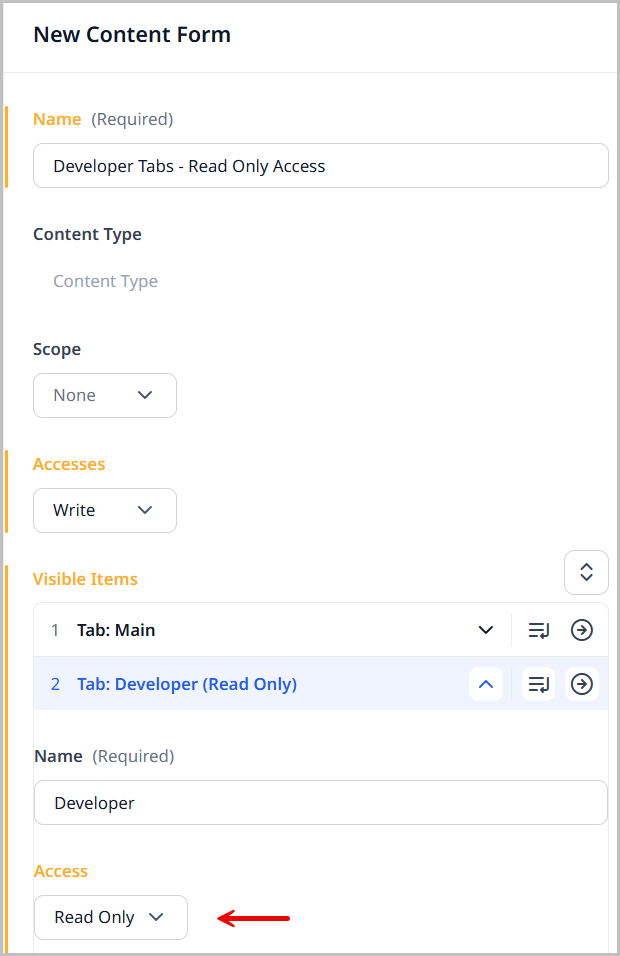
-
Click Save.
Creating the read-only role
After the custom form with read-only access for the Developer tab, it is time to create the role that uses that form.
To create the read-only role:
- Click > Admin > Users & Roles.
-
Click New Tool Role.
-
Enter a Name for this new role.
-
Complete the fields as you would for a normal role. See Creating roles for more information on role creation.
-
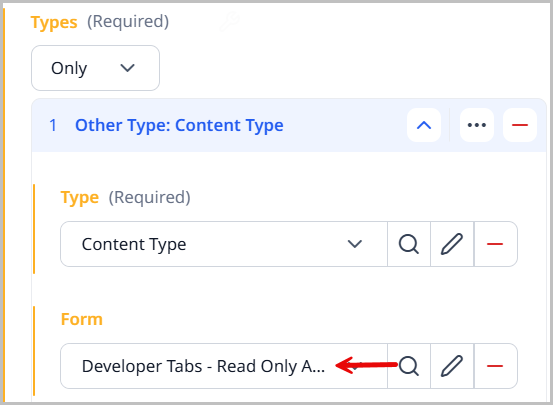
Expand the Types field and select Only.
-
Click below the Types field and select Other Type.
-
Expand the Type field and select Content Type.
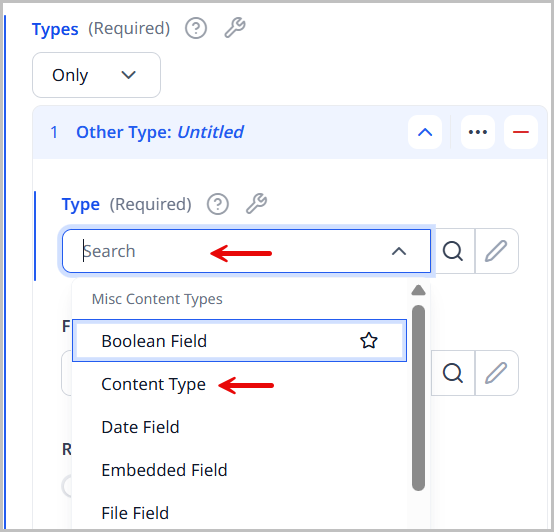
-
Expand the Form field and select the name of the custom form you created earlier.
-
Complete any other steps you need to for this role.
-
Click Save.
Now that the role with read-only access for the Developer tab has been created, you need only to assign this role to users for it to limit the Developer tab access.
Assign users to the read-only Developer tab role
Now that you have the read-only custom form and role created, the only thing left to do is assign it to users.
To add the read-only role to users:
- Click > Admin > Users & Roles.
-
Choose a user.
-
Expand Permissions and click Roles (if it is not already selected for this user).
-
Select the read-only role you just created in the previous steps.
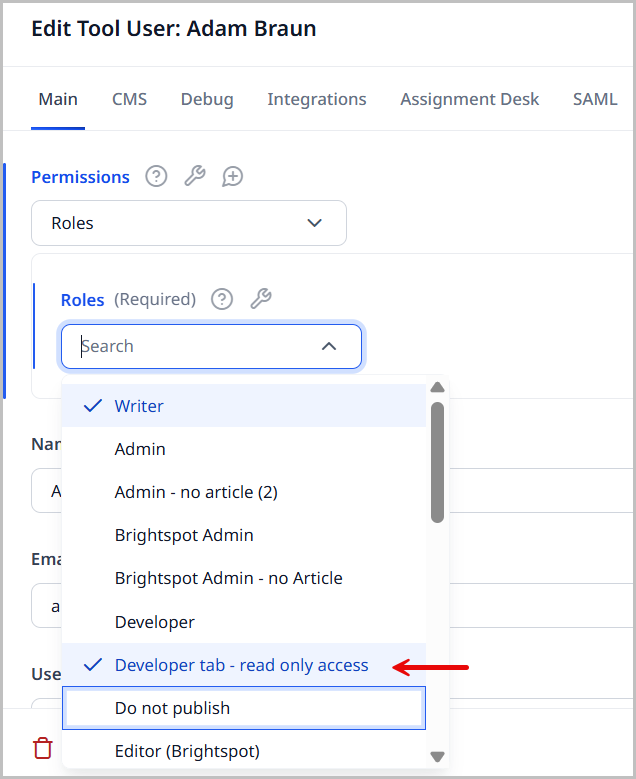
Click Save.
The selected users now have the read-only Developer tab role assigned to them. Whenever they access an editorial content type (ECT) and click the Developer tab, the fields are read-only and cannot be modified.
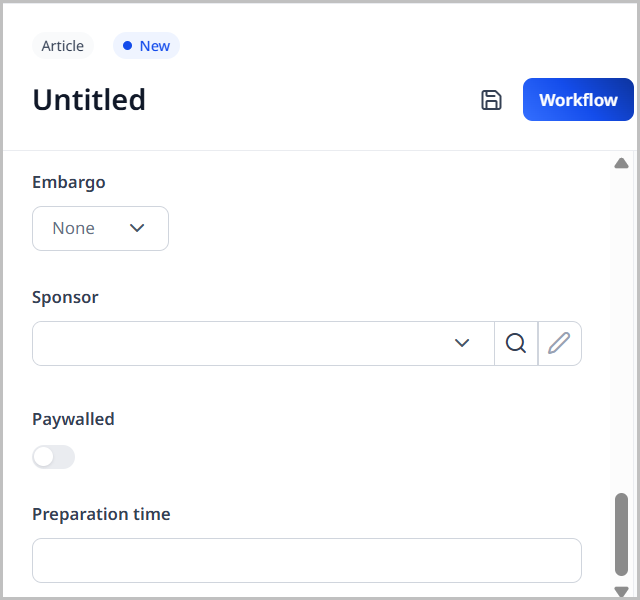
Modifying a standard content type
You can modify Brightspot's standard content types. For example, if your site publishes only recipes, you can add a field Preparation Time to the Article content type.
To modify a standard content type:
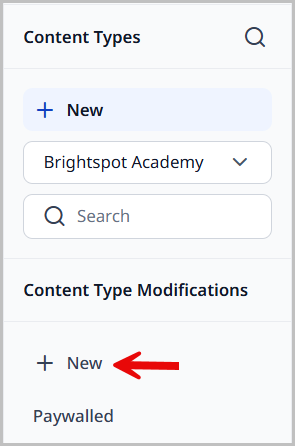
- Click > Admin > Content Types.
-
Under Content Type Modifications, click New.
-
In the Name field, enter a name for this modification.
-
From the Types list, select the content types to which you want to add fields.
-
Under Additional Items, click , and select one of the field types.
-
Complete the form for the selected field type.
-
Repeat steps 5–6 to add additional fields.
-
Rearrange the fields by dragging them into the order you want them to appear in the content edit form.
-
Click Save.
 |  |
|---|
Referring to the previous illustrations, editors starting a new article or blog post content types see a Preparation Time field in the content edit form.