Ads
Brightspot provides robust ad capability for your pages.
This section will provide you with the information you need to successfully place and publish ads on your pages.
Ad placement hierarchy
You can configure ad modules to appear at different levels in the content hierarchy.
Brightspot sends an ad request with the highest priority available in the content hierarchy. Referring to the following table, Brightspot checks if a particular asset has an ad feed (priority 1). If there is no such ad feed, Brightspot checks if one is configured for the content type (priority 2), and so on. As a best practice, configure a default ad feed at the global level so that all of your published content contains an ad—even for those levels in the content hierarchy for which you did not configure a tailored ad.
| Level | Scope | Priority |
|---|---|---|
| Asset | You can tailor an ad or ad feed for an individual asset. For example, if you published an article about the final game of the World Series, you can tailor a distinct ad feed for that event. | 1 |
| Content type | The same ad or ad feed appears in all assets of a particular content type. For example, if you have blog posts, videos, and galleries, you can tailor a distinct ad feed for each content type. | 2 |
| Section-Content type | The same ad or ad feed appears in all assets of a specified type included in the section. For example, if you have a gardening section that has blog posts, you can tailor a distinct ad feed for the blog posts that appear in that gardening section. | 3 |
| Section | The same ad or ad feed appears in all assets of a section, not only certain types. For example, if you have a gardening section and a cooking section, you can tailor a distinct ad feed for each section. | 4 |
| Site-Content type | The same ad or ad feed appears in all assets of a specified type included in the site. For example, if you have a sports site that has a baseball section, you can tailor a distinct ad feed for the assets that appear in that site's baseball section. (That section may have overrides by content type, in which case you can tailor an ad feed at the site-section-content type level.) | 5 |
| Site | The same ad or ad feed appears in all assets on the site. | 6 |
| Global-Content type | The same ad or ad feed appears in all assets of a specified content type. For example, if you have a baseball section in any of your sites, you can tailor a distinct ad feed for the assets that appear in that baseball section. (That section may have overrides by content type, in which case you can tailor an ad feed at the section-content type level.) | 7 |
| Global | The same ad or ad feed appears in all assets on all your sites. | 8 |
Ad considerations
The following sections provide guidelines you should consider as you design your ad feed.
Ad sizes
Typically, ads appearing as banners are wide and short, while ads appearing within text are square. Googles Ad Manager also provides an option for specifying an ad size based on the size of the visitor’s browser window. If the browser window is small, you can request a small ad; if the browser window is large, you can request a large ad.
Ad layout
Determine where on a page you want ads to appear. Publishers place ads above each item, below each item, wrapped inside each item, or combinations of all three. See the illustration in Modules for examples of where you can place ads.
Blocking ads
You can use a query string to block an ad feed. The key for the query string is disableAds, and you can configure the value. For example, if you chose a value 567abcded, then the following URL blocks an ad feed.

Configuring ad layout
This section describes how to lay out your ads at various levels in the content hierarchy.
Global level
- From the left navigation, under Admin, click Sites & Settings, then select the Global site.
- From the Front-End tab, expand the Layout cluster.
- Scroll down to one of the drop-down lists Above, Aside, or Below, and select Replace.
- Click , and in the module picker select Ad.
- From the Ad list, select an ad module.
- Click Save.
Global-content type level
- From the left navigation, under Admin, click Sites & Settings, then select the Global site.
- From the Front-End tab, expand the Type Specific Overrides cluster.
- Under Type Specific Overrides, click .
- From the Types list, select the content types for which you are configuring an ad layout at the global level.
- Scroll down to one of the drop-down lists Above, Aside, or Below, and select Replace.
- Click , and in the module picker select Ad.
- From the Ad list, select an ad module.
- Click Save.
Site level
- From the left navigation, under Admin, click Sites & Settings.
- From the Sites widget, select the site for which you want to deliver ads.
- From the Front-End tab, expand the Layout cluster.
- Scroll down to one of the drop-down lists Above, Aside, or Below, and select Replace.
- Click , and from the Add widget select Ad.
- From the Ad list, select an ad module.
- Click Save.
Site-content type level
- From the left navigation, under Admin, click Sites & Settings.
- From the Sites widget, select the site for which you want to deliver ads.
- From the Front-End tab, expand the Type Specific Overrides cluster.
- Under Type Specific Overrides, click .
- From the Types list, select the content types for which you are configuring an ad layout at the site level.
- Scroll down to one of the drop-down lists Above, Aside, or Below, and select Replace.
- Click , and in the module picker select Ad.
- From the Ad list, select an ad module.
- Click Save.
Section level
- Create or open the section in the content edit form.
- Expand Overrides > Layout Overrides.
- Scroll down to one of the drop-down lists Above, Aside, or Below, and select Replace.
- Click , and in the module picker select Ad.
- From the Ad list, select an ad module.
- Complete your site's workflow and publish the asset.
Section-content type level
- Create or open the section in the content edit page.
- Expand Overrides > Type Specific Overrides.
- Under Type Specific Overrides, click .
- From the Types list, select the content types for which you are configuring ad layout at the section level.
- Scroll down to one of the drop-down lists Above, Aside, or Below, and select Replace.
- Click , and in the module picker select Ad.
- From the Ad list, select an ad module.
- Complete your site's workflow and publish the asset.
Content type level
- Create a content template based on the content type as described in Content templates.
- Expand Overrides > Layout Overrides.
- Scroll down to one of the drop-down lists Above, Aside, or Below, and select Replace.
- Click , and in the module picker select Ad.
- From the Ad list, select an ad module.
- Complete your site's workflow and publish the asset.
Asset level
- Create or open the asset in the content edit form.
- Expand Overrides > Layout Overrides.
- Scroll down to one of the drop-down lists Above, Aside, or Below, and select Replace.
- Click , and in the module picker select Ad.
- From the Ad list, select an ad module.
- Complete your site's workflow and publish the asset.
Creating ad modules
Ad modules allow Google ad feeds to appear in your published site. The ads appear in an asset's above, aside, or below layout blocks. (For information about layout blocks, see Layout structure.)
Google AdSense
-
From your Google AdSense console, identify the slot you want to use for ad feeds in your Brightspot site.
- From the left navigation, under Admin, click Ads.
-
Under Create, select Google AdSense, then click New.
-
In the Name field, enter a name. Brightspot uses this name in various widgets, such as Edit Site.
-
In the Slot field, enter the slot number you identified in step 1.
-
From the Ad Size list, select an existing ad size, or create a new one by doing the following:
- Select Create New.
- In the New Ad Size form, enter a width and height in pixels.
- Click Save, then click Back.
- From the Ad Size list, select the ad size you just created.
-
Click Save.
Google DFP
This section describes incorporating ad feeds from Google DFP (DoubleClick for Publishers). While Google retired DFP in favor of Google Ad Manager, the terms in the following procedure apply to both DFP and Google Ad Manager.
-
From your Google DFP console, identify the slot you want to use for ad feeds in your Brightspot site.
- From the left navigation, under Admin, click Ads.
-
Under Create, select Google DFP Ad, then click New.
-
In the Name field, enter a name. Brightspot uses this name in various widgets, such as Edit Site.
-
In the Slot field, enter the slot number you identified in step 1.
-
From the Sizes list, select an existing ad size, or create a new one by doing the following:
- Click .
- Select Create New.
- In the New Ad Size form, enter a width and height in pixels.
- Click Save, then click Back.
- From the Sizes list, select the ad size you just created.
-
In the Size Mappings field, configure the mapping between a browser's window size and the size of the ad feed. (For example, if the browser's window size is 1920×1080, you can ensure that ads of size 300×250 and 468×60.)
-
Click .
-
From the Minimum Window Size, select an existing browser window size, or create a new one by doing the following:
- Select Create New.
- In the New Window Size form, enter a width and height in pixels.
- Click Save, then click Back.
- From the Minimum Window Size list, select the window size you just created.
-
From the Ad Sizes, select an ad size you want to be fed to the window size. Select an existing ad size, or create a new one by doing the following:
- Click .
- Select Create New.
- In the New Ad Size form, enter a width and height in pixels.
- Click Save, then click Back.
- From the Ad Sizes list, select the ad size you just created.
-
Repeat step c to add additional ad sizes for the current window size.
-
-
Toggle on Hide on Mobile to hide this ad from displaying on mobile versions.
-
Toggle on Hide on Desktop to hide this ad from displaying on desktop versions.
-
Toggle on Out Of Page to allow this module to feed out-of-page ads.
-
In the Google Dfp Targeting Map List field, enter a list of key-value pairs that help DFP feed ads appropriate for your site. For information about key-value pairs, see About key-values.
-
Click Save.
Injecting ads
Body text
You can inject ads between paragraphs in an asset's body text.
To inject ads into body text:
-
Configure an ad module.
- From the left navigation, under Admin, click Sites & Settings.
-
In the Sites widget, select the site for which you are injecting ads into body text, or select Global to inject ads into all assets' body text.
-
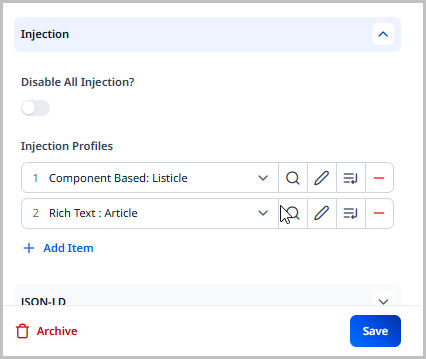
From the Front-End tab, expand the Injection cluster. Ensure that it is toggled off.
-
Under Injection Profiles, click Add Item.
-
Click Create New and select Rich Text Injector.
noteThe steps listed here go through the entire process of creating a new rich text injector profile. If the rich text injector profile you need already exists, you can select it from the Injection Profiles list and then click Save to complete this process.
-
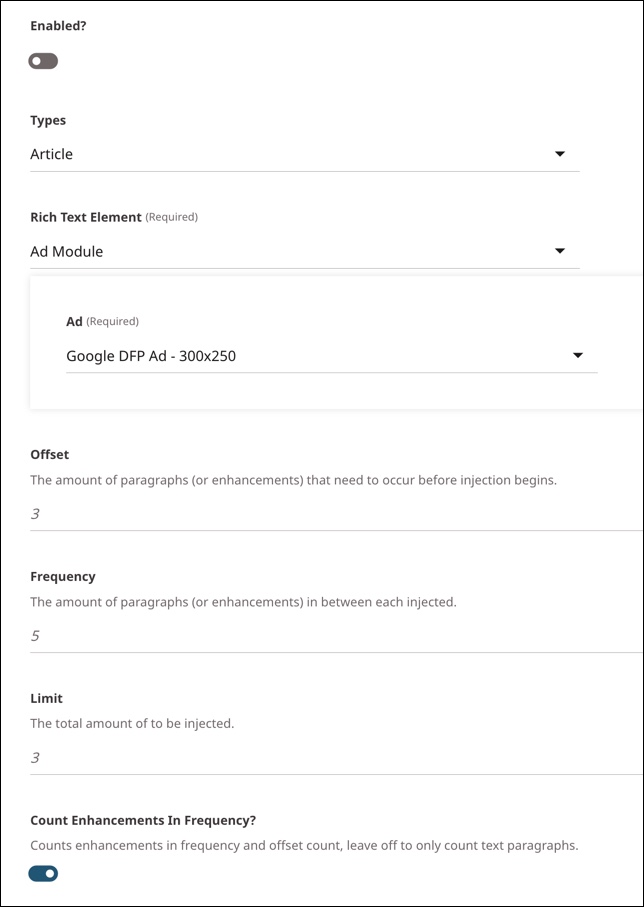
Toggle on Enabled.
-
From the Types list, select the content types into which you want to inject ads.
-
In the Rich Text Element field, select Ad Module.
-
In the Ad field, select the ad module to be injected.
-
In the Offset field, enter the number of components before which no ad appears. For example, if you enter
3, Brightspot injects the first ad after the third component in the content type selected. -
In the Frequency field, enter the number of components between each ad. For example, if you enter
4, Brightspot injects an ad after each four components. -
In the Limit field, enter the maximum number of ads to appear in a listicle. For example, if you enter
2, Brightspot injects up to two ads in the content type selected. -
In the Count Enhancements in Frequency field, do one of the following:
- Toggle on if you want your entries in the Offset, Frequency, and Limit fields to account for enhancements (such as images, videos, or audios).
- Toggle off if you want your entries in the Offset, Frequency, and Limit fields to account only for paragraphs.
See the examples below.
-
Click Save.
-
Click Back.
-
In the Injection Profiles field, select the rich text injector you just created, and close the content picker.
-
Click Save.
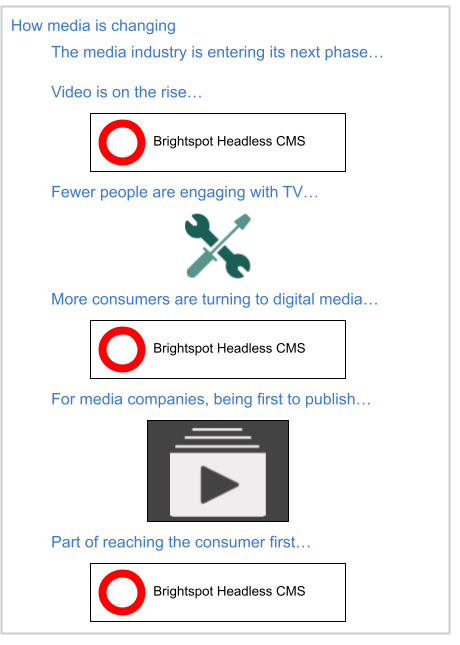
Example 1: Ad injection accounting for enhancements
Assume you configure ad injection as follows:
- Offset is 2.
- Frequency is 3.
- Limit is 3.
- Count enhancements in frequency is on.
The following drawing provides an example of ad injection with this configuration.

- The first ad appears after the second paragraph.
- The second ad appears after two paragraphs and one image enhancement.
- The third and final ad also appears after two paragraphs and one image enhancement.
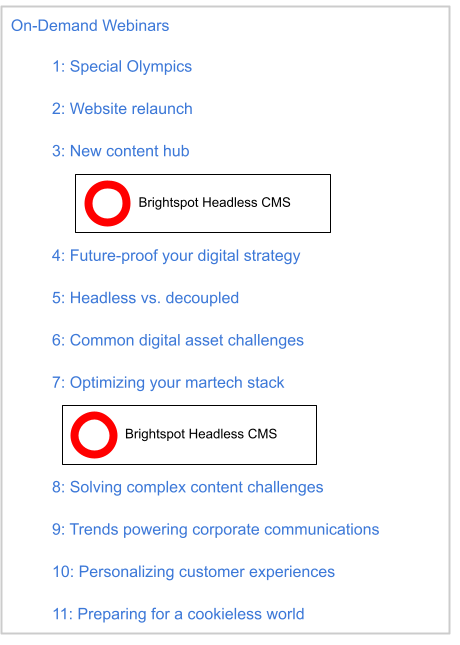
Example 2: Ad injection ignoring enhancements
Assume you configure ad injection as follows:
- Offset is 2.
- Frequency is 3.
- Limit is 3.
- Count enhancements in frequency is off.
The following drawing provides an example of ad injection with this configuration.
- The first ad appears after two paragraphs.
- The second ad appears after three paragraphs (ignoring the image).
Listicle
You can inject ads between items in a listicle.
To inject ads into a listicle:
-
Configure an ad module.
- From the left navigation, under Admin, click Sites & Settings.
-
In the Sites widget, select the site for which you are injecting ads into listicles, or select Global to inject ads into all listicles.
-
From the Front-End tab, expand the Injection cluster.
-
Toggle off Disable All Injection.
-
Under Injection Profiles, click Add Item.
-
Click Create New and select Listicle Ad Injection Profile.
noteThe steps listed here go through the entire process of creating a new listicle ad injection profile. If the listicle ad injection profile you need already exists, you can select it from the Injection Profiles list and then click Save to complete this process.
-
Toggle on Enabled.
-
In the Offset field, enter the number of components before which no ad appears. For example, if you enter
3, Brightspot injects the first ad after the third component in the listicle. -
In the Frequency field, enter the number of components between each ad. For example, if you enter
4, Brightspot injects an ad after a set of four components. -
In the Limit field, enter the maximum number of ads to appear in a listicle. For example, if you enter
2, Brightspot injects up to two ads in the listicle. -
In the Content field, select Set.
-
In the Ad field, select from the available ad modules.
-
Click Save.
-
Click Back.
-
In the Injection Profiles field, select the listicle ad injection profile you just created, and close the content picker.
-
Click Save.
Assets
When you subscribe to an ad feed, your published assets retrieve ads from the feed. Brightspot injects those ads into modules that you lay out at any point in the content hierarchy. Consider leveraging as much as possible the content hierarchy when configuring ad injection. If you configure ad injection at the global level, all assets flowing down from that level inherit the same configuration. Some publishers configure ad injection at the site level, then override the configuration at specific section levels.
To inject ads into assets:
-
Search for and open the asset to which you want to add an ad feed.
-
Expand Overrides > Layout Overrides.
-
From the Above, Aside, or Below list, select one of the following:
- Add After—Inherits the block’s modules from the parent level and adds an ad under them.
- Add Before—Inherits the block’s modules from the parent level and adds an ad above them.
- Replace—Replaces the block’s modules inherited from the parent level with an ad.
For more information about layout blocks, see Layout structure.
-
Click .
-
In the module picker, click Misc, then click Ad. You return to the content edit page.
-
From the Ad list, select one of the available ad layouts. (For information about creating an ad layout, see Creating ad layouts for AdSense units.)
-
Complete your site's workflow and publish the asset.