Content templates
Your publication's style guide may require that articles about product updates always include boilerplate text as follows:
- Headlines start with the teaser
Feature update:. - Bodies start with
Introducing another Brightspot productivity booster:.
The editor covering product updates can start new articles by manually pasting the boilerplate text, or by copying a previous article and erasing the extraneous text. A better way is to use content templates. Using content templates, editors can pre-populate the content edit form with boilerplate text.
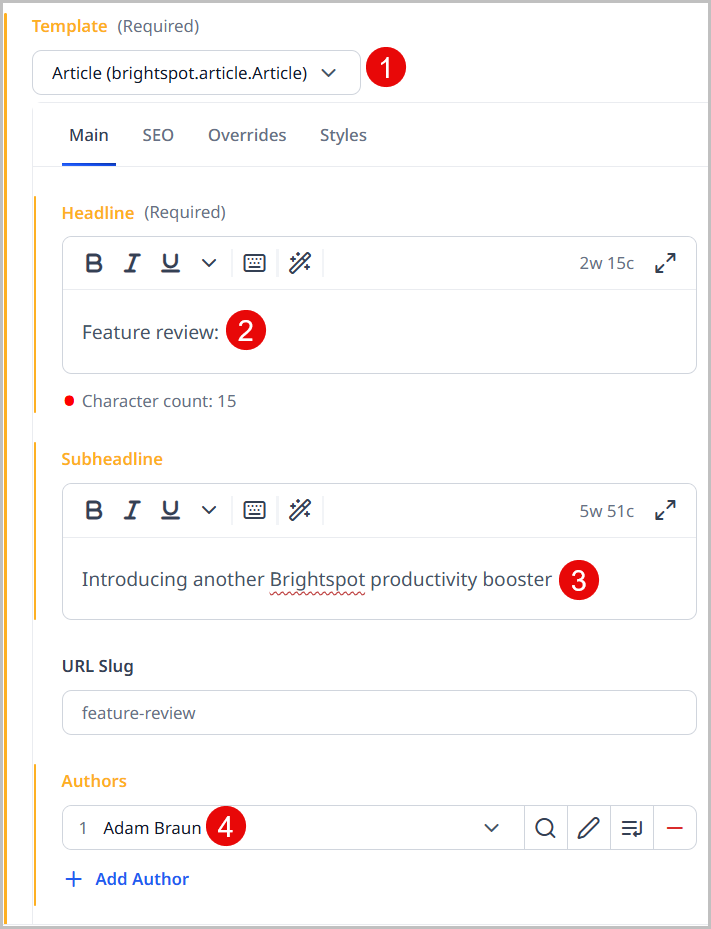
Referring to the previous illustration, when an editor starts a new article to which a content template has been applied—
- Brightspot displays the content edit form for articles.
- The Headline field is therefore populated with the phrase
Feature review:. - The Subheadline field is therefore populated with the phrase
Introducing another Brightspot productivity feature:. - The Authors field is therefore populated with
Adam Braun.
Using content templates provides two benefits:
- Consistency—Your assets acquire a consistent wording that your visitors expect.
- Productivity—Because Brightspot pre-populates the content edit form with template text, you spend less time typing and more time creating.
For more information on content templates, see Types of content templates and Organizing content templates. To begin creating content templates, see any of the following topics:
- Creating a site-level content template
- Creating a role-level content template
- Creating a user-level content template
Types of content templates
The following sections describe the two types of content templates.
Default templates
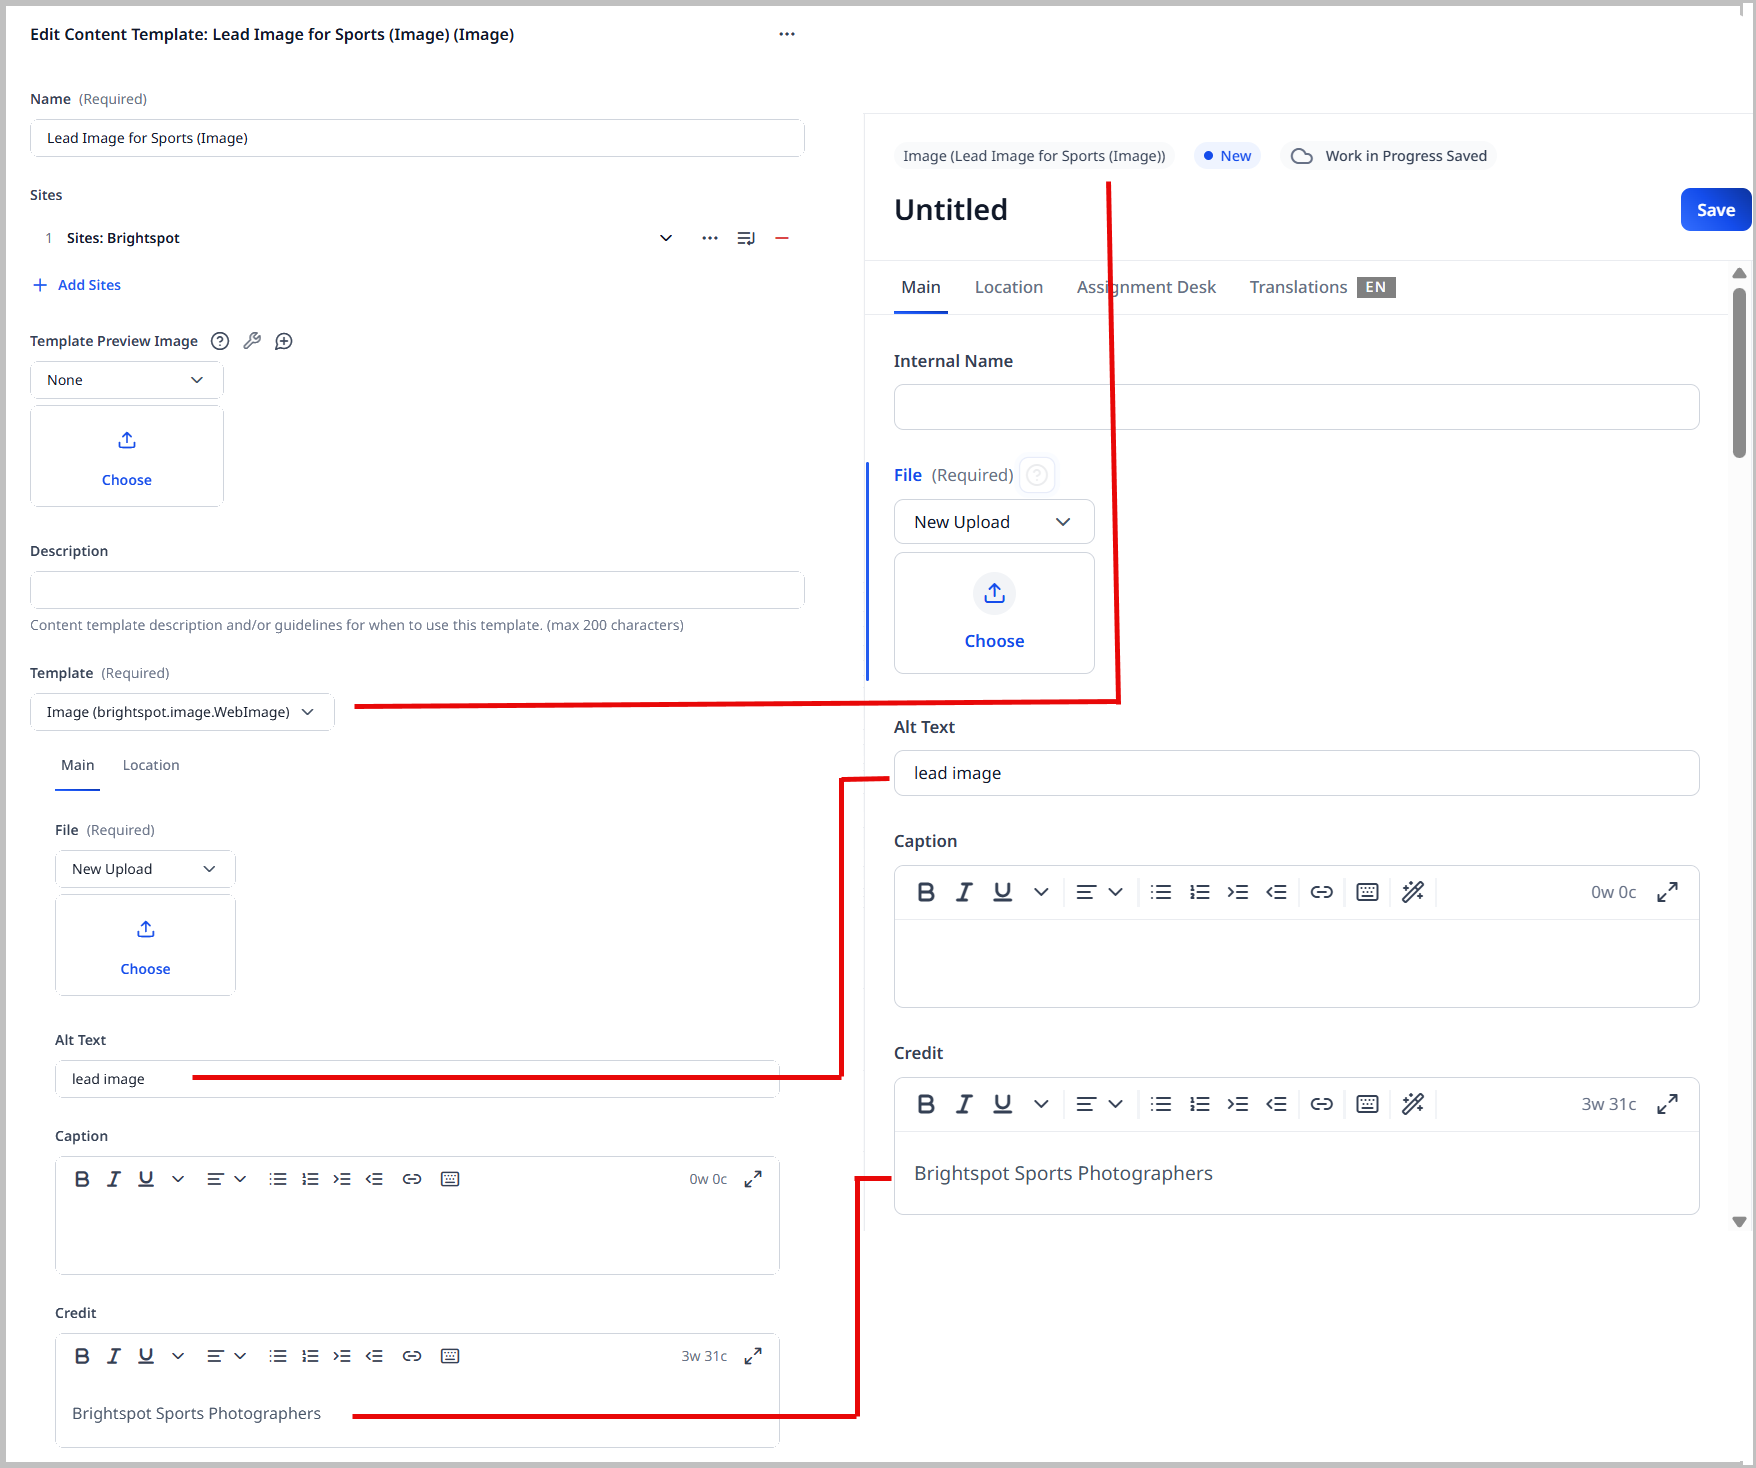
Default templates replace an underlying content type. Referring to the following illustration, Lead Image for Sports is a default template for images. When editors start an image in the Brightspot site, Brightspot opens a content form for an Image and pre-populates the fields with values defined in the content template Lead Image for Sports. Because Lead Image for Sports is a default template, editors must use it when creating an image.
Extra templates
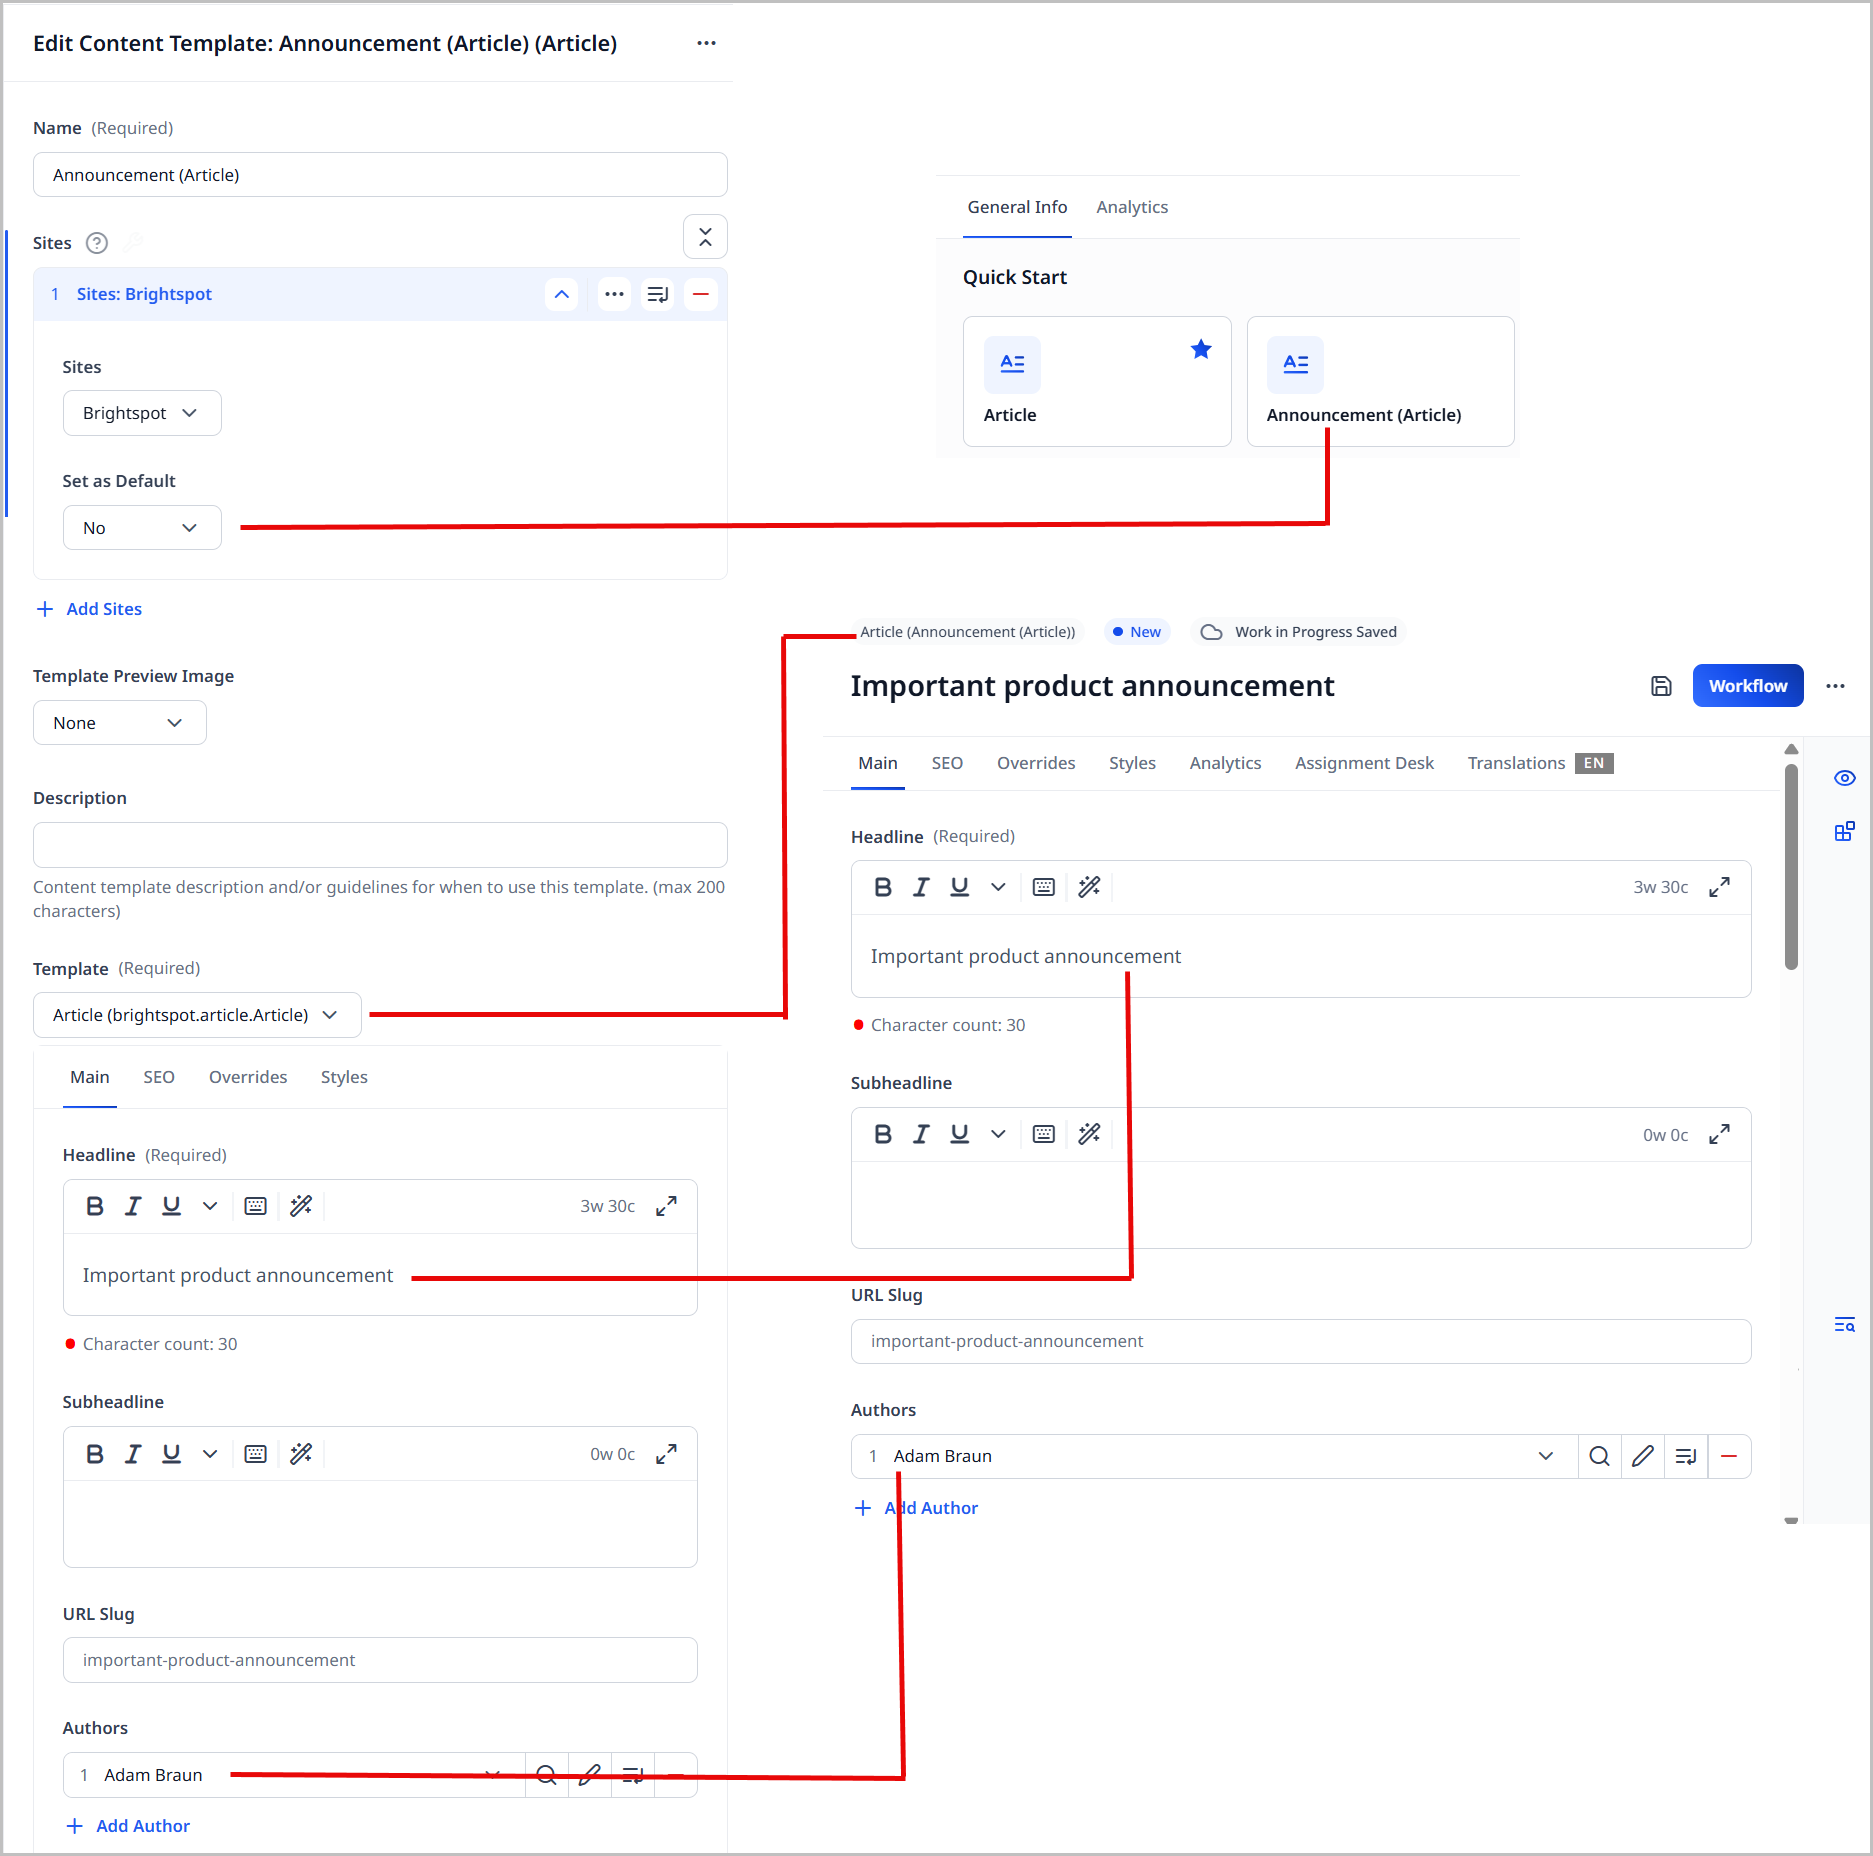
These templates are variants of an underlying content type with a different name and with pre-populated fields. Referring to the following illustration, Announcement is an extra template based on Article. When editors start an announcement in the Brightspot site, Brightspot opens a content form for an article and pre-populates the fields with values defined in the content template Announcement. Because Announcement is an extra template, editors see both Announcement and Article in the Quick Start widget.
Organizing content templates
Brightspot organizes content templates using a hierarchy from the site, then role, and then user levels. When a user opens the dashboard, Brightspot examines the user's ID, role ID (if any), and the site the user is working on. Brightspot then looks for content templates matching those criteria, and adds them to the Quick Start widget. Below are some examples.
-
All editors working on the site
Brightspotcan write articles highlighting software features. Using a site-level content template, they can pre-populate their articles' headlines with an introductory phraseFeature review.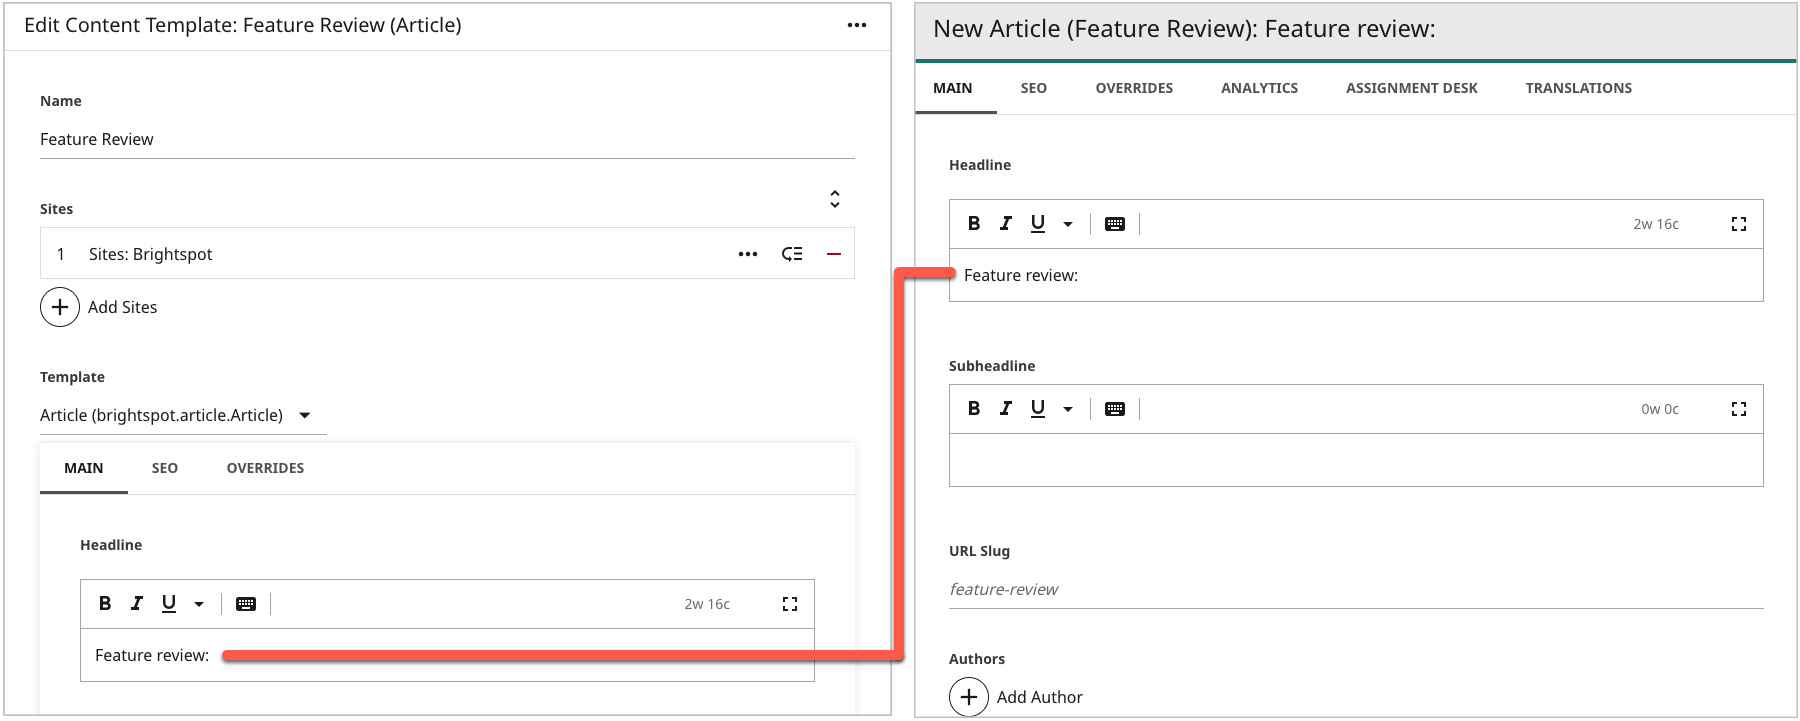
-
A special group of editors covers the company's annual user conference. For those articles, they use the role
Reporteron theBrightspotsite, and, using a role-level content template, pre-populate their articles' headlines with an introductory phraseSession summary.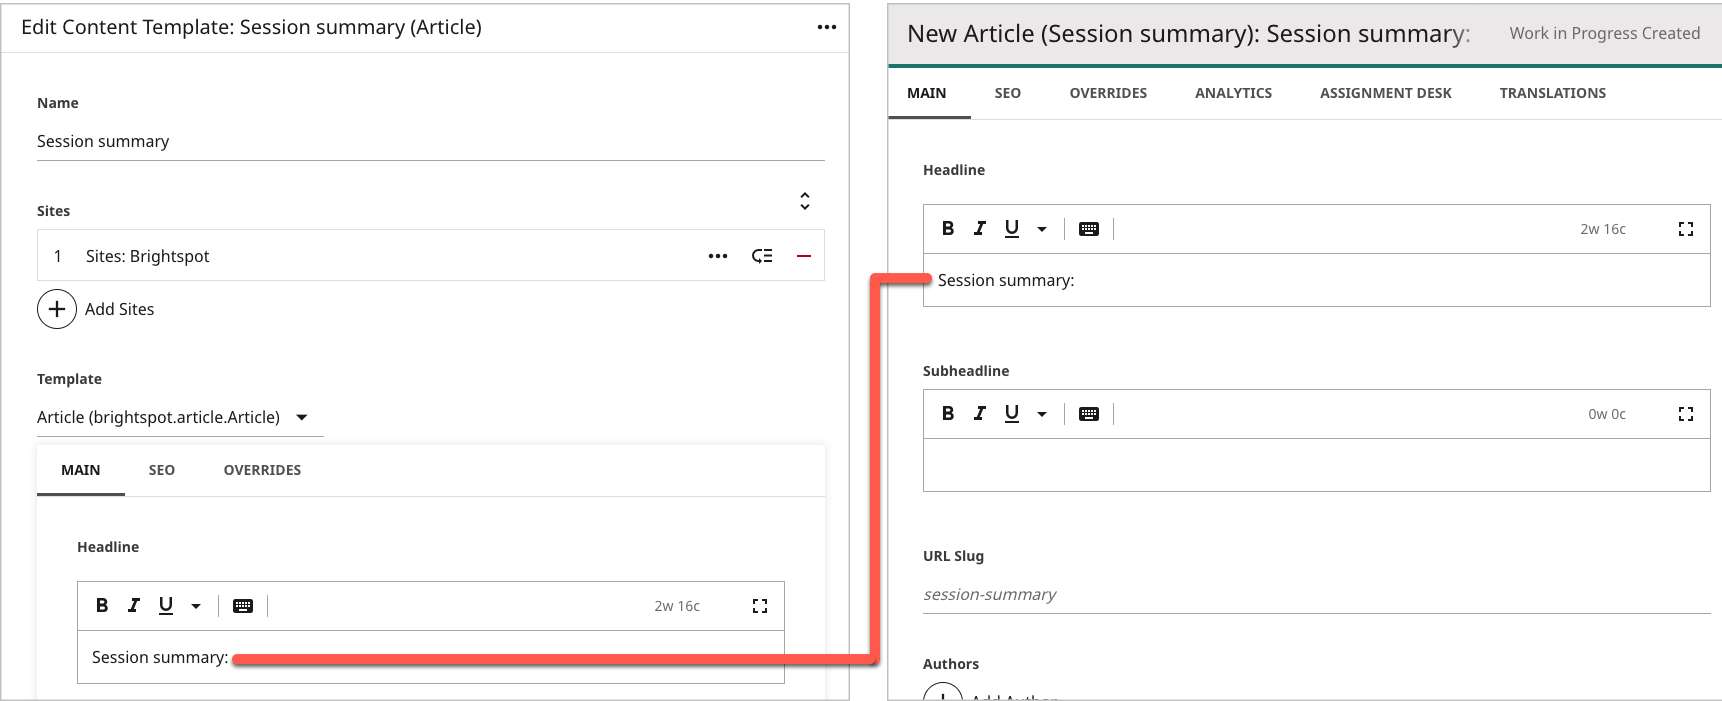
-
Olivia is the only editor providing code samples on the developer site
API Reference. For those articles, she uses a user-level content template to pre-populate her articles' headlines with an introductory phraseCode sample.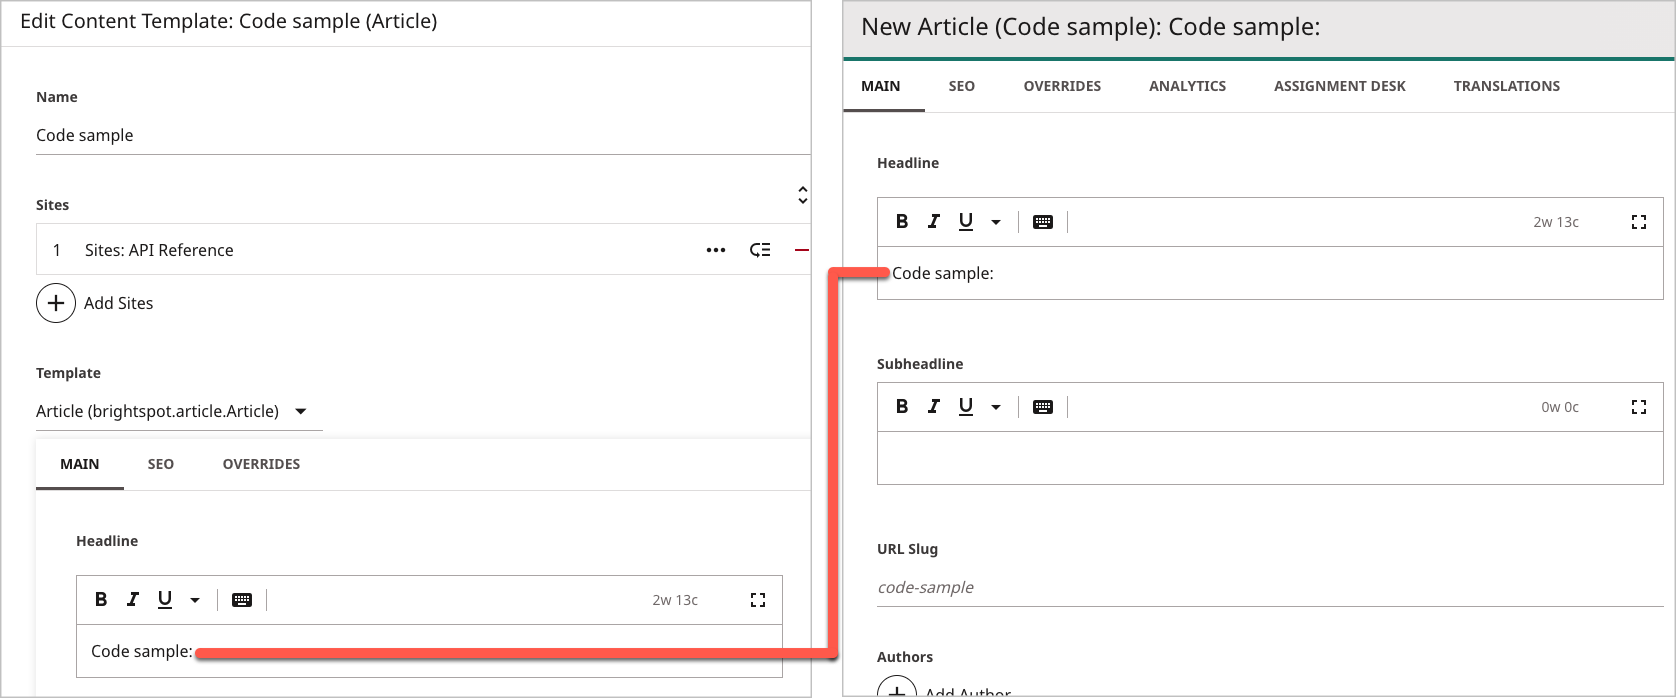
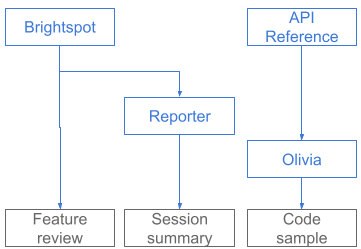
The following diagram illustrates the logic Brightspot uses to determine which content templates are available in the previous scenarios.
These examples show how you can design content templates in a wide variety of combinations:
- Any user working on a specific site.
- Any user working in a specific role.
- Any user working in a site-role combination.
- A specific user working on a specific site.
- A specific user working in a specific role.
- A specific user working on any site or role.
Think about how your publications re-use text at different combinations of sites, roles, and users, and design content templates to pre-populate your assets accordingly.
Searching for content templates
You can search for content templates to more quickly find the one you want to view or modify.
To search for content templates:
- Click > Admin > Content Templates.
-
Click at the top of the Content Templates widget.
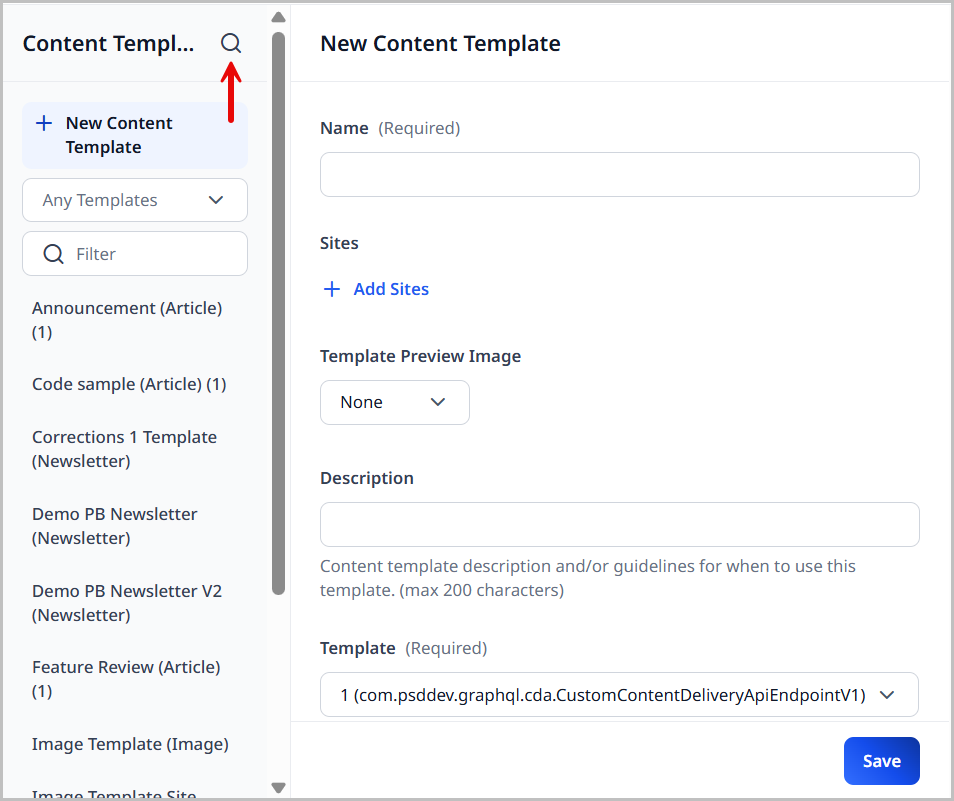
-
Enter the name of the content templates you are searching for in the Search field.
As you begin adding letters, the search results are narrowed to those that match your criteria.
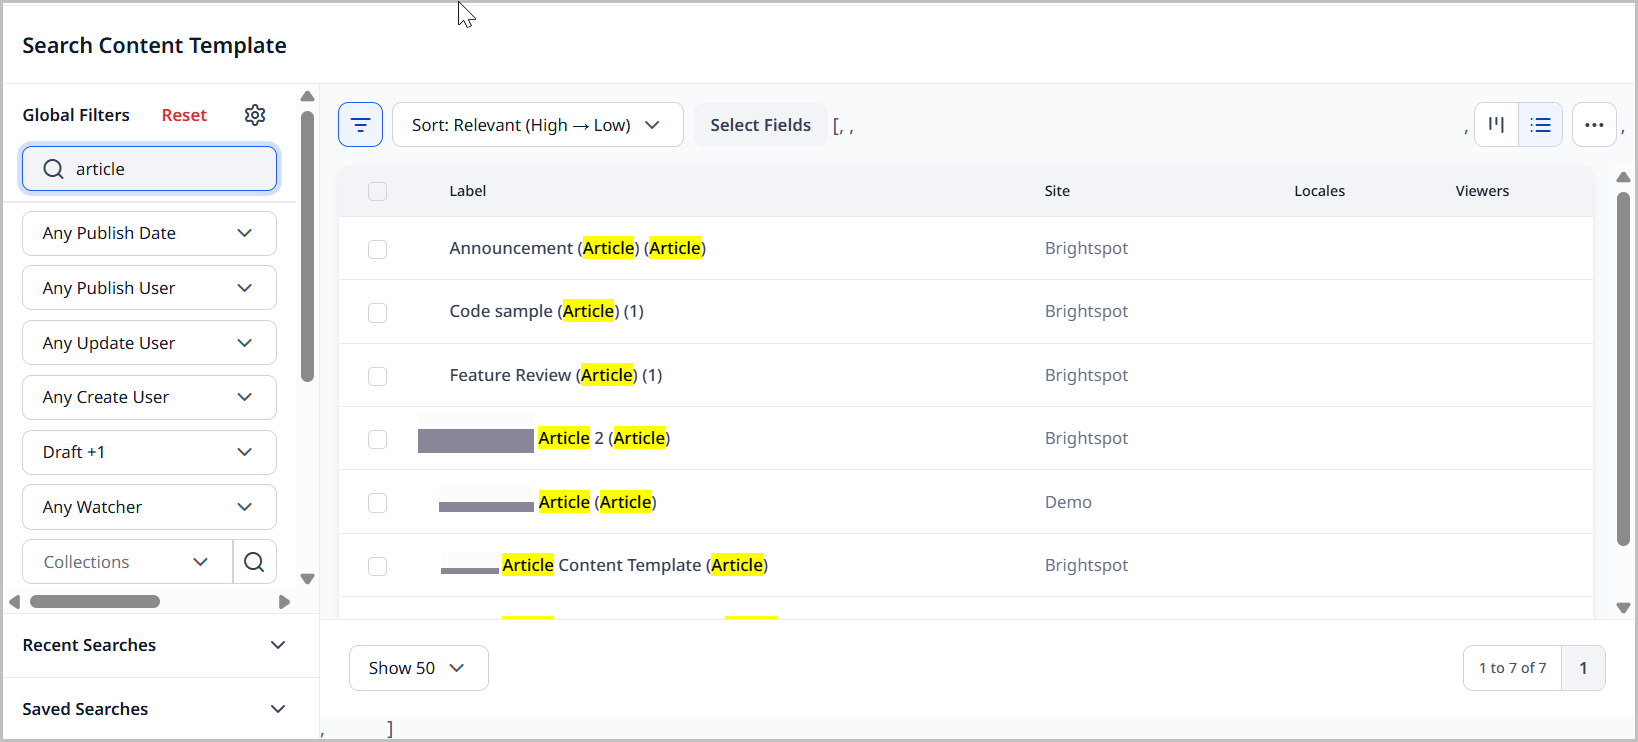
-
Click the name of the desired content template from the search results to view or edit that content template.
Creating a site-level content template
Site-level content templates are available to editors working on a specific site. When you create a new asset with this content template, Brightspot populates the fields with the text and values you set during this configuration.
To create a site-level content template:
- Click > Admin > Content Templates.
-
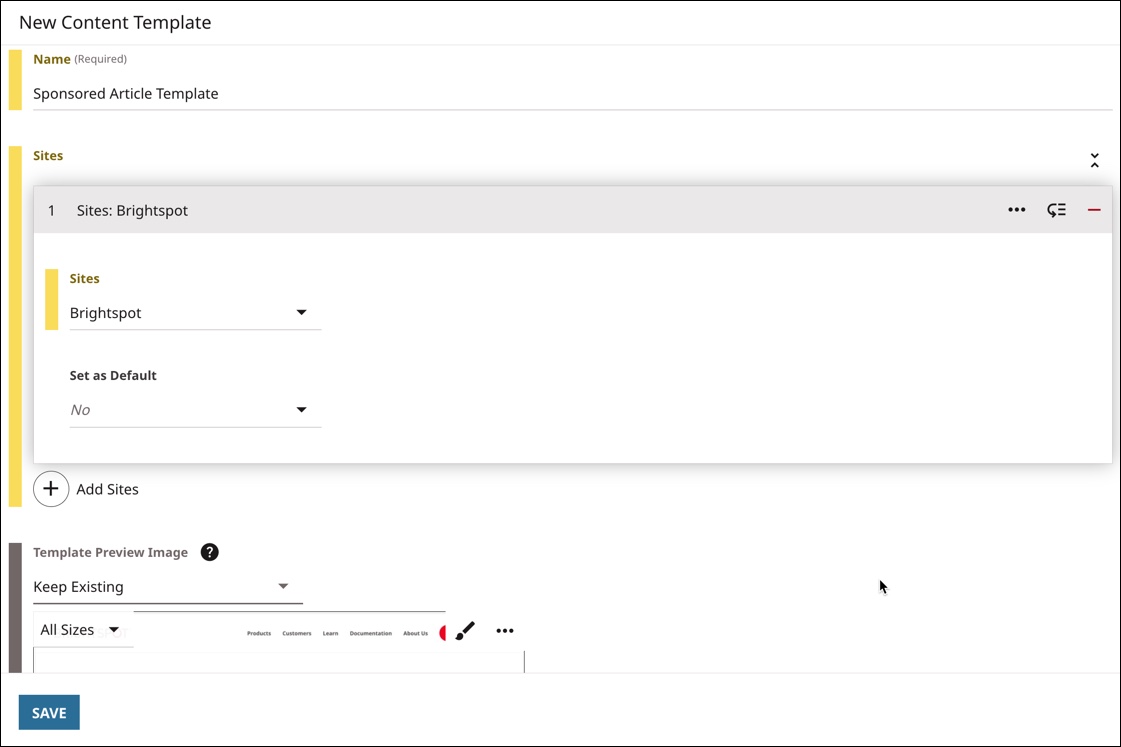
Under Content Templates, click New Content Template.
-
In the Name field, type a name for the content template.
-
If you want the template to apply to specific sites, do the following:
-
Under Sites, click .
-
From the Sites list, select the sites with which you want to associate this content template.
-
From the Set as default list, select one of the following:
-
Yes—The content template is the default for associated content types for the selected sites.
Only one default content template should be set per site for a content type. If you specify a second default content template for the same content type (for a site), a warning is displayed. If you save the second default content template, it is ignored, and instead, the existing content template is used for that content type on that site.

-
No—The content template is an extra for the selected sites.
If you specify the same template as both the default and extra for the same content type on the same site, a warning message is displayed. To correct this issue, either delete the extra version of the same template, or specify another template as the extra template for this content type on this site.

For the difference between default and extra content templates, see Types of content templates.
-
If you do not select any sites, the content template is not available until you associate it with a role or user. For details, see Creating a role-level content template and Creating a user-level content template.
-
-
Expand the Template Preview Image field to upload an image of new content template. This image is used in the Content Templates widget to show editors what this template looks like.
To avoid a preview image in the Content Templates widget, leave the Template Preview Image field set to None.
-
Enter a description of this template in the Description field, such as the purpose of the template or when to use it. This description is displayed in the Content Templates widget.
-
From the Template list, select the content type for which you want to create the content template.
-
In the widgets and fields, enter text and values.
-
Click Save.
When you create a new asset with this content template, Brightspot populates the fields with the text and values you set during this configuration.
Modifying a site-level content template
To modify a site-level content template:
- Click > Admin > Content Templates.
- Under Content Templates, select the content template you want to modify.
- Modify the content template as required. For an explanation of the available fields, see Creating a site-level content template.
- Click Save.
When you create a new asset with this content template, Brightspot populates the fields with the text and values you set during this configuration.
Archiving and deleting a site-level content template
When you archive or delete a site-level content template, it is no longer available to the roles and users that reference it.
- When you archive a content template, you can later restore it; for details, see Restoring archived assets.
- Deleting a content template erases it completely; you cannot later restore the content template.
To archive and delete a site-level content template:
- Click > Admin > Content Templates.
- Under Content Templates, select the content template you want to archive.
- At the bottom of the widget, click Archive.
- In the confirmation prompt, click OK.
- To delete the content template permanently, in the editorial toolbar, click , and then click Delete Permanently.
- In the confirmation prompt, click OK.
Creating a role-level content template
You can associate existing content templates with a role. When an editor associated with the role creates a new asset based on the content type, Brightspot populates the content edit form with the corresponding content template’s text.
To create a role-level content template:
-
Prepare a content template as described in Creating a site-level content template.
-
If necessary, create a new role as described in Creating roles.
- Click > Admin > Users & Roles.
-
Under Roles, select the role for which you want to create a content template.
-
Expand CMS > Content Templates.
-
Under Content Templates, click .
-
From the Content Template list, select a content template.
-
If you want the role's template to apply to specific sites, do the following:
-
From the Sites list, select the sites with which you want to associate this content template.
-
From the Set as default list, select one of the following:
- Yes—The role's content template is the default for associated content types for the selected sites.
- No—The role's content template is an extra for the selected sites.
If you do not select any sites, the role's content template becomes an extra template for all sites.
-
-
Click Save.
When you create a new asset with this content template, Brightspot populates the fields with the text and values you set during this configuration.
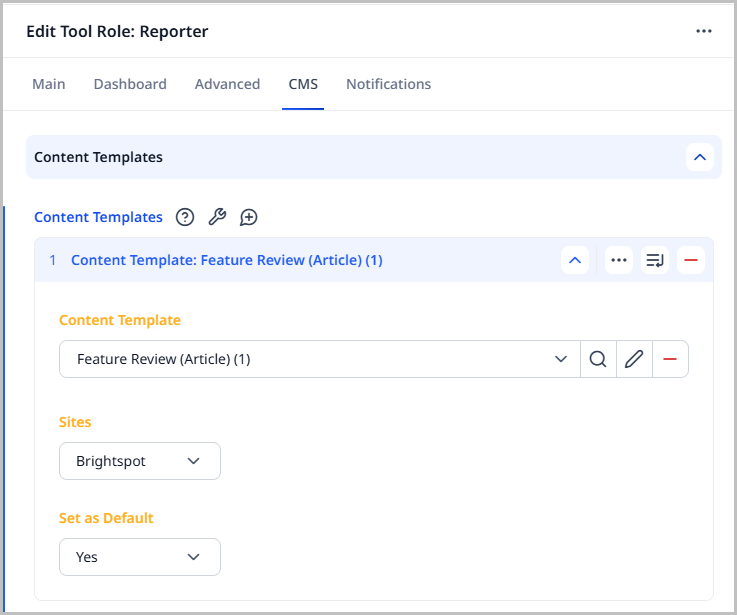
Referring to the previous image—
- The content template
Feature Reviewis available to the roleReporterwhile working on the siteBrightspot. Feature Reviewis the default template for the content typeArticle.
Modifying a role-level content template
To modify a role-level content template:
- Click > Admin > Users & Roles.
-
In the Roles widget, select the role for which you want to modify a content template.
-
Expand CMS > Content Templates.
-
Under Content Templates, expand the content template you want to modify.
-
Modify the template as required.
-
Click Save.
Brightspot saves the changes to the content template. The changes apply to all users associated with this role. When you create a new asset with this content template, Brightspot populates the fields with the text and values you set during this configuration.
Deleting a role-level content template
When you delete a role-level content template, it is no longer available to the users working in that role.
To delete a role-level content template:
- Click > Admin > Users & Roles.
- In the Roles widget, select the role from which you want to delete a content template.
- Expand CMS > Content Templates.
- Click for the content template you want to delete.
- Click Save.
Creating a user-level content template
You can associate content templates with an individual user. When the user creates a new asset based on the content type, Brightspot populates the content edit form with the corresponding content template’s text.
To create a user-level content template:
-
Create a content template.
-
If necessary, create a new user as described in Creating users.
- Click > Admin > Users & Roles.
-
Under Users, select the user for which you want to create a content template.
-
Expand CMS > Content Templates.
-
Under Content Templates, click .
-
From the Content Template list, select a content template.
-
If you want the user's template to apply to specific sites, do the following:
-
From the Sites list, select the sites with which you want to associate this content template.
-
From the Set as default list, select one of the following:
- Yes—The user's content template is the default for associated content types for the selected sites.
- No—The user's content template is an extra for the selected sites.
If you do not select any sites, the user's content template becomes an extra template for all sites.
-
-
Click Save.
When you create a new asset with this content template, Brightspot populates the fields with the text and values you set during this configuration.
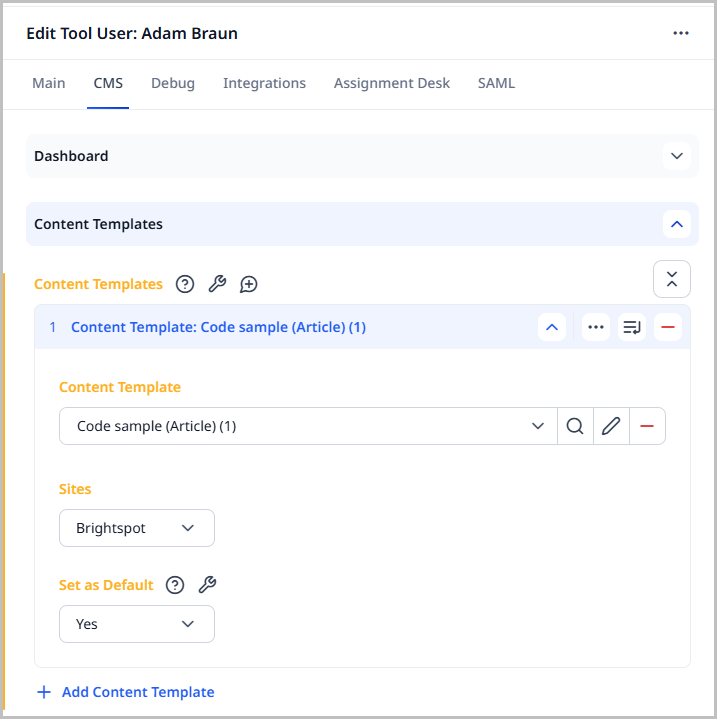
Referring to the previous image—
- The content template
Code Sampleis available to the userOliviawhile working on the siteBrightspot. Code Sampleis the default template for the content typeArticle.
Modifying a user-level content template
To modify a user-level content template:
- Click > Admin > Users & Roles.
-
In the Users widget, click the user for which you want to modify content templates.
-
Under CMS > Content Templates, expand the content template you want to modify.
-
Modify the template as required.
-
Click Save.
When you create a new asset with this content template, Brightspot populates the fields with the text and values you set during this configuration.
Deleting a user-level content template
To delete a user-level content template:
- Click > Admin > Users & Roles.
- In the Users widget, click the user from which you want to delete a content template.
- Under CMS > Content Templates, click for the content template you want to delete.
- Click Save.
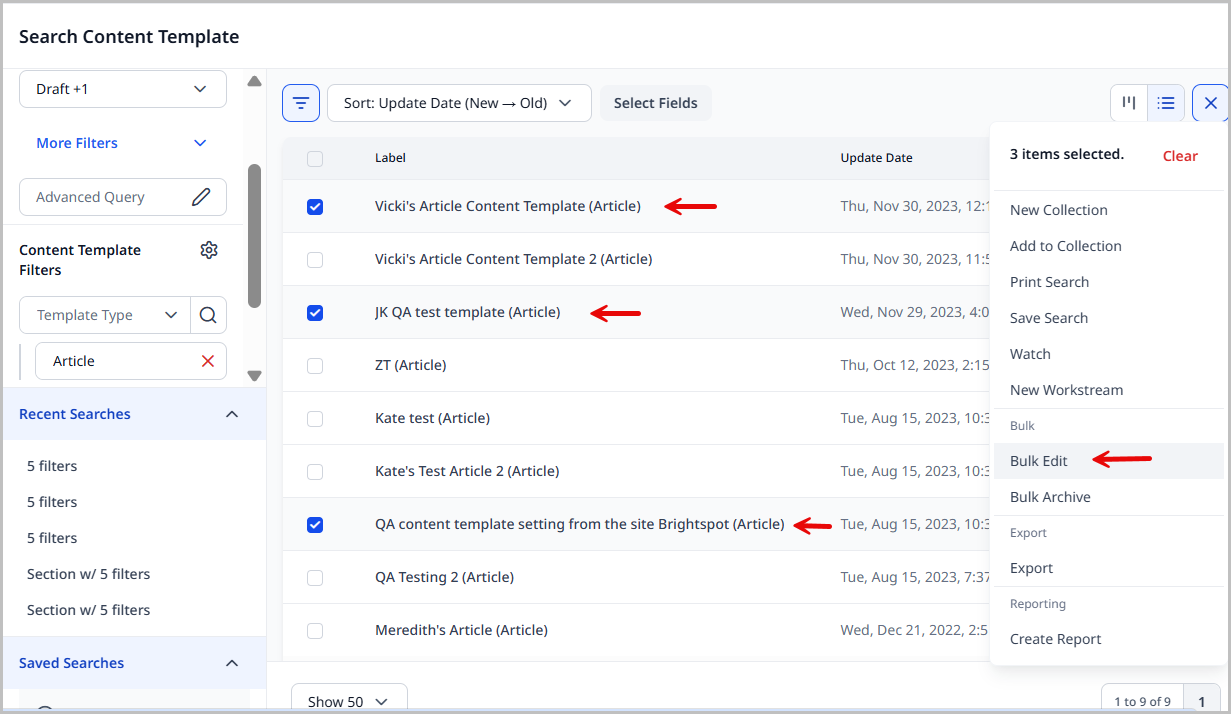
Bulk editing content templates
If multiple content templates exist for the same content type (such as article), you can bulk edit these content templates at one time.
To bulk edit multiple content templates:
- Click > Admin > Content Templates.
-
Click in the Content Templates widget in the left navigation bar to open the content templates search panel.
You can use the search filters to pare down the list to only those content templates you are looking for.
-
Expand Template Type, in the Content Template Filters area, and select the content type associated with the content templates you want to edit.
noteYou must select a Template Type or you will not have the bulk edit options available for your selected content templates.
-
Select the content templates you want to edit.
-
Click in the upper-right corner of the search panel and select Bulk Edit.
-
From the Bulk Edit pop-up, make any changes needed to the content templates selected. The fields available to change are based on the Template Type you chose.
warningPlease note that any changes you make on the Bulk Edit pop-up will affect all of the content templates you selected on the search panel.
In the image below, you can see three content templates had their sites replaced to all be available only on the
Brightspotsite, and these content templates have been made the default content template for articles on that site. -
Click Bulk Save.
The Bulk Edit Status pop-up shows the results of your edits. If any failures occur, they are noted in this pop-up.
Tutorial: Setting site-level and user-level content templates
Introduction
You want to streamline the work for your editorial team, which consists of writers and one photographer. To save time for your writing team, you want to create a new content type for them called Story that has fields relevant to their use case, like a headline, a subheadline, a lead, a body field, and a tag field.
You then want to set up a site-level content template for the headline field that autopopulates with Feature Review: and one for the subheadline field that autopopulates with TL;DR:; however, you also want to streamline the operations for your photographer, so you set up a user-level content template for them for the out-of-the-box Image content type, specifically for the caption field, that says In this image:. This helps you enforce your style guidelines while also speeding up the photographer's work since a field is partially filled out for them.
Assumptions
- You have access to the Admin area in Brightspot .
- You have the
Imagecontent type available in your environment.
1. Create the Story content type
Create an editorial content type called Story for your team of writers. You will add a number of fields to it that your writers can use to meet your requirements.
- Click > Admin > Content Types.
-
In the Name field, enter
Storyas a name for this content type. -
From the Sites list, select All Sites.
-
In the Icon field, enter
mono_stories. This value corresponds with an icon in Google's material icon library and automatically pulls it into Brightspot. -
Under Items, do the following:
-
Click and select Text Field.
- Under Name, enter
Headline. - Under the Advanced cluster, toggle on Required.
- Under Name, enter
-
Click and select Text Field.
- Under Name, enter
Subheadline.
- Under Name, enter
-
Click and select Reference Field.
- Under Name, enter
Lead. - Under Types, select Image.
- Under Name, enter
-
Click and select Rich Text Field.
- Under Name, enter
Body.
- Under Name, enter
-
Click and select Reference Field.
- Under Name, enter
Tag. - Under Types, enter Tag.
- Under Name, enter
-
-
Click Save.
You have now created a content type called Story that your writers can use to create content. In the next step, you will create and apply a content template to it to save them time.
2. Create a site-level content template for the Story content type
Now that you have created the Story content type, you want to save editors additional time by creating a site-wide content template for it.
- Click > Admin > Content Templates.
-
In the Name field, enter
Story Template. -
Under Sites, click .
-
From the Sites list, select All Sites. This means that the template is applied to all sites within Brightspot.
-
Enter a description of this template in the Description field, such as the purpose of the template or when to use it.
-
From the Template list, select Story to apply the content template to the content type you created in step 1 of this tutorial. Brightspot then lists the fields you created for the content type.
-
Enter text that autopopulates the content edit page as follows:
- Headline:
Feature review: - Subheadline:
TL;DR:
- Headline:
-
Click Save.
You have now created a site-level content template called Story Template that your writers can use to create content. In the next step, you will verify that applying the Story Template content template autopopulates the content within the Story content type.
3. Verify that Story Template is working properly
Now that you have created the Story content type and the Story Template content template, you will verify whether it is working properly.
- In the header, click .
- From the Create list, select Story.
- Verify that the text in the Headline and Subheadline fields are autopopulated.
Now that you have verified that the content template is working, the next step is to create a content template for an existing content type that you will associate to an individual user.
4. Create a content template for the Image content type
Now that you have verified whether the Story content template is working properly, you will create a content template for the Image content type that your photographer can use. Since the Image content type is available out-of-the-box, you do not need to create it.
- Click > Admin > Content Templates.
- In the Name field, enter
Image Template. - Under Sites, click .
- From the Sites list, select All Sites. This means that the template is applied to all sites within Brightspot.
- Enter a description of this template in the Description field, such as the purpose of the template or when to use it.
- From the Template list, select
Image. Brightspot then lists the fields for the content type. - In the Caption field, type
In this image:. - Click Save.
Now that you have created an image template, you are going to use this template by applying it to your photographer user; however, first, you must create the photographer user.
5. Create a photographer user
Now that you have created an Image Template template, create a photographer user so that you can apply the template to your photographer.
- Click > Admin > Users & Roles.
- In the Users widget, click New Tool User.
- In the Name field, enter
Photographer User.
Now you can assign Image Template to the newly created photographer user.
6. Assign Image Template to the photographer user
- Click > Admin > Users & Roles.
- Under Users, select the user to whom you want to assign the content template.
- Expand CMS > Content Templates.
- Under Content Templates, click .
- From the Content Template list, select
Image Template. - Click Save.
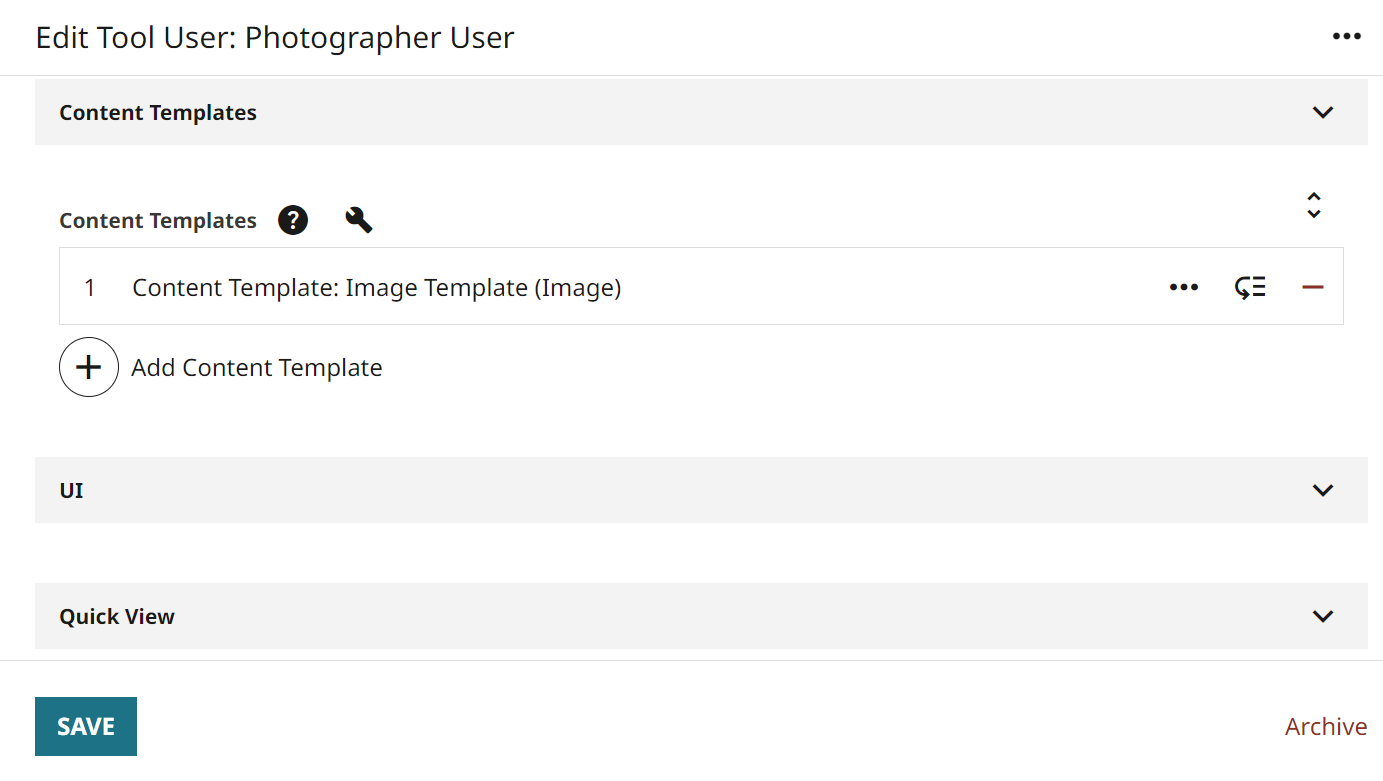
Referring to the previous image—
- The content template
Image Templateis applied to thePhotographer User.
You have now associated Image Template to your photographer. In the next step, you will verify that Brightspot is properly applying the template to the user.
7. Verify that Image Template is working properly
Now that you have applied Image Template to the photographer user, you can verify whether Image Template is working properly.
-
Impersonate the photographer user by doing the following:
- Click > Admin > Users & Roles.
- Search for and open the photographer user you created in step 5.
- Click > Impersonate This Tool User. Brightspot navigates you to the dashboard as the impersonated user.
-
In the header, click .
-
From the Create list, select Image.
-
Verify that the text in the Caption field value is autopopulated with
In this image:.
You now have verified that Image Template is being properly applied at a user level for the photographer user; however, you must now verify that the template is not being applied to the Image content type for anyone else.
- In the banner at the top of the screen, click Stop Impersonating. Brightspot navigates you to the dashboard as the user you are signed in as.
- In the header, click .
- From the Create list, select Image.
- Verify that the text in the Caption field value is not autopopulated with
In this image:
You now have verified that Image Template is being properly applied at a user level for the photographer user, but not for any other user.
Conclusion
As a result of this tutorial, you now have a new content type called Story that will serve your writers and expedite their work since a content template that partially fills in two fields for them has been applied. Additionally, you have expedited the work of your photographer user since a content template that partially fills in one field for the Image content type has been individually applied to them. You have verified that this template applies only to the photographer's instance of the Image content edit page, and as such, you can enforce your style for the photographer, but not limit other users who may also need to create images.