Calendars
You can integrate with popular calendar providers to reduce context switching when creating content in Brightspot CMS.

Brightspot offers two calendar integrations:
- Google Calendar
- Microsoft Outlook Calendar
Once configured, you can import existing calendars, and Brightspot will keep them in sync and display them on the dashboard.
See the topics in this section for more details on the configuration process.
Google Calendar
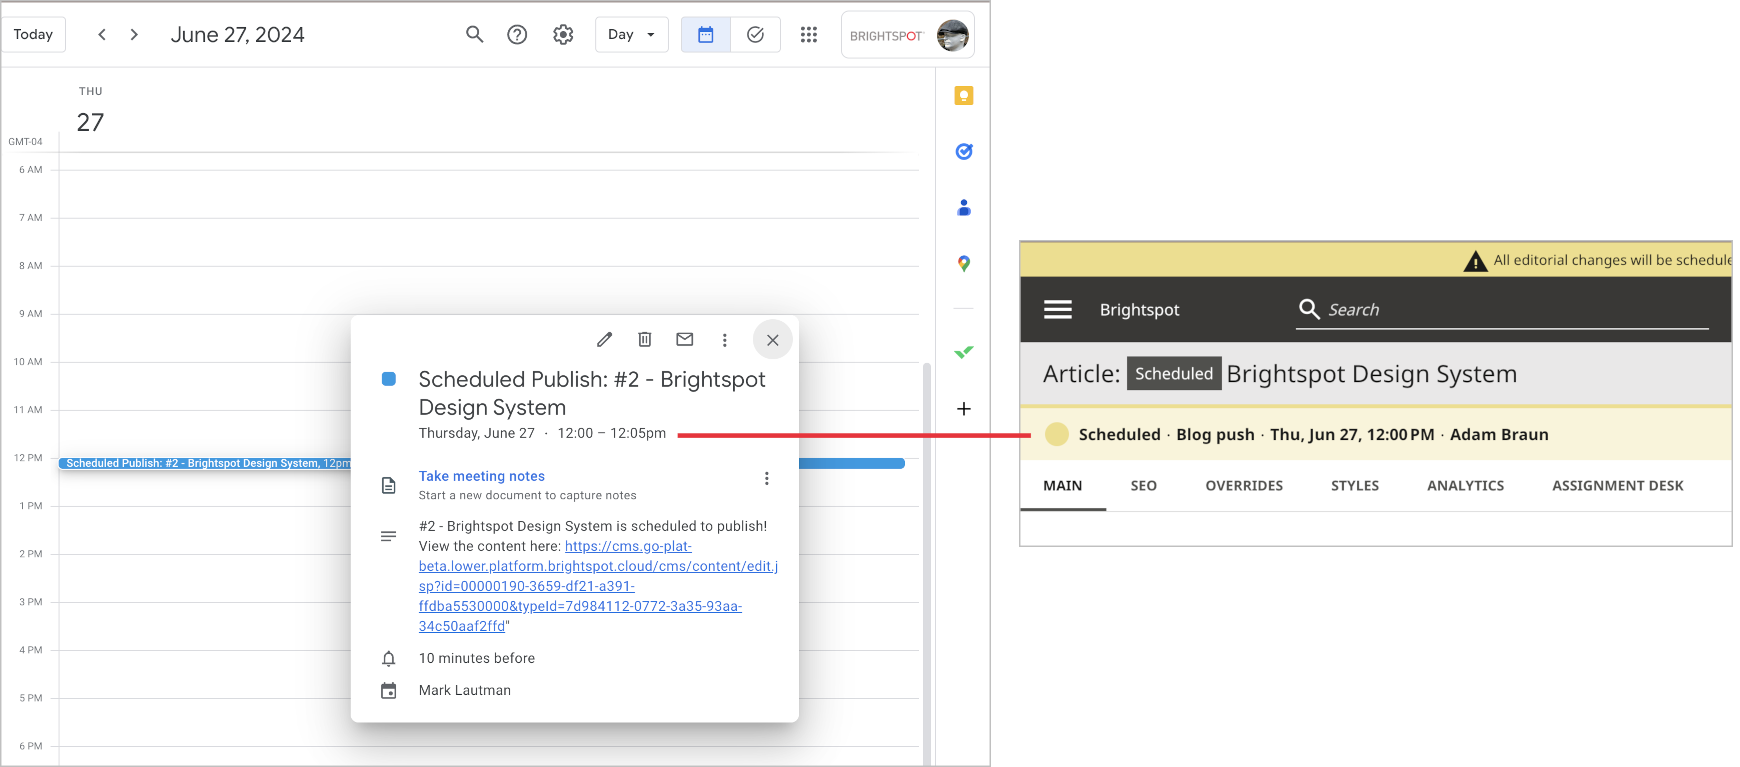
With the Google Calendar integration, you can synchronize your Brightspot calendar with your Google Calendar. When the integration is active, the following appear in your Google Calendar:
- Drafts scheduled for publication, either individually or as part of a bulk schedule.
- Assignments with due dates.
This section describes how to configure the integration in Brightspot, and how to make the corresponding settings in your Google console.
The integration requires an account with Google.
Including Google Calendar in a build
The following table lists the dependencies to include in your build configuration.
| Artifact | Description |
|---|---|
:calendar-external | Exposes functionality related to external calendars, such as synchronizing events and creating external events based on notifications. |
:calendar-google | Exposes an implementation of the ExternalCalendar interface to integrate event distribution, endpoint listening, and event updates with Google Calendar. |
Runtime prerequisites
- Ops configuration—In the Google Cloud console, configure a project and associated OAuth consent, credentials, and the Google Calendar API. For details, see Authenticate by using API keys.
- CMS configuration—Configure the site interfacing with Google Calendar. For details, see Configuring the Google Calendar synchronization.
See also:
Configuring Google Calendar
You configure the integration with Google Calendar at the Global level.
To configure the Google Calendar integration:
-
In your Google Cloud console, obtain your client ID and client secret from the required project's credentials.
- Click > Admin > Sites & Settings > Sites > Global.
-
Expand Integrations > Google Calendar.
-
From the Calendar Service list, select Create New.
-
In the New Google Service form, do the following:
- In the Internal Name field, enter an internal name. Brightspot uses this name in selection fields.
- In the Client ID and Client secret fields, paste the values from step 1.
-
Click Save.
-
Click Back.
-
From the Calendar Service list, select the calendar service you created.
-
Click Save.
Configuring external calendar processing
Configuring the low-level processing of external calendar synchronization requires identifying the task host and the frequency of synchronization.
To configure calendar processing:
- Click > Admin > Sites & Settings > Sites > Global.
- Expand CMS > Calendars.
- In the Task Host field, enter the host name or IP address of the host running the synchronization. If blank, Brightspot uses the default task host configured in Global site settings.
- In the External Calendar Sync Frequency field, enter the interval in minutes after which Brightspot synchronizes with the external calendars, or leave blank to use the default of one minute.
- Click Save.
Authenticating with Google Calendar
You can import multiple Google Calendars into Brightspot from your Google account. Before importing a calendar, you must first authenticate with your Google account.
To authenticate with Google Calendar:
- In the header, click your username > Profile.
- Expand Main > Google Calendar.
- Under Calendar Access, click Click here to authorize with Google Calendar.
Once connected, you can import calendars from your Google account and synchronize them with future events in Brightspot.
Importing a Google Calendar
You can import a Google Calendar into Brightspot. After importing, you can perform the following actions:
- Synchronize between Brightspot and the imported Google Calendar.
- Share your imported calendar with other Brightspot editors.
Before importing a calendar from your Google account, you must first have authenticated your Brightspot account with Google. For details, see Authenticating with Google Calendar.
Consider creating a dedicated calendar in your Google account with a name similar to Synchronized with Brightspot. When you import this calendar, all the events synchronized from Brightspot are easier to filter and manage within your Google account. For more information, see Create a new calendar.
To import a Google Calendar:
- Click > Admin > Calendars.
-
From the External Calendar Importer list, select Google Calendar.
-
From the Calendar list, select the calendar you want to import.
-
Under User Access, select one of the following options:
- All Users—The Google Calendar is accessible to all Brightspot users.
- Import User—The Google Calendar is accessible only to you, the user who imports the calendar.
- Some Users—The Google Calendar is accessible only to the users or roles you select in the Users or Roles field.
-
Click Import.
Brightspot imports the calendar and displays it in a content edit form.
Configuring the Google Calendar synchronization
You can configure the synchronization between Brightspot and Google Calendars using combinations of sites, future events, and content types. For example, the following combinations in Brightspot can be synchronized with a Google Calendar:
- Scheduling drafts of articles on a Blog site.
- Creating new assignments on a User Conference site.
To configure a Google Calendar synchronization:
- Click > Admin > Sites & Settings.
-
In the Sites widget, select the site for which you want to configure this setting.
-
Under CMS > Calendar > External Calendar Distributions, click Add.

-
Select the type of future event you want to synchronize.
-
Under Distributors, click Add Google Calendar.
-
In the Google Calendar widget, do the following:
- From the Calendar field, select one of the imported Google Calendars.
- (For scheduled drafts only) From the Types field, select the required content types, or leave blank to synchronize all content types.
-
Click Save.
Opening a Google Calendar
The following procedure describes how to search for and open an imported Google Calendar. After you open the calendar, you can share it, manually synchronize it, and otherwise manage it.
To search for and open a Google Calendar:
- Click > Admin > Calendars.
- In the search bar in the left rail, search for the desired Google Calendar.
- Click the label of the Google Calendar you want to manage.
See also:
- Sharing a Google Calendar
- Manually synchronizing an imported Google Calendar
- Disabling automatic synchronization for an imported Google Calendar
- Deleting an imported Google Calendar
Sharing a Google Calendar
When you share a Google Calendar, the associated users make updates to those calendars. For example, Adam shares his Google Calendar with Olivia. When Olivia creates or modifies events, they are reflected on Adam's Google Calendar.
To share a Google Calendar:
-
Search for and open the calendar as described in Opening a Google Calendar.
-
Click > Edit User Access.
-
Under User Access, select one of the following options:
- All Users—The Google Calendar is accessible to all Brightspot users.
- Import User—The Google Calendar is accessible only to you, the user who imports the calendar.
- Some Users—The Google Calendar is accessible only to the users or roles you select in the Users or Roles field.
-
Click Save.
Manually synchronizing an imported Google Calendar
Your Brightspot administrator configures the time interval between automatic synchronizations with imported Google Calendars. You can also manually synchronize with your Google Calendar as needed.
To manually synchronize an imported Google Calendar:
- Search for and open the calendar as described in Opening a Google Calendar.
- Click > Sync Calendar.
- In the confirmation message, click Sync Now.
See also:
Disabling automatic synchronization for an imported Google Calendar
Brightspot automatically synchronizes your imported Google Calendars at an interval configured by your administrator. You can turn off the automatic synchronization for a specific Google Calendar.
To disable automatic synchronization for an imported Google Calendar:
- Search for and open the calendar as described in Opening a Google Calendar.
- Click > Disable Auto-Sync.
See also:
Deleting an imported Google Calendar
You can delete a Google Calendar imported into Brightspot. When you delete a calendar, the following occurs:
- The calendar itself is no longer available within Brightspot.
- Any synchronizations you configured (as described in Configuring the Google Calendar synchronization) are deleted.
Deleting a Google Calendar does not delete the following:
- Events already synchronized with the calendar; those events remain in the calendar.
- Delete the Google Calendar itself.
To delete an imported Google Calendar:
- Search for and open the calendar as described in Opening a Google Calendar.
- In the lower right-hand corner, click Delete Permanently.
- In the confirmation prompt, click OK.
See also:
Outlook Calendar
If you have Apache Auth enabled for the Brightspot environment in which you are integrating with Outlook, then you may encounter errors. Please disable Apache Auth in order to proceed with configuration and then usage of this integration.
With the Outlook Calendar integration, you can synchronize your Brightspot calendar with your Microsoft Outlook Calendar. When the integration is active, the following appear in your Outlook Calendar:
- Drafts scheduled for publication, either individually or as part of a bulk schedule.
- Assignments with due dates.
This section describes how to configure the integration in Brightspot, and how to make the corresponding settings in your Azure console.
The integration requires an account with Microsoft Outlook.
Overview of the configuration process
To configure the Outlook Calendar integration, you take the following steps:
- Configure the integration at the Global level. For details, see Configuring Outlook Calendar.
- In your profile, authenticate with Microsoft Outlook. For details, see Authenticating with Outlook Calendar.
- Import an Outlook Calendar. For details, see Importing an Outlook Calendar.
- Ensure that Microsoft Outlook and Brightspot are synchronized. For details, see Configuring the Microsoft Outlook synchronization.
- If needed, manage the Outlook Calendar or make changes to its settings. For details, see Managing an Outlook Calendar.
- View the Outlook Calendar on your dashboard. For details, see Viewing events synchronized with imported calendars.
- If desired, change the background color of your Outlook Calendar. For details, see Customizing a calendar's background.
Including Outlook Calendar in a build
The following table lists the dependencies to include in your build configuration.
| Artifact | Description |
|---|---|
:calendar-external | Exposes functionality related to external calendars, such as synchronizing events and creating external events based on notifications. |
:calendar-outlook | Exposes an implementation of the ExternalCalendar interface to integrate event distribution, endpoint listening, and event updates with Outlook Calendar. |
Runtime prerequisites
- Ops configuration—In the Azure console, configure a project and associated OAuth consent, credentials, and the Outlook Calendar API. For details, see Microsoft Graph authentication and authorization overview.
- CMS configuration—Configure the site interfacing with Outlook Calendar. For details, see Configuring the Microsoft Outlook synchronization.
See also:
Configuring Outlook Calendar
You configure the integration with Outlook Calendar at the Global level.
To configure the Outlook Calendar integration:
- Click > Admin > Sites & Settings > Sites > Global.
- Expand Integrations > Outlook Calendar.
- From the Microsoft App list, select an existing Microsoft app or create a new one. For details on how to create a Microsoft app for use in Brightspot, refer to Adding a Microsoft app.
- In the Notification Tool URL Prefix, add the URL Brightspot uses to receive notifications from Outlook, or leave blank to use the URL configured in Edit Global > Main > Default Tool URL.
- Expand CMS > Calendar.
- In the Task Host field, enter the task host running the synchronization job between the calendar and Brightspot.
- (Optional) In the External Calendar Sync Frequency field, enter the interval in minutes after which Brightspot synchronizes with the external calendars, or leave blank to use the default of one minute.
- Click Save.
Authenticating with Outlook Calendar
You can import multiple Outlook Calendars into Brightspot from your Microsoft account. Before importing a calendar, you must first authenticate with your Microsoft account.
To authenticate with Outlook Calendar:
- In the header, click your username > Profile.
- Expand Main > Outlook Calendar.
- Under Calendar Account, click Sign in with Microsoft.
Do not click Save after authenticating with Microsoft. Instead, navigate back to the dashboard before proceeding with configuration.
Once connected, you can import calendars from your Microsoft account and synchronize them with future events in Brightspot.
Importing an Outlook Calendar
You can import an Outlook Calendar into Brightspot. After importing, you can perform the following actions:
- Synchronize between Brightspot and the imported Outlook Calendar.
- Share your imported calendar with other Brightspot editors.
Before importing a calendar from your Microsoft account, you must first have authenticated your Brightspot account with Microsoft. For details, see Authenticating with Outlook Calendar.
Consider creating a dedicated calendar in your Microsoft account with a name similar to Synchronized with Brightspot. When you import this calendar, all the events synchronized from Brightspot are easier to filter and manage within your Microsoft account. For more information, see Get started with the Outlook Calendar.
To import an Outlook Calendar:
- Click > Admin > Calendars.
-
From the External Calendar Importer list, select Outlook Calendar.
-
From the Calendar list, select the calendar you want to import.
-
Under User Access, select one of the following options:
- All Users—The Outlook Calendar is accessible to all Brightspot users.
- Import User—The Outlook Calendar is accessible only to you, the user who imports the calendar.
- Some Users—The Outlook Calendar is accessible only to the users or roles you select in the Users or Roles field.
-
Click Import.
Brightspot imports the calendar and displays it on a content edit page.
Configuring the Microsoft Outlook synchronization
You can configure the synchronization between Brightspot and Microsoft Outlook using combinations of sites, future events, and content types. For example, the following combinations in Brightspot can be synchronized with an Outlook Calendar:
- Scheduling drafts of articles on a Blog site.
To configure an Outlook Calendar synchronization:
- Click > Admin > Sites & Settings.
-
In the Sites widget, select the site for which you want to configure this setting.
-
Under CMS > Calendar > External Calendar Distributions, click Add, then select Scheduled Drafts.
-
Select the type of future event you want to synchronize.
-
Under Distributors, click Add, then select Outlook Calendar.
-
In the Outlook Calendar widget, do the following:
- From the Calendar field, select one of the imported Outlook Calendars.
- From the Types field, select the required content types, or leave blank to synchronize all content types.
-
Click Save.
Managing an Outlook Calendar
The following procedure describes how to search for and open an imported Outlook Calendar. After you open the calendar, you can share, manually synchronize, and otherwise manage it.
To manage an Outlook Calendar:
- Click > Admin > Calendars.
-
In the search bar in the left rail, search for the desired Outlook Calendar.
-
Click the label of the Outlook Calendar you want to manage.
-
Click to open the tools menu, then select one of the following options:
- Disable Auto-Sync—Disables the automatic synchronization between Brightspot and Outlook.
- Edit User Access—Allows you to edit who has access to this Outlook Calendar.
- Sync Calendar—Manually re-syncs the calendar with Outlook.
- History—Lists any revisions that have been made to the Outlook Calendar.
- Add to Collection—Adds the Outlook Calendar to a collection.
- View Watchers—Lists the users who are watching the Outlook Calendar.
- Watch—Adds yourself as a watcher of the Outlook Calendar.
To delete the Outlook Calendar from Brightspot, click Delete Permanently in the lower right corner of the edit page, then in the confirmation prompt, click OK.
Viewing events synchronized with imported calendars
You can view the events synchronized with your imported calendars.
To view synchronized events with imported calendars:
-
In the dashboard, click Calendar.
-
In the upper Editorial Calendar widget, select the calendars whose events you want to view.
-
Select the required layout: single day, week, or month.
-
Use and to page forward and backward in the calendar.
-
Click Today to display the calendar with today's date.
-
Click the event to view its summary.
Customizing a calendar's background
Brightspot displays events in all calendars with the same background color. You can change the background color for a calendar to help you track associated events.
To customize a calendar's background color:
- In the dashboard, click Calendar.
- Click Manage Colors.
- In the Calendar Color Manager widget, select a color for each calendar, or click to use the default color.
- Click Save.