Shopify
Brightspot's integration with Shopify enables you to import products from your Shopify account directly into Brightspot along with pertinent details like price, SKU, and more. Once inside of Brightspot, you can display your products in various ways, and include them in lists that appear on pages or on your assets themselves.

To use the Shopify integration, you take the following steps:
- Create a configuration for the integration.
- Enable the integration.
- Import Shopify products into Brightspot.
Additionally, if you have a Google Analytics account, you can configure product reports for your products, comprised of Google Analytics data. For details, see Configuring product reports for your Shopify products.
Configuration
You can configure the Shopify integration in Brightspot to showcase your products in the same place where you write content to market them. Brightspot's integration with Shopify enables you to import your products from your Shopify account directly into Brightspot along with pertinent details like price, SKU, and more. Once inside of Brightspot, you can display your products in various ways and include them in lists that appear on pages or on your assets themselves.
To configure the Shopify integration:
-
Retrieve your store URL and Shopify access token, API secret key, and store URL from your Shopify account. For details, see Get the API credentials for a custom app.
-
Ensure that a default tool URL is set in > Admin > Global > Default Tool URL.
- From the left navigation, under Admin, click Sites & Settings.
-
Select the site for which you want to configure this integration.
-
Click , located to the left of , and type
Shopify. -
Under Settings, click , then from the list, select Create New.
-
In the Internal Name field, enter an internal name. Brightspot uses this name in selection fields.
-
In the Store URL field, enter the URL for your Shopify store. (For example,
https://brightspot.myshopify.com). -
In the Shopify Access Token field, enter the Shopify access token provided by your Shopify account.
-
In the API Secret Key field, enter the Shopify API secret key provided by your Shopify account.
-
Under Auto Update Settings, do the following:
-
From the list, select Set.
-
Toggle on Enabled to enable automatic updates to your imported Shopify products when changes are made to them in Shopify.
-
Under Auto Update User, select a Brightspot administrator to whom update actions are attributed.
-
Under Subscriptions, click , then do the following:
-
Under Events, select one of the following options:
-
New Products—Automatically imports new products in Shopify to Brightspot. This applies only to products that are created after this event is configured. Any products existing in Shopify before this event is created must still be imported manually. For details, see Importing Shopify products into Brightspot.
-
Product Deletions—Automatically removes imported products from Brightspot if they are deleted in Shopify.
warningIf any products are deleted in Shopify, their imported counterparts in Brightspot are also deleted and will no longer be included in any live promos or lists in which they existed before. Brightspot recommends caution before deleting products in Shopify.
-
Product Updates—Automatically applies any updates made to Shopify products in Shopify to those that have been imported to Brightspot.
-
-
Under Processor, retain Default.
noteOnce subscriptions are configured, the Subscription Statuses field will list the statuses you have configured. This listing may take up to five minutes to update.
-
-
-
Click Save.
For details on how to enable your Shopify integration, see Enabling the Shopify integration for a site.
Enabling the Shopify integration for a site
Once the Shopify integration is configured, you can enable it for your site. Shopify can be enabled at the Global level, thereby applying to all of your sites in Brightspot, or only for specific sites.
To enable the Shopify integration:
- Ensure you have configured the Shopify integration for your site. For details, see Configuring the Shopify integration.
- From the left navigation, under Admin, click Sites & Settings.
- Select the site for which you want to enable this integration.
- Click , located to the left of , and type
Shopify. - Under Settings, click , then select your Shopify integration from the list.
- Click Save.
Importing Shopify products into Brightspot
You can use integrated search to import Shopify products into Brightspot. Once imported, you can choose different presentation options for your products and highlight them on your site's pages or in your site's assets.
The following procedure describes how to import a single product from Shopify. If you want to import multiple products, consider adding them to a collection in Shopify and then importing the collection. For details, see Importing Shopify collections into Brightspot.
To import Shopify products:
- Ensure that your instance of Brightspot has a Shopify integration enabled. For details, see Configuring the Shopify integration.
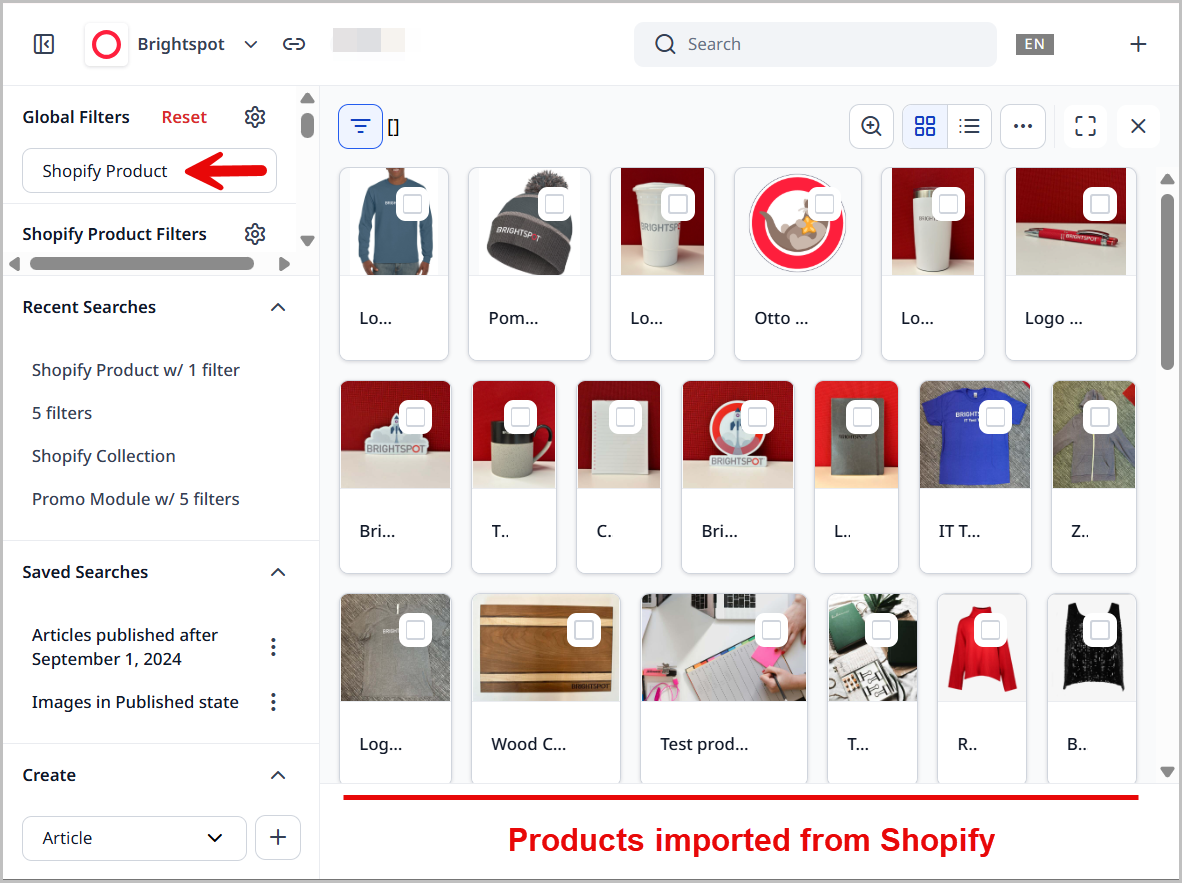
- In the header, click the search field to open the search panel.
- Under Global Filters, from the Any Content Type filter, select Shopify Product. Brightspot displays a list of products associated with the Shopify account configured for the current site.
- Perform an integrated search to import Shopify products. For details, see Performing integrated searches in Brightspot.
- In the search panel, click the product you want to import.
- Click Import.
- Click Publish.
Brightspot imports the metadata listed below for each product. For a better understanding of how the import populates values for products in Brightspot, see Understanding Shopify product imports.
Product
-
Product.id—A globally unique identifier within Shopify. -
Product.title—The title of the product. -
Product.description—Stripped description of the product, single line with HTML tags removed. -
Product.onlineStoreURL—The URL used for viewing the resource on the shop's online store. -
Product.featuredImage—The featured image of the product.Image.url—The location of the image as a URL.Image.altText—A word or phrase to share the nature or contents of an image.id—A unique identifier for the image.Image.shopifyId—A unique ID for the image.
-
Product.media—The media associated with the product. -
Product.updatedAt—The date and time when the product was last modified.
ProductOption
ProductOption.name—The product option's name.ProductOption.values—The corresponding value to the product option name.
ProductVariant
ProductVariant.title—The product variant's title.ProductVariant.selectedOptions—A list of product options applied to the variant.ProductVariant.image—The Image associated with the product variant. This image defaults to the product image if no product variant image is available.ProductVariant.price—The product variant's price.ProductVariant.compareAtPrice—The compare at price of the variant.ProductVariant.quantity—The total sellable quantity of the variant for online sales channels.ProductVariant.sku—The SKU (stock keeping unit) associated with the variant.ProductVariant.barcode—The bar code (for example, ISBN, UPC, or GTIN) associated with the variant.
Understanding Shopify product imports
In Brightspot, you can create products from scratch; however, products are more commonly imported from Shopify. As a result of the import, a variety of metadata pertaining to the products is brought into Brightspot, including:
- The product's details: price, compare-at price, quantity, SKU number, and barcode.
- Any variants of the product, like different size or color variants. The product details described above (price, quantity, etc.) are then distributed to each variant. For example, if your product is a shirt that costs $40, and you create red and black variants, then the $40 price detail is attributed to both variants.
After importing a Shopify product, Brightspot maps these details and variants to the Options field in the content edit form. The contents of this field vary widely depending on how the product is configured in Shopify, but the field typically contains read-only values that you can only change in Shopify. After importing a product, the Options field will be set to one of two values: No Options or Options Available. Refer to the module below for more information.
Options fields (No Options)
If your product in Shopify has details like price, compare-at price, quantity, SKU, or barcode but no variants (like size or color variants), then after an import, the Options field in Brightspot is set to No Options by default. The fields in this selection, described below, are read-only.
| Field | Description |
|---|---|
| Price | Pricing information about the product. |
| Compare At Price | Pricing information for the product or other comparable products as they appear on other online stores. Prices entered into this field are rendered on your site with strike-through formatting. |
| Quantity | Quantity information for the product. |
| SKU | The product's SKU number. |
| Bar Code | The product's bar code number. |
After an import, if the Options field is set to No Options, your content edit form appears in read-only format.
Options fields (Options Available)
If your product in Shopify has details like price, compare-at price, quantity, SKU, or barcode, and also has size, color, or other variants, then after an import, the Options field in Brightspot is set to Options Available by default.
After an import, if the Options field is set to Options Available, your content edit form looks similar to the following:
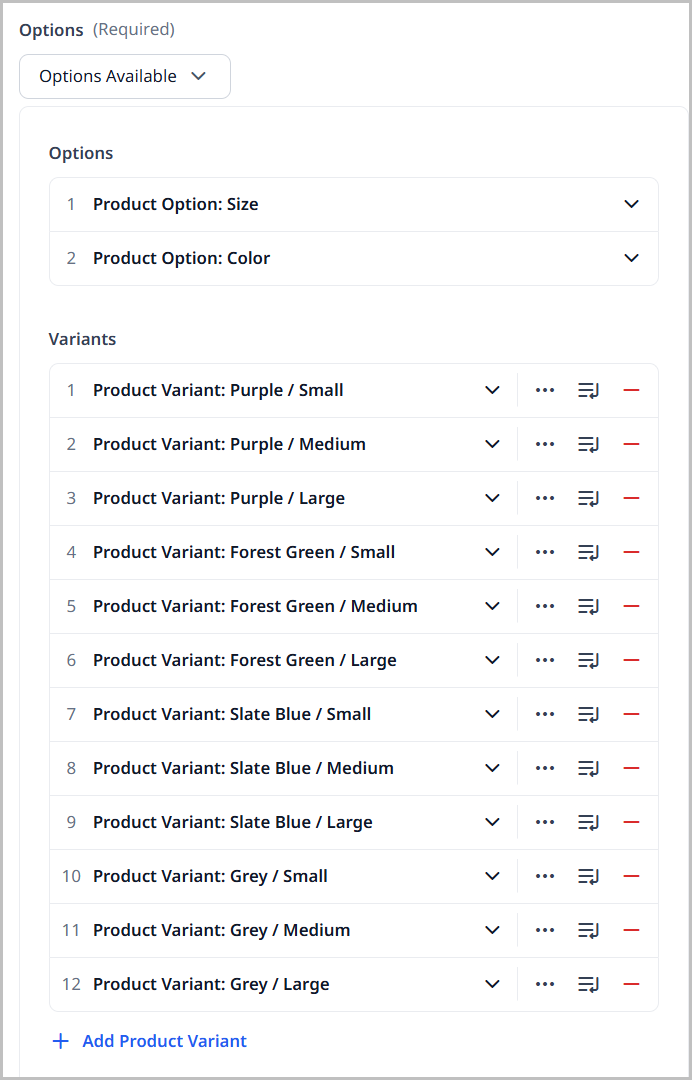
The Options Available selection contains the following fields:
| Field | Description |
|---|---|
| Options | A list of variant types, like size and color. This list does not contain the variants themselves (like Red, Black, Medium, Large), only information about the type of variant. The field itself contains two fields:
|
| Variants | A list of the product's variants. Each item in the list is a combination of the variant types and variants that comprise it. For example, if you added the variant types Size (and variants Medium and Large) and Color (and variants Red and Black), then this Variants field will contain a list of the following four variants:
The variants themselves contain the following fields:
Any product details like price, compare-at price, quantity, SKU, or barcode are distributed to each variant and are read-only; however, you may override the title and image for each variant. |
Importing Shopify collections into Brightspot
You can use integrated search to import Shopify collections into Brightspot. Importing a Shopify collection also imports the underlying products, so this is the preferred method to do a bulk import of products from Shopify.
To import Shopify collections:
- In Shopify, create a collection and add products to it. For details, see Collections.
- In the Brightspot header, click the search field to open the search panel.
- Under Global Filters, from the Any Content Type filter, select Shopify Collection. Brightspot displays a list of collections associated with the Shopify account configured for the current site.
- Perform an integrated search to identify the Shopify collections you want to import. For details, see Performing integrated searches in Brightspot.
- In the search panel, click the collection you want to import. Brightspot displays the collection and its associated products.
- Click Import.
- Click Publish.
Brightspot imports the Shopify collection and associated products.
For information about the metadata Brightspot ingests with each product, see Importing Shopify products into Brightspot.
Understanding the Shopify-Brightspot synchronization
The following logic applies to the Shopify-Brightspot synchronization.
-
Within your Shopify account, every time you add, modify, or delete a product, Shopify sends a transaction message to Brightspot.
-
Every minute, Brightspot ingests the transactions sent from Shopify.
-
For each transaction, the ingestion job does the following:
-
If the transaction was a create, creates the product in Brightspot.
-
If the transaction was a delete, deletes the product from Brightspot.
-
If the transaction was a modify, modifies the product in Brightspot.
- The modifications overwrite any changes you made to the product in Brightspot. For example, you imported a product from Shopify, and in Brightspot, you subsequently modified its title. If you later modify the product's title in Shopify, the updated title is ingested into Brightspot, overwriting the title you changed.
- Archiving a product in Shopify is considered a modification, and the corresponding product in Brightspot is also archived.
-
-
Synchronization applies only to Shopify products, not to Shopify collections.
- If you modify a collection's title in Shopify, the new title does not migrate to Brightspot.
- If you add or remove a product from a Shopify collection, the corresponding collection in Brightspot does not change.
- If you modify a product in Shopify that is part of a collection, the modification does not migrate to Brightspot.
-
The synchronization starts only after you enable it in Brightspot. If you imported 50 products from Shopify, and subsequently enable the synchronization, Brightspot does not check for updates or deletions on the existing 50 products.
Configuring product reports for your Shopify products
You can run analytics reports on your Shopify products in Brightspot. In order to do this, you must first make the connection between Shopify and Google Analytics in your Shopify console. Once that connection is made, you can set the configurations in Brightspot.
In order to configure product reports, your build must include the com.brightspot.go:lib-model-google-analytics-4-product dependency.
To configure product reports:
- In your Shopify console, connect your Shopify account to Google Analytics. For details, see the Shopify documentation.
- From the left navigation, under Admin, click Sites & Settings, then select the Global site.
- Under the Integrations tab, expand the Google Analytics 4 cluster.
- Toggle on Product Report Enabled.
- Under Product Metrics to Display, click Add, then select the metrics. These metrics are displayed in the GA Product Data tab on a product's content edit page. If none are selected, all metrics are displayed.
- Under Product Analytics Timeframe, select an option from the list to customize product analytics dynamic lists, or retain the default of seven days.
- Click Save.
Tutorial: Creating an online store in Brightspot using Shopify products
This tutorial explains how to incorporate Shopify products into an asset. You will be creating a module using Shopify products you import into Brightspot, then adding that module to an asset. You will also modify one of the products in that list, and verify that the change you made appears as intended.
Before starting this tutorial, ensure you have completed the following:
- Integrating your version of Brightspot with Shopify as described in Configuring the Shopify integration and Enabling the Shopify integration for a site.
- All the products you want to include in Brightspot are ready for sale in Shopify.
Step 1: Refresh your Shopify product listing in Brightspot
In this step, you refresh the listing of all your Shopify products within Brightspot.
- Open the search panel.
- From the content-type filter, under External Types, select Shopify Product. Add any other filters as necessary.
Brightspot imports all matching Shopify products.
Step 2: Create a shared product list module
In this step, you create a shared product list module. Using this approach, you have a list of Shopify products that you can add to more than one asset.
-
In the header, click .
-
From the Create list, select Product List Module.
-
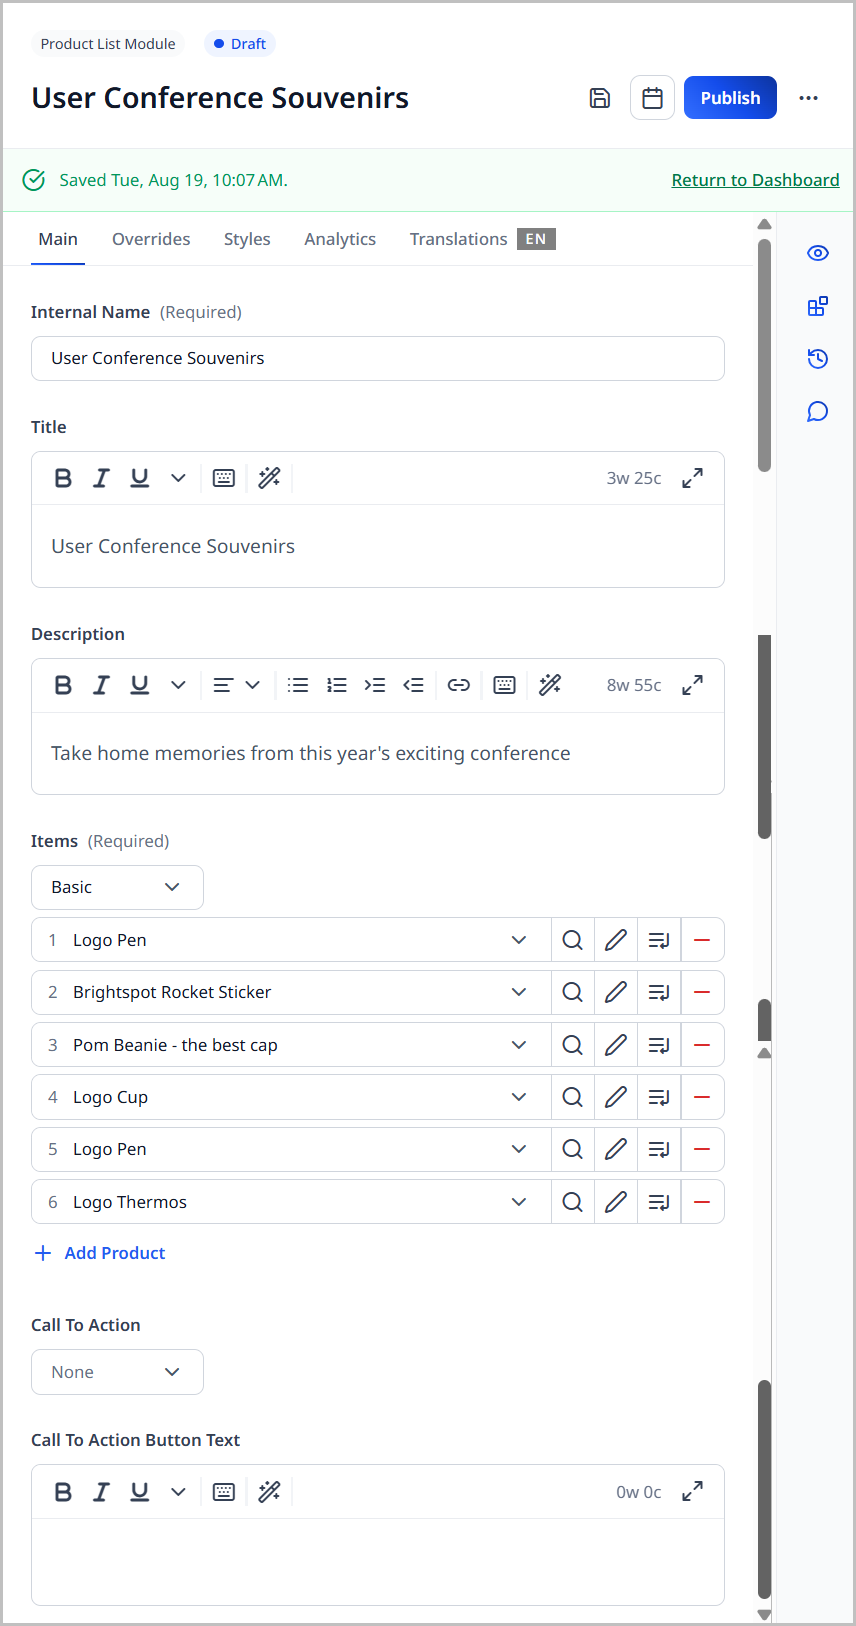
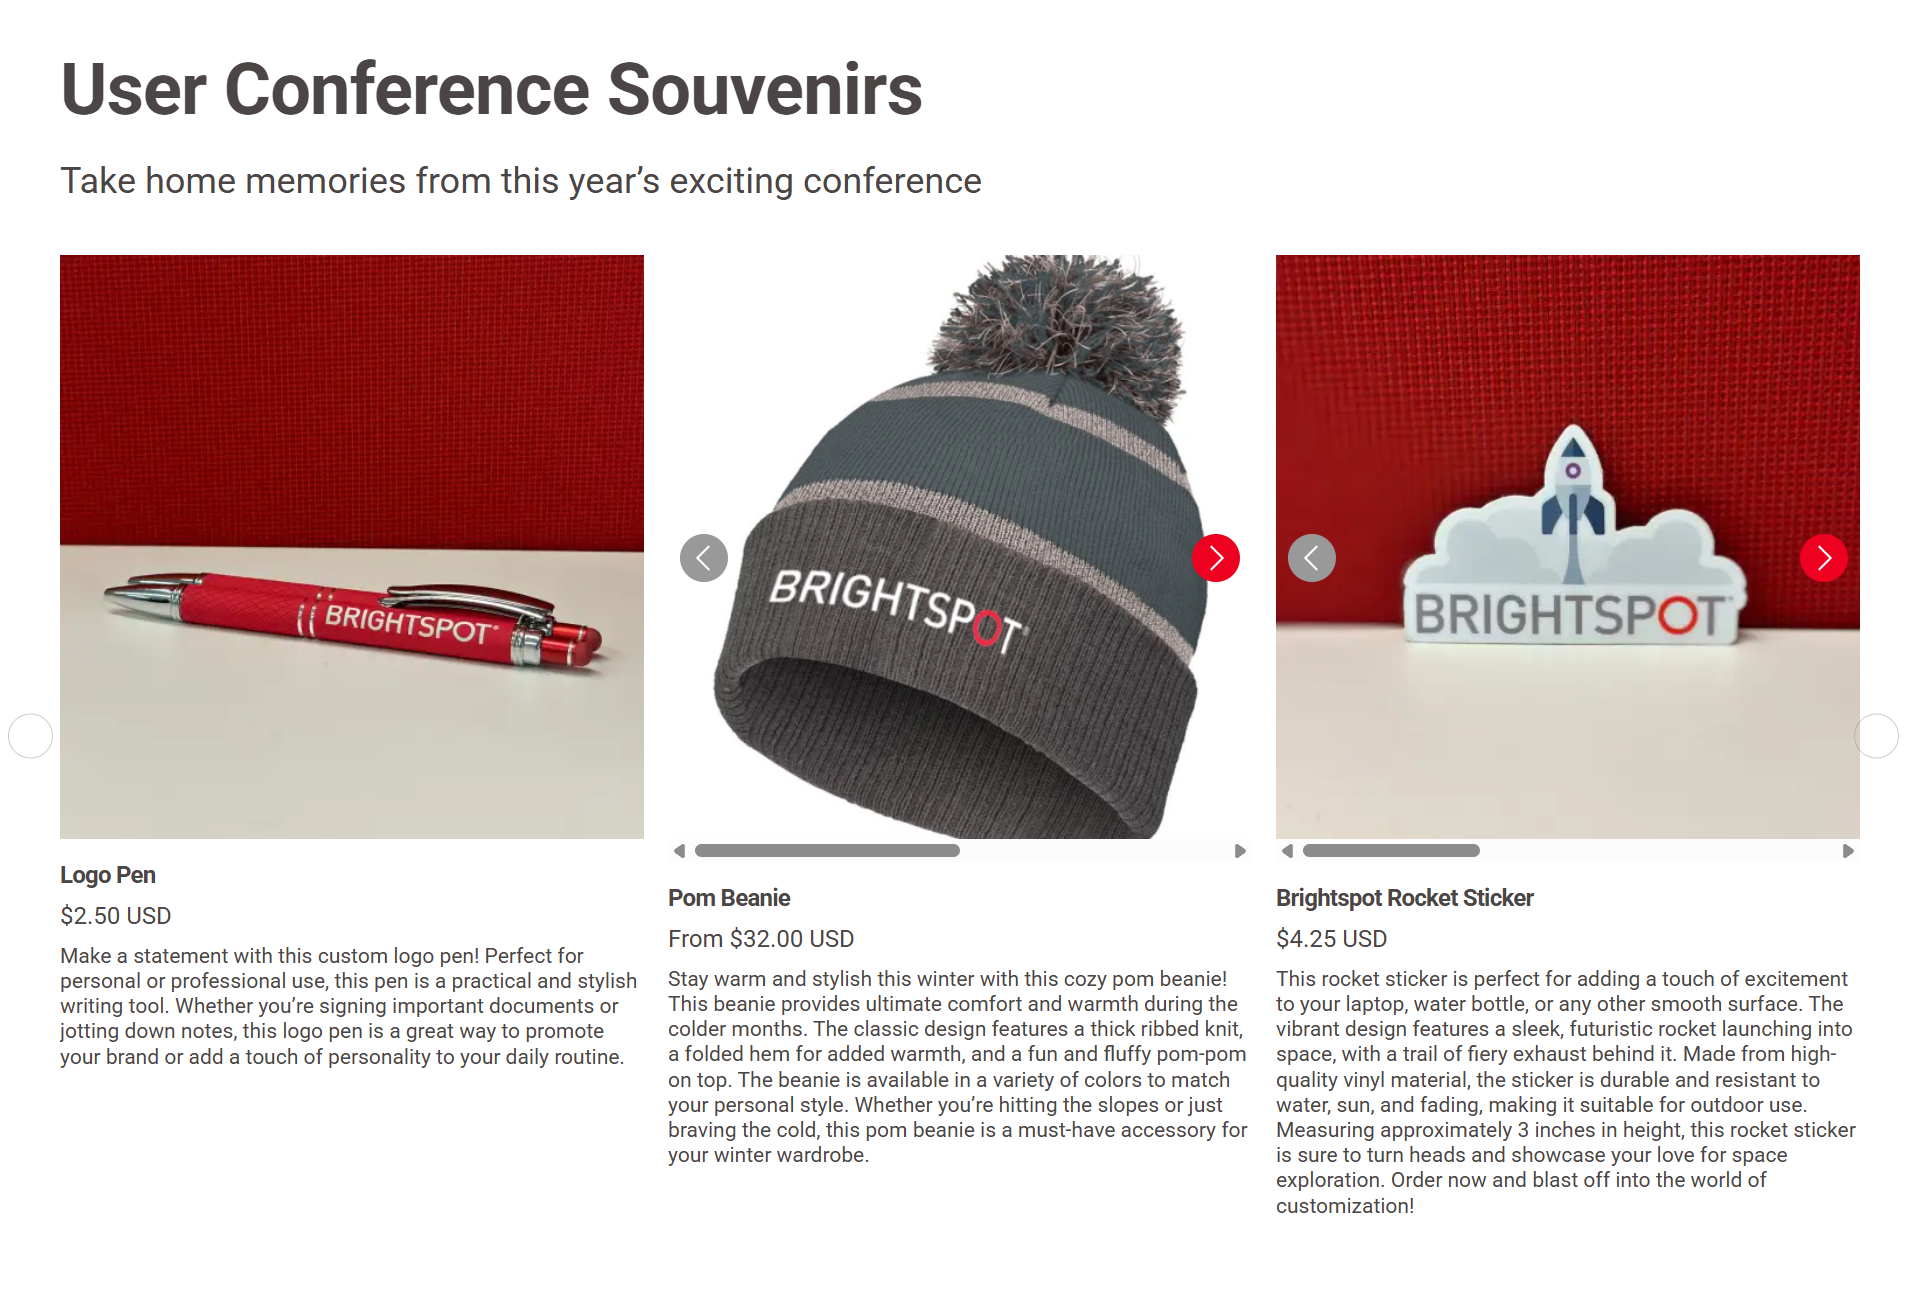
In the Internal Name field, enter
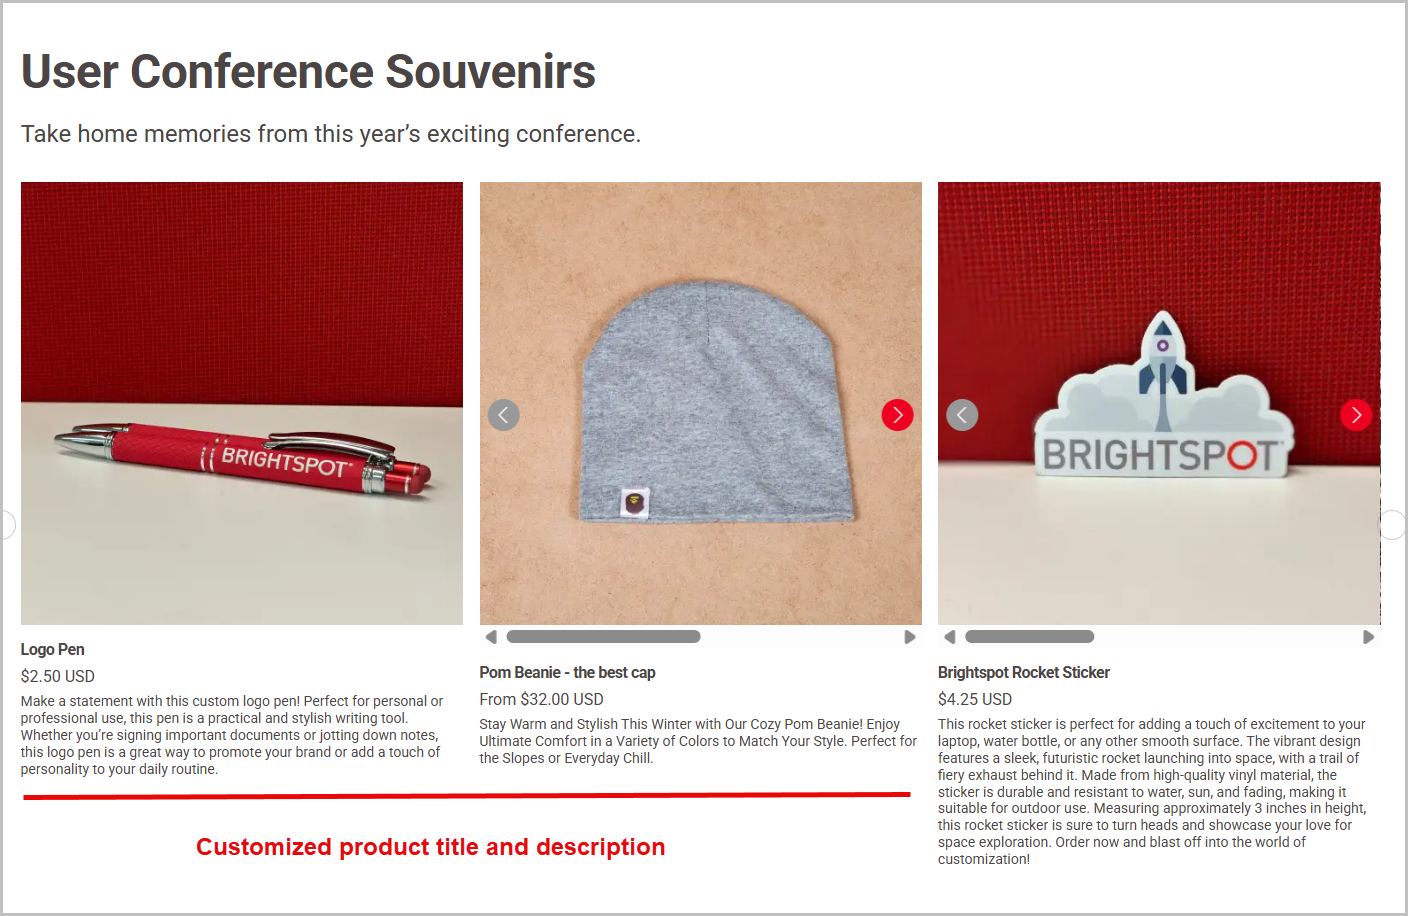
User Conference Souvenirs. You will use this name in "Step 3: Add the shared product list module to a page." -
In the Title field, enter
User Conference Souvenirs. This title appears above the product listing. -
In the Description field, enter
Take home memories from this year's exciting conference.. This description appears above the product listing. -
From the Items list, select Basic.
-
Click .
-
In the field you just added, click .
-
In the content picker, click one or more products you imported from Shopify.
-
Close the content picker. Your content edit form looks similar to the following.
-
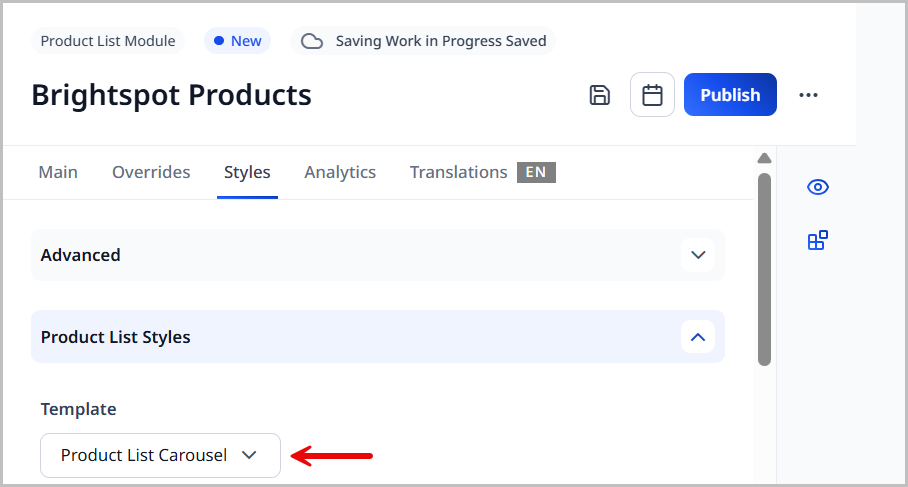
Expand Styles > Product List Styles.
-
From the Template list, select Product List Carousel. (Each template provides a different layout for the products.)
-
Click .
-
Click to view the product list module in the preview pane (and click to view the product list module in a new browser tab).
-
Complete your site's workflow and publish the product list module.
Step 3: Add the shared product list module to a page
In this step, you create a page and add to it the shared product list module from "Step 2: Create a shared product list module."
-
In the header, click .
-
From the Create list, select Page.
-
In the Display Name field, enter
User Conference Closing Session. -
In the Description field, enter
See you again next year!.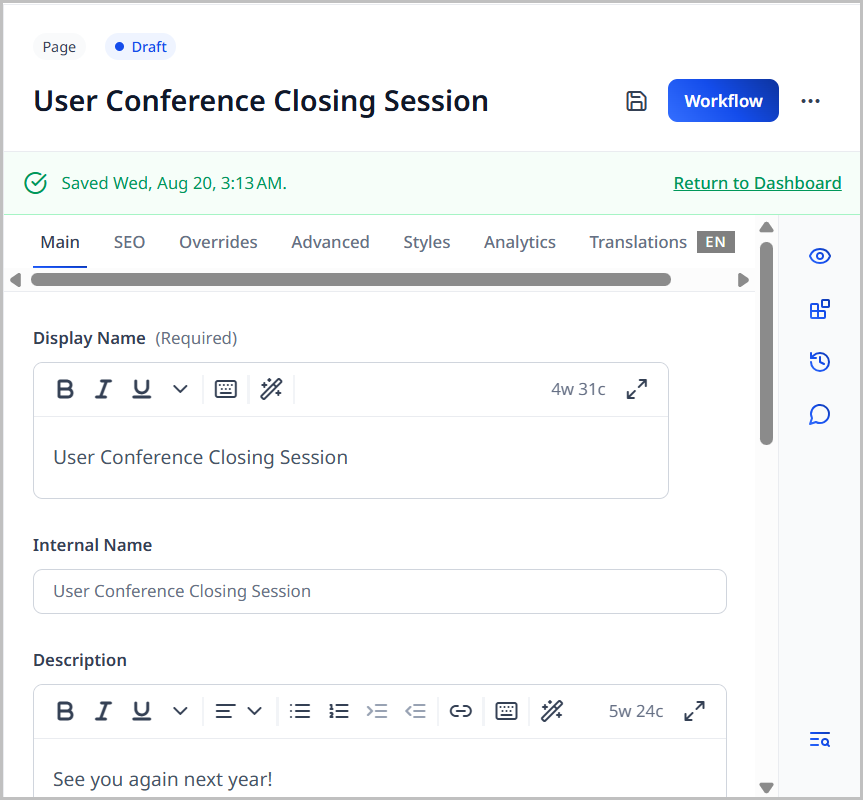
-
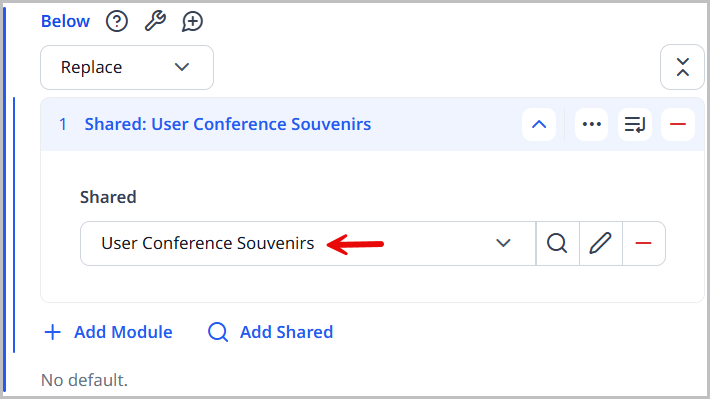
Expand Overrides > Layout Overrides.
-
From the Below list, select Replace.
-
Click .
-
In the module picker, filter by Misc, and select Shared Product List Module.
-
Back on the content edit form, from the Shared list, select User Conference Souvenirs. (This is the internal name of the shared product list module you created in "Step 2: Create a shared product list module.")
-
Click .
-
Click to view the page in the preview pane (and click to view the page in a new browser tab).

-
Complete your site's workflow and publish the asset.
Visitors clicking on a product in the carousel are redirected to the same item in your Shopify store. From there, they can purchase the product.
Step 4: Modify a product's description
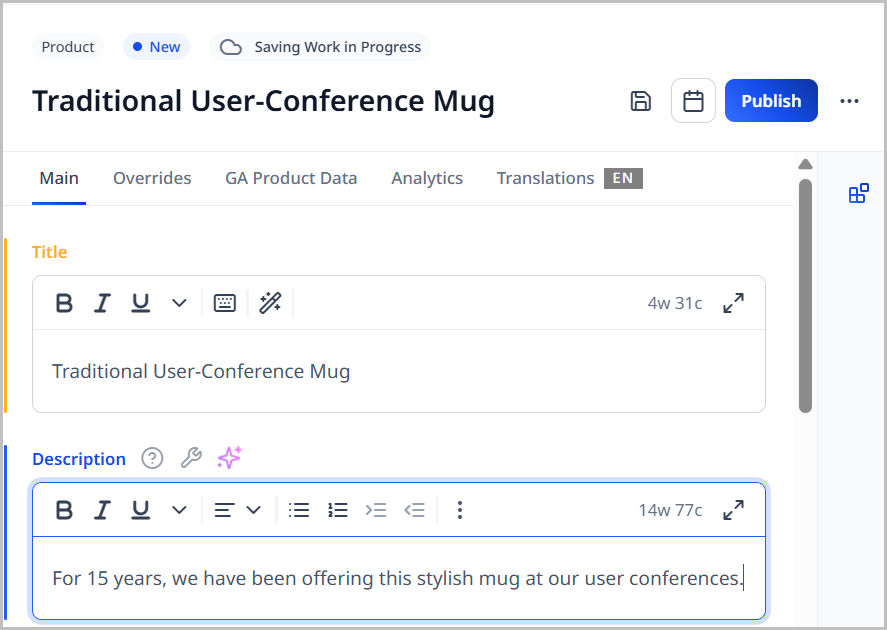
Brightspot imports titles and descriptions from Shopify. Your Shopify descriptions may not match the context of a particular Brightspot asset. For example, you can give visitors who attended a user conference a more personalized description about a product (and increase the chances of a sales conversion). In this step, you customize a product's title and description appearing in the page you created in "Step 3: Add the shared product list module to a page."
-
Open the product listing you created in "Step 2: Create a shared product list module."
-
Under the Items list, click for the product whose title or description you want to customize.
-
In the Title and Description fields, modify the text as appropriate.
-
In the Featured Image field, select a different image as appropriate.
-
From the Options list, select Options Available, and further customize the product offering for this product list module. For details, see Product.
-
Click Publish.
-
Click Back.
-
Click .
-
Click to view the product list module in the preview pane (and click to view the product list module in a new browser tab).
-
Complete your site's workflow and publish the product list module.
-
Refresh the content edit form for the page you created in "Step 3: Add the shared product list module to a page."
-
Click to view the page in the preview pane (and click to view the page in a new browser tab).
The modifications you made in this step apply only to this product list module.
- The modifications are not ingested into Shopify or into any other product list module.
- The modifications appear in any other asset that contains this product list module.
See also: