Authentication and authorization
You may want to expose certain parts of your site to visitors who are logged in. To achieve this, you configure authentication and authorization settings in Brightspot, and then create a login module that you place on a login page for those visitors to log in. This topic explains the order of operations to achieve this result.
At this time, Brightspot offers two third-party authentication providers through which your site visitors can authenticate: Facebook and Google.
To configure authentication and authorization settings:
-
Add a callback endpoint for the provider you choose. For details, see the following two topics.
-
(Facebook only) Add a disconnect endpoint. For details, see the following two topics:
-
Add the provider's app to Brightspot. For details, see the following two topics.
-
Configure the authentication settings. For details, see the following two topics.
-
Once you have configured authentication, configure authorization. For details, see the following topic.
-
Once you have configured authorization, build a login module through which your visitors can authenticate. For details, see the following topic.
-
Build a login page to which you can direct visitors that hosts the login module. For details, see the following topic.
-
(Optional) Add a button to the login page to your site's navigation. For details, see the following topic.
Authentication via Facebook
Adding a Facebook callback endpoint
Before you can configure Facebook authentication settings, you must add a Facebook callback API endpoint.
To add a Facebook callback endpoint:
- Click > Admin > APIs.
- From the Endpoints widget, under the Create list, select Facebook Authentication Callback Endpoint, then click New.
- Retain the default path, which is
/auth/login/facebook. - Click Save.
Once you have created a Facebook callback endpoint, slot it into the Callback Endpoint field when configuring Facebook authentication settings.
Adding a Facebook disconnect endpoint
Before you can configure Facebook authentication settings, you must add a Facebook disconnect API endpoint.
To add a Facebook disconnect endpoint:
- Click > Admin > APIs.
- From the Endpoints widget, under the Create list, select Facebook Authentication Disconnect Endpoint, then click New.
- Retain the default path, which is
/auth/login/facebook/disconnect. - Click Save.
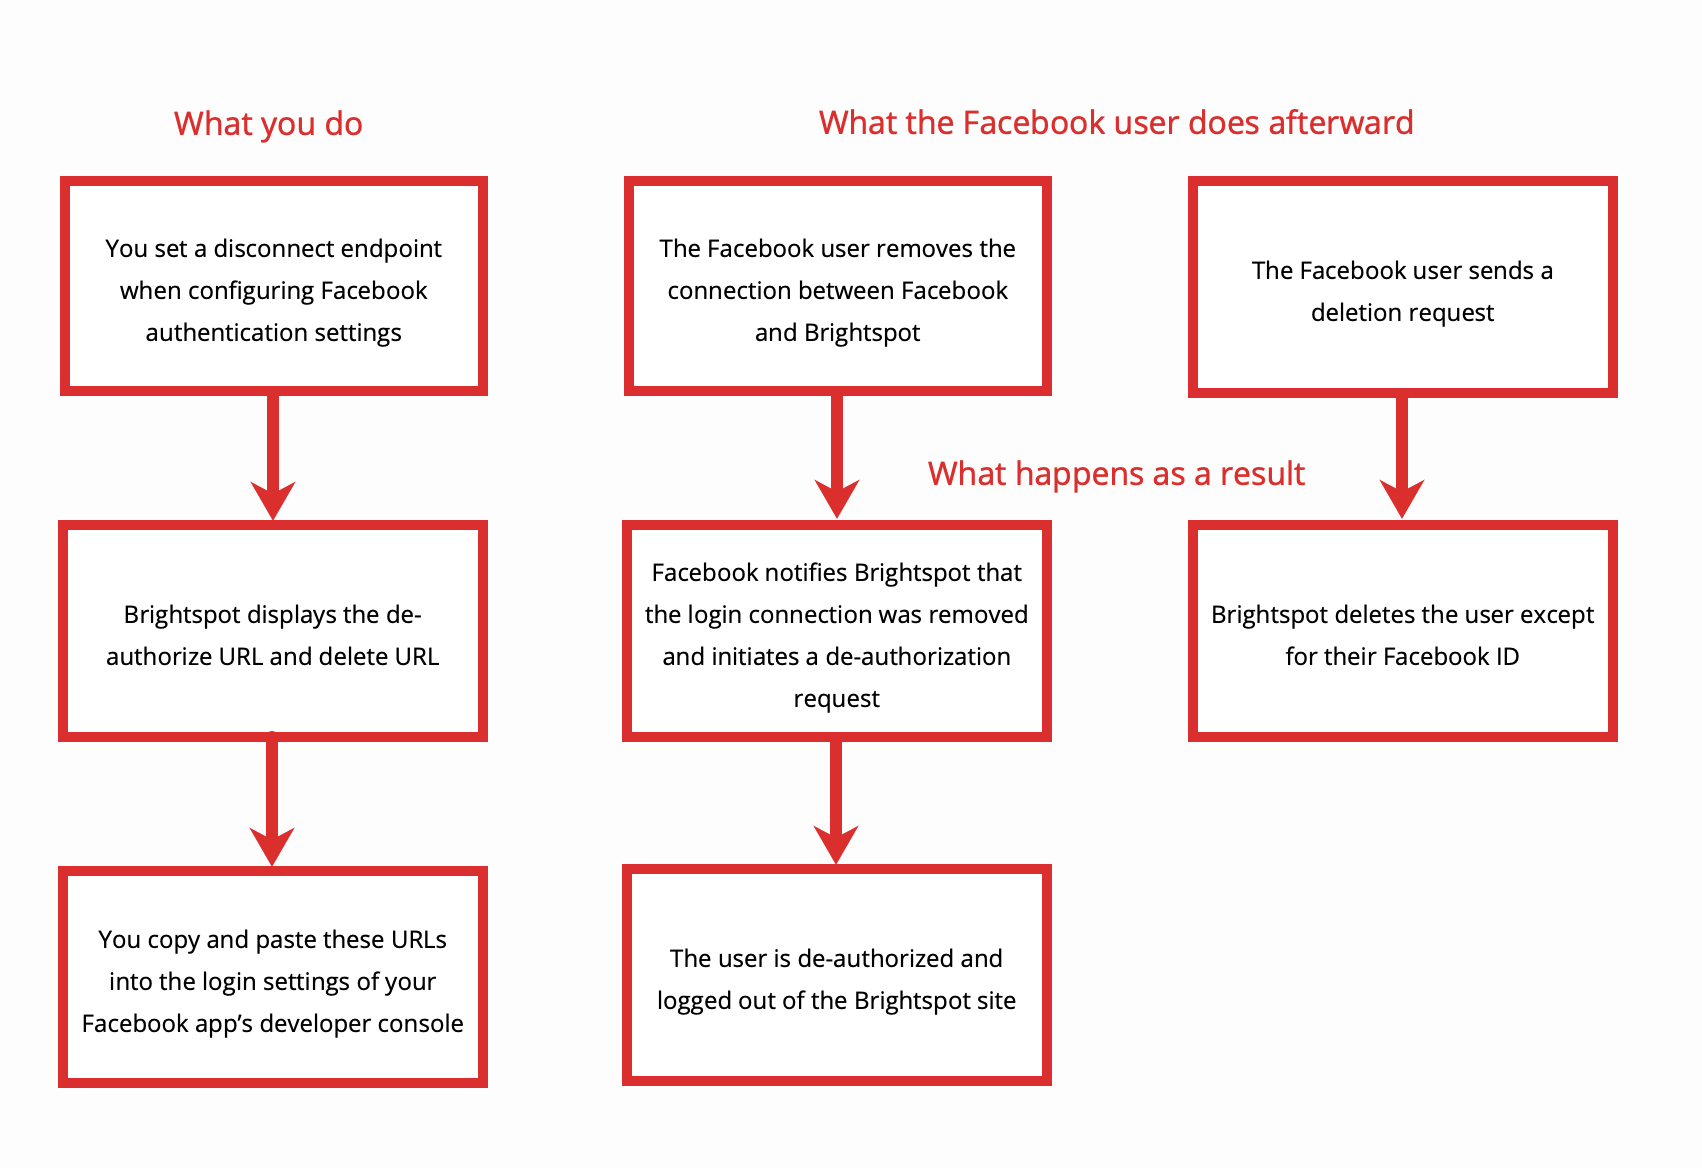
Understanding Facebook authentication record deletion
You can delete Facebook authentication records in Brightspot. The groundwork for this process is laid out when you add a Facebook disconnect endpoint, which is a necessary step of configuring Facebook authentication settings.
Once you slot in the Facebook disconnect endpoint into the Disconnect Endpoint field, Brightspot displays a new note at the top of the content edit page that includes the de-authorize URL and delete URL. Copy and paste these URLs into the login settings in the developer console for your Facebook app.
After this, when a Facebook user removes the connection between their Facebook account and Brightspot, Facebook notifies Brightspot that the login connection was removed, thereby initiating a de-authorization request. This request de-authenticates the user from the front end of your Brightspot site, and the user is logged out. For additional details on how this result is achieved in Facebook, refer to Facebook's documentation on removing apps.
The Facebook user may then additionally send a data deletion request. When this happens, Brightspot deletes all but the Facebook ID of the user who made the request. You can validate this by viewing authentication entities. For details, see Viewing authentication entities.
Creating a Facebook service
Authenticating with Facebook requires creating a Facebook app, then creating a corresponding Facebook service in Brightspot.
To create a Facebook service:
-
Ensure that you have already configured a Facebook app as described in the following steps:
- Navigate to Facebook for Developers > All Apps.
- Navigate to App Settings.
- Set your App Domains to the domains that will be used by the app.
- Copy the App ID and App Secret.
- Click > Social > Services.
-
In the Services widget, click New Facebook Service.
-
Under Name, enter a name for this Facebook service.
-
Under App ID, paste the app ID you copied from Facebook.
-
Under App Secret, paste the app secret you copied from Facebook.
-
Click Save.
Once you have created a Facebook service, slot it into the Facebook Service field when configuring Facebook authentication settings.
Configuring Facebook authentication settings
You can configure Brightspot to allow visitors to authenticate with your site via Facebook. In order to complete this configuration, the following prerequisite steps are required:
- Creating a Facebook app and adding a Facebook Login product (both performed within Facebook's console).
- Adding a Facebook callback endpoint. For details, see Adding a Facebook callback endpoint.
- Adding a Facebook disconnect endpoint. For details, see Adding a Facebook disconnect endpoint.
- Mapping the Facebook app to Brightspot. For details, see Creating a Facebook service.
To configure Facebook authentication settings:
-
Ensure that you have already configured a Facebook app and added the Facebook Login product as described in the following steps.
- Navigate to your Facebook application and click Add Product in the left rail. Add Facebook Login as a product option.
- In Facebook Login settings, ensure Client OAuth Login, Enforce HTTPS, and Use Strict Mode for Redirect URIs are enabled.
- In Valid OAuth Redirect URIs, add the absolute URL for the callback endpoint you set up for the site. (Note: Must be HTTPS protocol). For details on this callback, see Adding a Facebook callback endpoint.
- Save the product changes.
- Click > Admin > Sites & Settings.
-
In the Sites widget, select the site for which you want to configure these settings, or select Global to configure these settings for all sites.
-
Under the Front-End tab, expand the Authentication/Authorization cluster.
-
From the Authentication Settings list, select Create New.
-
Under Name, give these settings a name (for example,
Facebook Auth). -
Under Authentication Providers, click Add Item.
-
Click to open the content picker, and then from the Create list in the bottom left, select Facebook and click New.
-
Enter an internal name for this asset. Brightspot uses this name internally, such as in the search panel and recent activity widget. This name is not visible to visitors to your site.
-
Under Facebook Service, enter your Facebook service. For details, see Creating a Facebook service.
-
Under Callback Endpoint, select the endpoint you configured for these Facebook authentication settings. For details, see Adding a Facebook callback endpoint.
-
Under Disconnect Endpoint, select the endpoint you configured for these Facebook authentication settings. For details, see Adding a Facebook disconnect endpoint.
noteOnce you slot in the Facebook disconnect endpoint into this field, Brightspot displays a new note at the top of the content edit page that includes the de-authorize URL and delete URL. Copy and paste these URLs into the login settings in the developer console for your Facebook app. For details, see deleting Facebook authentication records.
-
Under Login Session Expiration, set the time (in seconds) until a visitor must log in again. This field defaults to 86,400 seconds (24 hours).
-
Toggle on Should Validate Cross-Site Request Forgery to protect against malicious requests being made to a site the visitor is logged in to. In order to utilize this, the cookie
[bsp-oauth-csrf-0000018c-63be-d739-a39e-63be047b0000]must be allowed and forwarded by CDNs serving the website. -
Click Save.
-
Click Back.
-
From the content picker, select the Facebook authentication provider you just created.
-
Click Save.
Once you have configured Facebook authentication settings, you can add Facebook as an authentication option to a login module, which can be used on a login page to help your front-end visitors authenticate with your site.
Authentication via Google
Adding a Google callback endpoint
Before you can configure Google authentication settings, you must add a Google callback API endpoint.
To add a Google callback endpoint:
- Click > Admin > APIs.
- From the Endpoints widget, under the Create list, select Google Authentication Callback Endpoint, then click New.
- Retain the default path, which is
/auth/login/google. - Click Save.
Once you have created a Google callback endpoint, slot it into the Callback Endpoint field when configuring Google authentication settings.
Creating a Google service
Authenticating with Google requires creating a Google app, and then creating a corresponding Google service in Brightspot.
To create a Google service:
-
Ensure that you have already configured a Google app as described in the following steps:
- Navigate to Google Cloud Console - API Credentials.
- Click OAuth consent screen and fill out the form, then click Save.
- Click Create Credentials and name the application.
- Copy the Client ID and Client Secret.
- Click > Social > Services.
-
In the Services widget, click New Google Service.
-
Under Name, enter a name for this Google service.
-
Under Client ID, paste the client ID you copied from Google.
-
Under Client Secret, paste the client secret you copied from Google.
-
Click Save.
Once you have created a Google service, slot it into the Google Service field when configuring Google authentication settings.
Configuring Google authentication settings
You can configure Brightspot to allow visitors to authenticate with your site via Google. In order to complete this configuration, the following prerequisite steps are required:
- Creating a Google app and fetching credentials (both performed within Google's console).
- Adding a Google callback endpoint. For details, see Adding a Google callback endpoint.
- Mapping the Google app to Brightspot. For details, see Creating a Google service.
To configure Google authentication settings:
- Click > Admin > Sites & Settings.
- In the Sites widget, select the site for which you want to configure this setting.
- Under the Front-End tab, expand the Authentication/Authorization cluster.
- From the Authentication Settings list, select Create New.
- Under Name, give these settings a name (for example,
Google Auth). - Under Authentication Providers, click Add Item.
- Click to open the content picker, and then from the Create list in the bottom left, select Google and click New.
- Enter an internal name for this asset. Brightspot uses this name internally, such as in the search panel and recent activity widget. This name is not visible to visitors to your site.
- Under Google Service, enter your Google service. For details, see Creating a Google service.
- Under Callback Endpoint, select the endpoint you configured for these Google authentication settings. For details, see Adding a Google callback endpoint.
- Under Login Session Expiration, set the time (in seconds) until a visitor must log in again. This field defaults to 86,400 seconds (24 hours).
- Toggle on Should Validate Cross-Site Request Forgery to protect against malicious requests being made to a site the visitor is logged in to. In order to utilize this, the cookie
[bsp-oauth-csrf-0000018c-644c-d739-a39e-66ec13db0000]must be allowed and forwarded by CDNs serving the website. - Click Save.
- Click Back.
- From the content picker, select the Google authentication provider you just created.
- Click Save.
Once you have configured Google authentication settings, you can add Google as an authentication option to a login module, which can be used on a login page to help your front-end visitors authenticate with your site.
Viewing authentication entities
You can view a list of users who have authenticated with a third-party authentication service on your site.
To view authentication entities:
- Click > Admin > Authentication Entities.
The Authentication Entities area acts similarly as the search panel. You can sort and filter the results as necessary. For details, see Search filters.
Configuring authorization settings
Once you have configured authentication settings, you can set up authorization settings to control how authenticated and non-authenticated visitors can interact with your site.
To configure authorization settings:
- Click > Admin > Sites & Settings.
-
In the Sites widget, select the site for which you want to configure this setting, or select Global to configure this setting for all sites.
noteIf configuring authorization at the global level, navigate to the Auth tab. Under Authorization Manager, select Create New, and proceed to step 5.
-
From the Front-End tab, expand the Authentication/Authorization cluster.
-
From the Authorization Settings list, select Create New.
-
Under Name, give these settings a name (for example,
Authorization - <your site>). -
Under Authorization Handler, click one of the following options:
- Advanced—Allows you to completely customize authorization access. See the section "Configuring Advanced authorization settings" below for more information.
- Full-Site—Denies access to all authorizable types unless a visitor is logged in. While unauthenticated, the user will be redirected to the specified login page. See the section "Configuring Full-Site authorization settings" below for more information.
- Under Section(s)—Denies access to all content under the specified sections unless a visitor is logged in. While unauthenticated, the visitor will be redirected to a specified login page. See the section "Configuring Under Section(s) authorization settings" below for more information.
Configuring Advanced authorization settings
Selecting Advanced in the Authorization Handler field allows configuring an authorization policy that is composed of the "who" (principals), "what" (resources), "action" (scopes), and "when" (conditions) of authorized access.
-
Under Authorization Handler, select Advanced.
-
Under Policies, click , then select one of the following options:
- Allow All—Allows any principal to access any resource in any scope. No additional configuration is required.
- Deny All—Prevents any principal from accessing any resource in any scope. No additional configuration is required.
- Custom—Allows you to customize all elements of access. See the table below.
Custom policy fields
| Field | Description |
|---|---|
| Principals | Configure the principal to which the policy applies. Any—The policy applies to any principal. Any Authenticated—The policy applies to any authenticated principal. Role—The policy applies to any principals who have the specified role (for example, any principal with the role Editor is authorized). Roles—The policy applies to any principals who have all of the specified roles (for example, any principal who has both the roles of Editor and Admin is authorized). User—The policy applies to any principals who match the specified user (for example, any principal who matches the user Adam Braun is authorized). |
| Resources | Configure the resource to which the policy applies. Any—The policy applies to any resource. Content—The policy applies to a resource that matches the specified asset (for example, the principal is authorized to view the specific asset What is GraphQL?). Content Type—The policy applies to a resource if it is of the specified content type (for example, the principal is authorized to view assets of the content type Article, so the principal can view the articles What is GraphQL?, What is JAMstack, and what does it mean for web development? and any other article). |
| Scopes | Configure the scope to which the policy applies. Any—The policy applies to any scope. View—The policy pertains to whether authorized principals can view authorized resources. |
| Conditions | Configure the date condition for which the policy applies. Any Date—The policy pertains to any date. Date—The policy pertains to authorizable resources after a specified start date (for example, authorized principals can view authorizable resources after Jan. 1, 2024). Date Range—The policy pertains to authorized resources between a specified start date and end date (for example, authorized principals can view authorized resources between the dates Jan. 1, 2024 and Feb. 1, 2024). |
| Effect | Configure the effect when an access request matches the policy. Allow—Allows access. Deny—Denies access. |
Configuring Full-Site authorization settings
Full-site authorization settings deny access to all authorizable types unless a user is authenticated. While unauthenticated, Brightspot directs the user to a specified log in page.
| Field | Description |
|---|---|
| Not Logged In Page | Location where Brightspot redirects unauthenticated visitors. Select one of the following options: External—Redirects the visitor to a page outside of your site. Internal—Redirects the visitor to a page within your site. Site Search—Redirects the visitor to a specified site search page with a specified query entry (for example, a query that says How can I log in? that returns assets that may help the visitor authenticate). You may also specify search filters and search sorts to further curate search results. |
Configuring Under Section(s) authorization settings
Section authorization settings deny access to all assets under specified sections unless a visitor is authenticated. While unauthenticated, Brightspot directs the visitor to a specified log in page.
| Field | Description |
|---|---|
| Sections | Select a section that is denied to the user if they are not authenticated. To add additional sections, click Add Item. |
| Not Logged In Page | Location where Brightspot redirects unauthenticated visitors if they are not authenticated. Select one of the following options: External—Redirects the visitor to a page outside of your site. Internal—Redirects the visitor to a page within your site. Site Search—Redirects the visitor to a specified site search page with a specified query entry (for example, a query that says How can I log in? that returns assets that may help the visitor authenticate). You may also specify search filters and search sorts to further curate search results. |