Sailthru
Brightspot uses Sailthru to cultivate mailing lists, and then use those lists when sending out newsletters. In addition, Brightspot integrates with Sailthru to provide access to their content library.
Configuration
To configure the Sailthru integration:
- Click > Admin > Sites & Settings.
-
Select the site for which you want to configure this integration.
-
From the Integrations tab, expand the Sailthru cluster.
-
In the Settings field, select Set. Selecting None does not allow for this integration to be enabled for this site.
-
Enter your API Key and API Secret. Both of these values are obtained from Sailthru.
-
Enable the Content Library Auto-Sync Settings by doing the following:
- Click in the Add Content Library Auto-Sync Settings field.
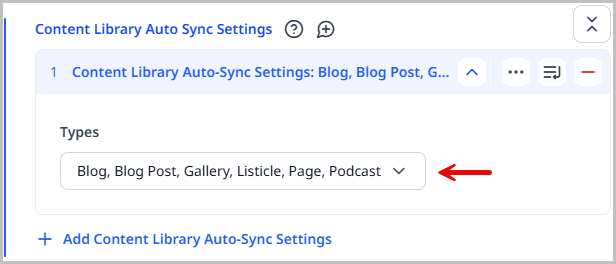
- Expand the Types menu, and select the content types you would like to have automatically synced with the Sailthru Content Library.
-
You also have the option to set the following default fields for your newsletter emails:
noteThese are just the default settings. You have the option to override these for individual mailings.
- Default From Name—Enter the default name for the individual or entity from which the newsletter emails appear to come.
- Default From Email—Enter the default email for the individual or entity from which the newsletter emails appear to come.
- Default Subject—Enter the default subject line for the emails from Sailthru that contain your newsletters.
- Default Reply To—Enter the default email address for individuals who wish to reply to your email mailings.
-
Toggle on Enable Beacon Injection to allow Sailthru to track the open rate for your emails. Toggle off to not have Sailthru track the open rates of your emails.
-
Click Save.
Creating campaigns
Brightspot integrates with Sailthru to allow you to create campaigns to distribute your newsletters. Prior to creating a campaign, you must create your audience and segments in Sailthru.
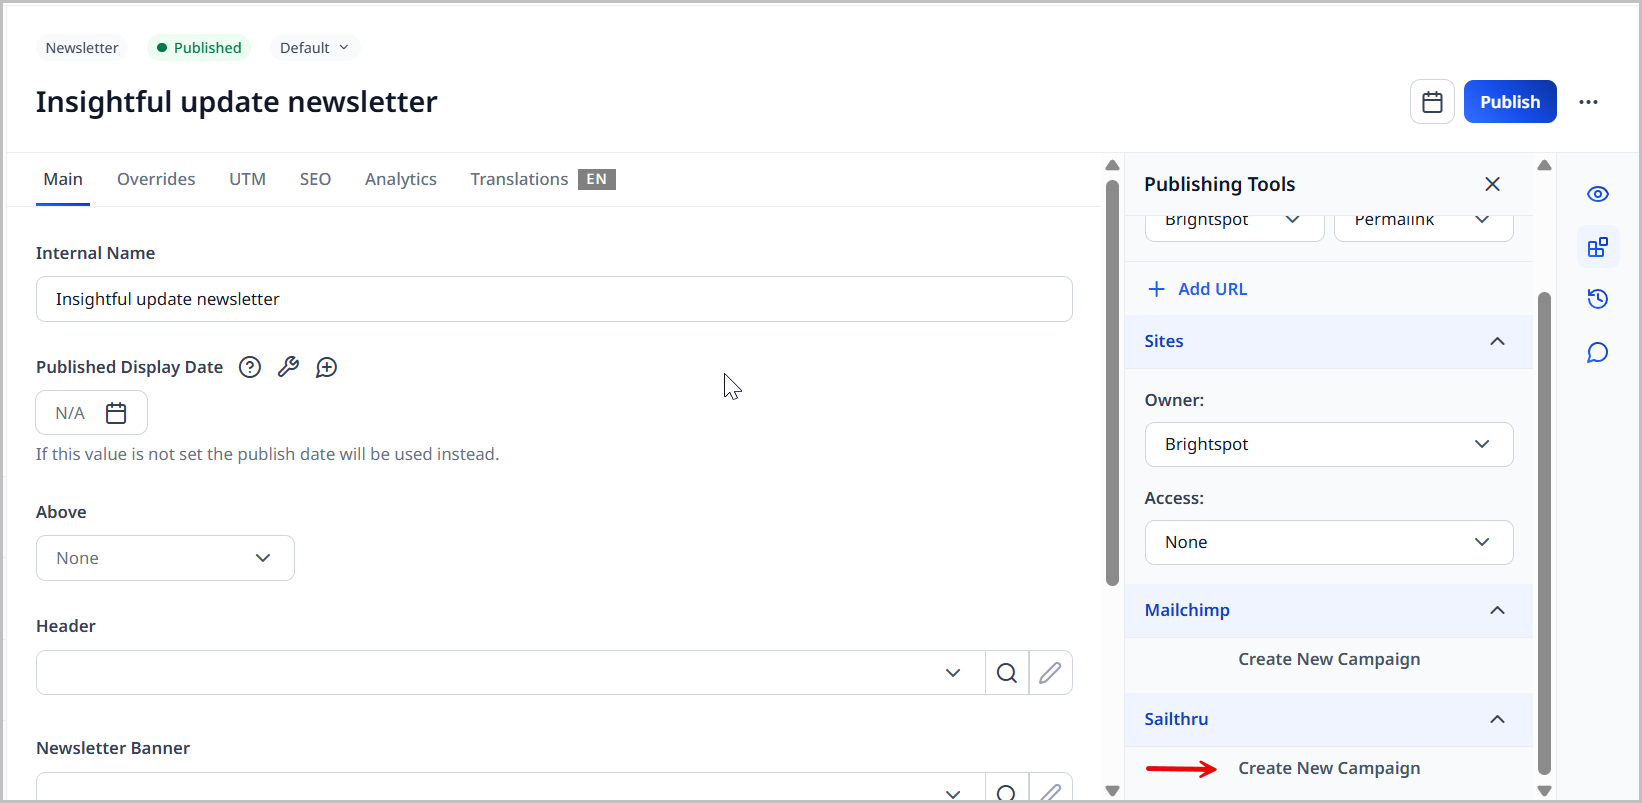
Campaigns are created from the Sailthru widget that appears in the right rail of the newsletter content edit form after the newsletter is published. If you do not publish your newsletter, you will not have the Sailthru widget available.
To create a Sailthru campaign:
-
After publishing your newsletter, click Create New Campaign in the Sailthru widget in the right rail.
-
Select the Audience List for this campaign.
-
Select the Suppress List for this campaign.
tipRemember, audience and suppress lists for campaigns are created within Sailthru, not Brightspot.
-
Enter the Campaign Title for your new campaign.
-
The Subject Line, From Name, From Email, and Reply To fields are auto-populated with the defaults set on the Sailthru integration page in Brightspot. These values can be overwritten if necessary.
-
Click Create Campaign, then click Done. The Sailthru widget changes and displays the Options menu. This is where you can manage your campaign.
tipNewsletters can only be assigned to one Sailthru campaign, but a single Sailthru campaign can have multiple newsletters assigned to it.
Testing campaigns
Once you have a newsletter campaign set up, you may find it useful to test it before sending it out to the audience. This allows you to make sure the newsletter is being delivered and displaying properly.
To test a Sailthru newsletter campaign:
-
Click Options in the Sailthru widget to display the Options menu.
-
Click Send Test Email to open the Send Test Emails pop-up window.
-
Expand Emails and select Values or Comma Delimited.
- Select Values if you want to enter the email addresses to receive this test email individually. Press Enter to add additional email addresses.
- Select Comma Delimited if you want to enter the email addresses to receive this test email in a comma-separated list.
-
Click Send. The test newsletter is delivered to those email addresses you added. If it is not delivered to your test recipients, you may want to visit Sailthru and verify your settings.
Updating campaigns
Once a campaign is saved, you can make changes as needed.
To update a Sailthru campaign:
- Click Options in the Sailthru widget to display the Options menu. The Options menu is only available after a newsletter campaign has been created.
- Click Update Campaign. This displays the Update Campaign form which contains all of the fields you completed when you created the campaign.
- Make any changes that are needed.
- Click Update.
Scheduling campaigns
Once you have created your Sailthru newsletter campaign, you can schedule when you would like it to begin.
To schedule a Sailthru newsletter campaign:
-
Click Options in the Sailthru widget to display the Options menu. The Options menu is only available after creating a newsletter campaign.
-
Click Schedule. This displays the Schedule Campaign form.
-
From the Schedule Type list, select one of the following:
- Specific Time—Sailthru sends the campaign at the selected time when that time arrives in the configured time zone on your Sailthru account. For example, if your Sailthru account is configured for the New York time zone, and you select 1 December 2022 6:05 AM, Sailthru sends the campaign at that time in the New York time zone. In this scenario, all recipients receive the emails simultaneously, so a recipient in London receives the email at 11:05 AM.
- Personalized for Recipient—Sailthru sends the emails to each recipient based on history of interacting with previous campaign emails. For example, Adam Braun has interacted with previous email campaigns at 9:00 AM. If you configure your email starting at 6:00 AM with a 12-hour send window, Sailthru sends the email to Adam at 9:00 AM.
- Recipient's Local Time—Sailthru sends the emails when the selected time arrives in the recipient's time zone. For example, Adam Braun lives in London, and you select 1 December 2022 6:05 AM. Sailthru sends Adam's email at 1:05 AM New York time. In this scenario, all recipients receive the emails at the same local time of 6:05 AM.
-
Click to open the scheduler.
-
Select the date and time you would like the campaign to begin.
-
Click Set. The Schedule Campaign form refreshes to display the date and time you selected.
tipClick Clear to erase the schedule.
-
If you selected Personalized for Recipient in step 3, enter the window in the Send Window field.
-
Click Schedule Campaign to schedule the campaign to begin at the date/time you selected. The Sailthru widget updates to show the date/time the campaign is scheduled to begin.

Once a Sailthru campaign is scheduled, you can no longer modify the settings. The Update Campaign button in the Options menu changes to View Settings.
Sending campaigns immediately
You have the option of sending a Sailthru newsletter campaign immediately without scheduling it in advance.
To send a Sailthru campaign immediately:
- Click Options in the Sailthru widget to display the Options menu.
- Click Send Now to open the Send Campaign pop-up window.
- Toggle on the Are you sure you want to send this campaign now field to confirm that you want to send the campaign out immediately.
- Click Send Campaign Now.
Viewing a campaign's activity log
As your Sailthru campaign for your newsletter progresses, you may want to see the activity log for the campaign (to diagnose errors, for example).
To view a Sailthru campaign's activity log:
- Click Options in the Sailthru widget to display the Options menu.
- Click View Activity Log to display the View Activity Log pop-up window. This activity log displays all of the actions that have occurred with your Sailthru campaign and is updated as each event occurs.
Disconnecting campaigns
Once a newsletter is connected to a mail campaign, you may find it necessary to remove that newsletter from the campaign. Brightspot provides an easy way to accomplish this task.
To disconnect a newsletter from a campaign:
- Click Options in the Sailthru widget to display the Options menu.
- Click Disconnect From Campaign to display the Disconnect Campaign pop-up window.
- Toggle on the Are you sure you want to disconnect this template from the Sailthru Campaign field to confirm that you actually want to disconnect this campaign.
- Click Disconnect. Brightspot disconnects the newsletter from the Sailthru campaign.
Submitting content to the Sailthru Content Library
The Sailthru Content Library is currently available for the following content types:
- Article
- Author
- Blog
- Blog post
- Gallery
- Listicle
- Live blog
- Live blog post
- Page
- Person
- Podcast
- Podcast episode
- Press release
- Section
Submitting automatically
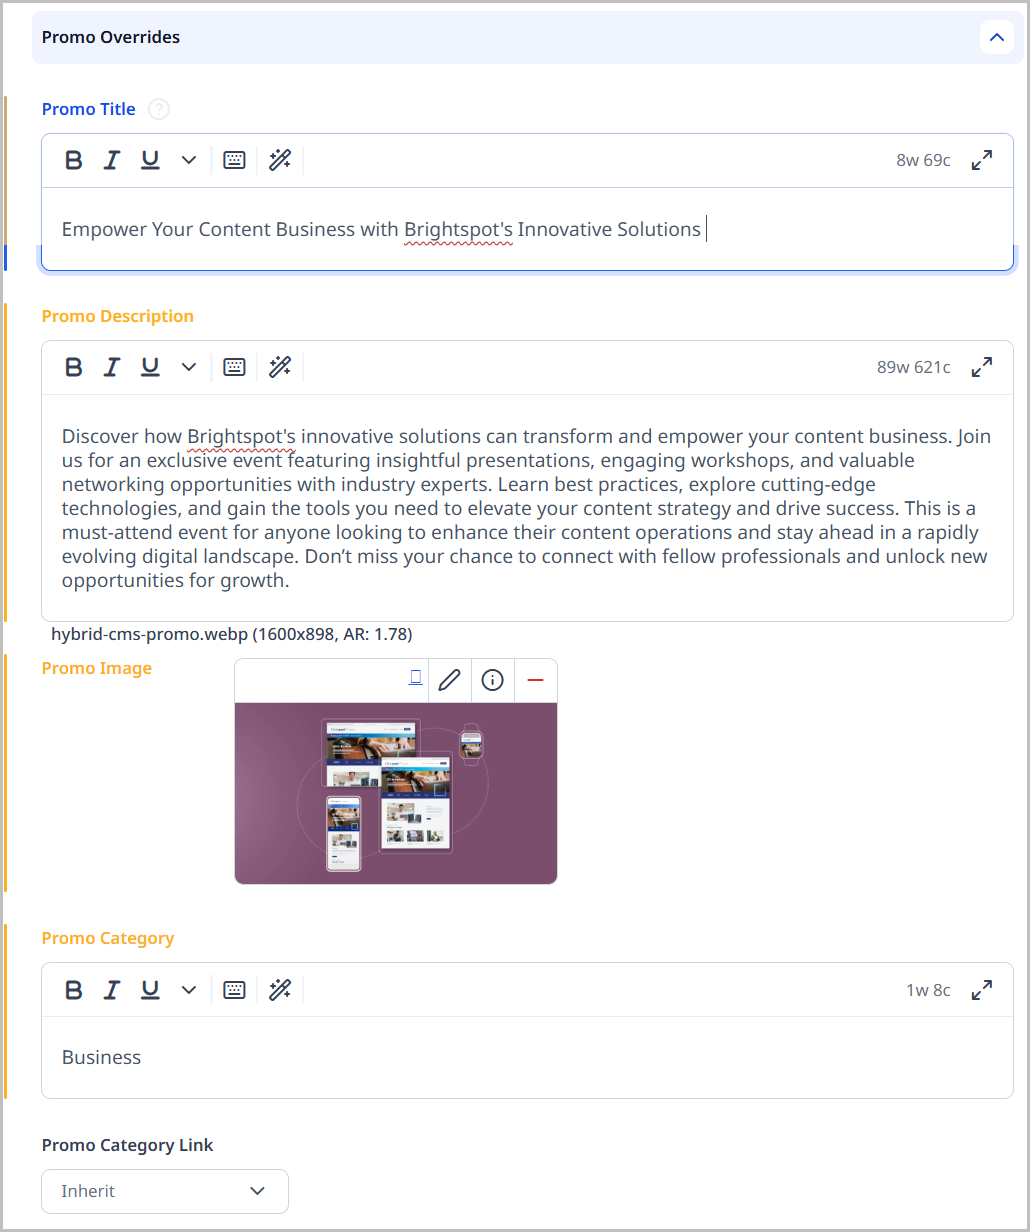
When content is submitted to Sailthru, it is only the data contained in the Overrides > Promo Overrides cluster for that asset that is sent.
To submit content to the Sailthru Content Library automatically:
- Click > Admin > Sites & Settings.
-
Select the site that you would like to configure to have content submitted automatically to Sailthru.
-
Click , located to the left of , and type
Sailthru. -
Expand the Sailthru cluster (if it is not already expanded).
-
Click in the Content Library Auto-Sync Settings field.
-
Expand the Types list and select the content types you would like to have automatically submitted to Sailthru.
-
Click Save.
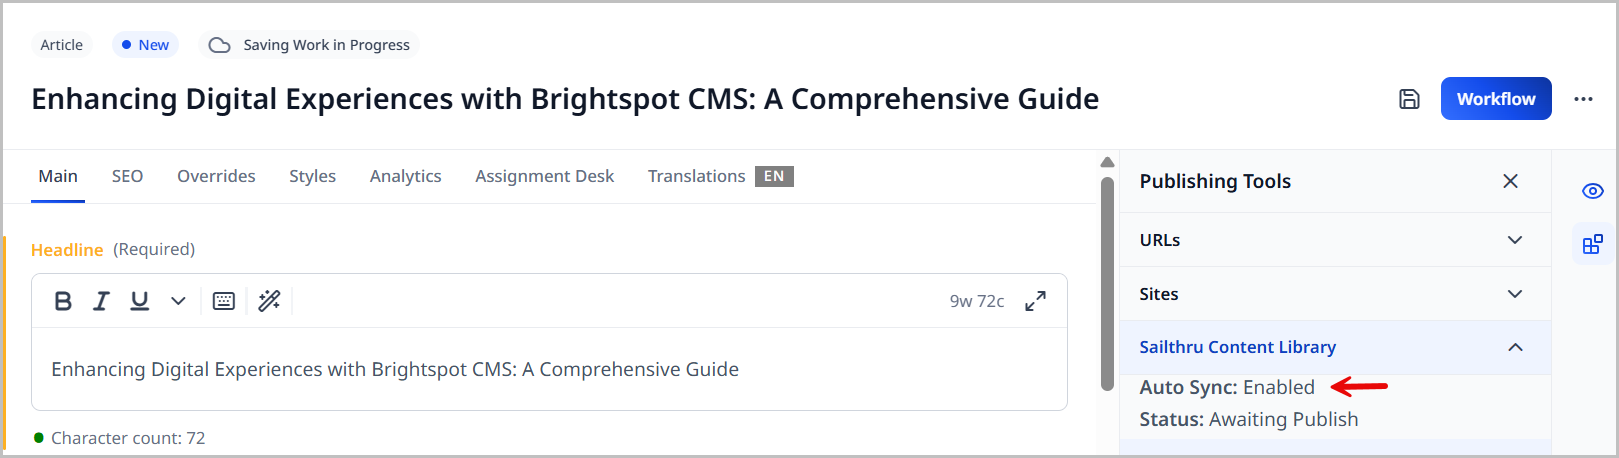
When you open a content type that has been enabled for Auto-Sync, it will be reflected in the Sailthru widget as seen in the image below. Once that asset is published, the data from the Overrides > Promo Overrides cluster is sent to Sailthru.
After you publish the asset, the Sailthru widget updates to show that the asset has been synced with the Sailthru Content Library. The Options button is also available now.
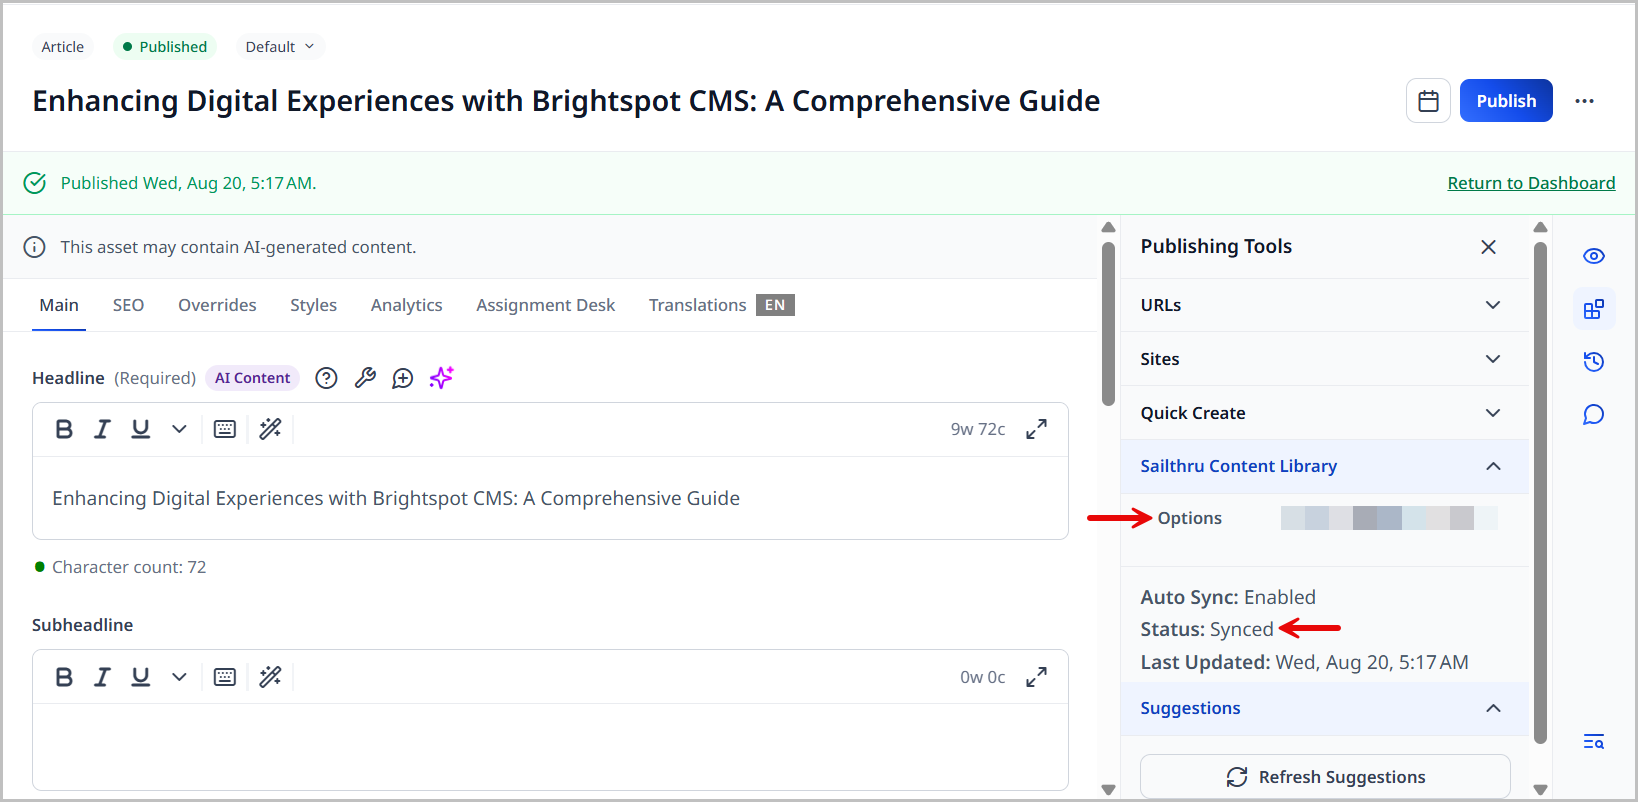
Any time you make changes to this asset and click Publish, the data is automatically sent to Sailthru. If the Status in the Sailthru widget does not say Synced, you can click Options > Update Content Library to manually push the content data to the Sailthru Content Library.
To view the data in Sailthru, you must have an active Sailthru account. You can then click Options > View in Sailthru where you are taken to their site to view the asset's data.
Submitting manually
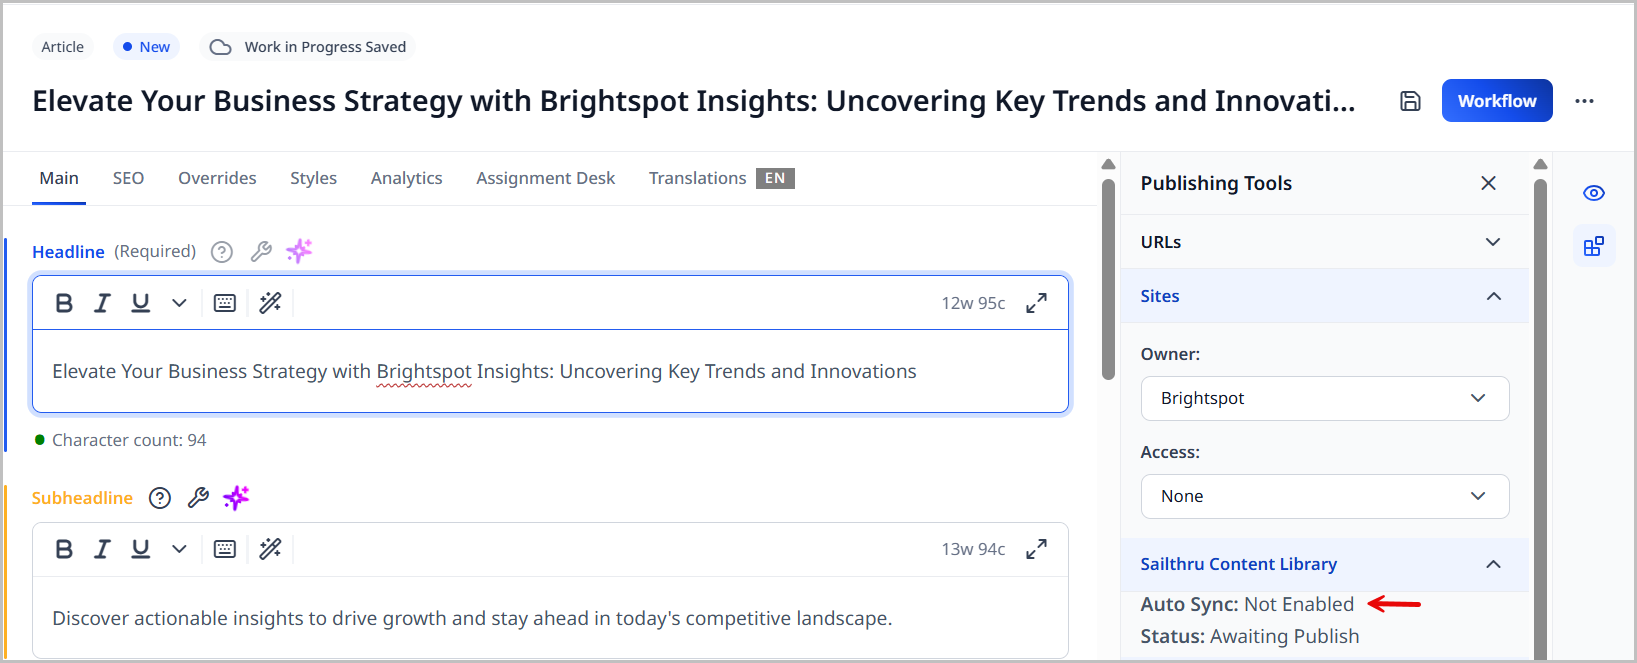
If you haven't enabled Auto-Sync for one of the content types listed above, you can still push those assets to Sailthru manually.
To manually submit content to the Sailthru Content Library:
-
Create and publish your content in Brightspot. Once your content is published, the Sailthru widget will display the Options button.
-
Click Options > Update Content Library.

A confirmation message displays letting you know you have successfully updated the content library.
If you make changes to this asset and then publish, the Sailthru widget updates to show you that the Sailthru Content Library is not synced.
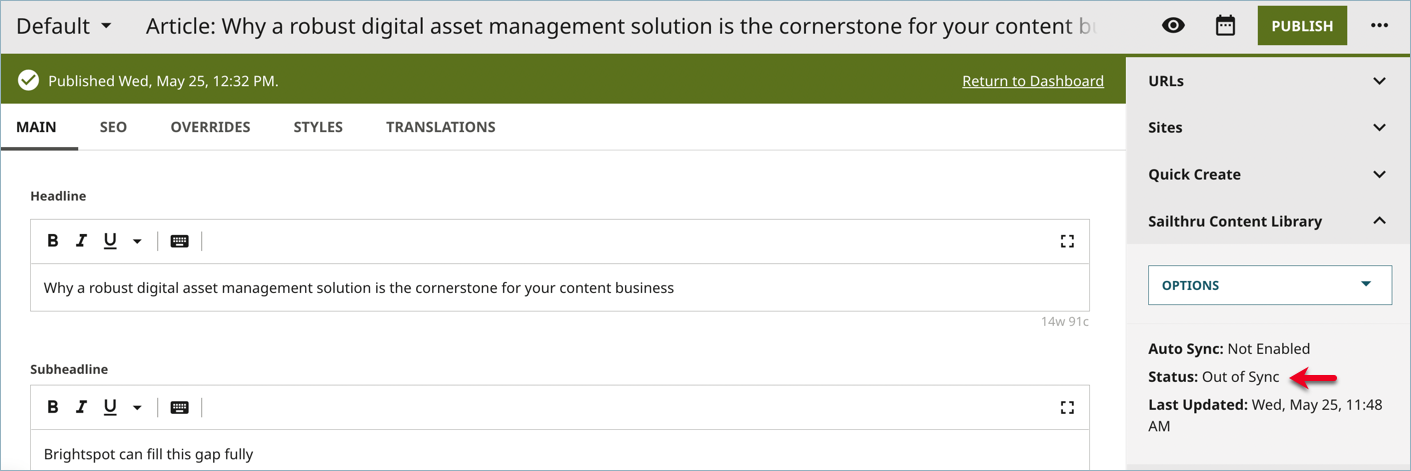
To send the updated version to the Sailthru Content Library, click Options > Update Content Library. You must do this each time you make published changes to an asset.
Once an asset has been submitted to Sailthru successfully, the View in Sailthru option is available when you click Options. Clicking this option takes you to the Sailthru website where you can view the data you submitted to Sailthru. You must have an active Sailthru account to view this information.