Google Analytics
Google Analytics ceased support of Universal Analytics (also known as Google Analytics 3) on July 1, 2023. Google Analytics 4 replaces Universal Analytics. Brightspot customers who currently leverage the Google Analytics integration must reconfigure the integration to be supported by Google Analytics 4.
Overview of the configuration process
To configure the Google Analytics 4 integration, you take the following steps:
- Set up Google Analytics. For details, see
[GA4]Set up Analytics for a website and/or app. - Connect the integration to Brightspot. For details, see Adding the Google Analytics 4 integration.
- Configure the integration itself so you can view Google Analytics data in Brightspot at the site or page level. For details, see Configuring a site to retrieve analytics.
- Retrieve any custom events that should display at the site or page level. For details, see Retrieving custom event data.
- (Optional) Configure analytics data such that you can use it as sorting criteria in Brightspot search. For details, see Adding analytics data to the search panel.
How Brightspot displays Google Analytics data
Brightspot displays Google Analytics data in two ways:
- At the site level, via Report widgets that you configure when creating dashboards. For details, see Configuring the Report widget.
- At the asset level, via the Analytics cluster on an asset's content edit form. For details, see Configuring analytics in Brightspot.
Including Google Analytics in a build
The following table lists the dependencies to include in your build configuration.
| Artifact | Description |
|---|---|
com.psddev:google-analytics-4 | Exposes core Google Analytics 4 functionality for configuration. |
com.brightspot.go:lib-model-google-analytics4-script | Necessary for inputting the measurement ID that gets injected into the markup of your pages to invoke Google Analytics 4. |
com.brightspot.go:lib-model-google-analytics4-ui | Exposes elements necessary for the integration to appear in Sites & Settings and in Analytics widgets. |
Adding the integration
Before you can leverage the Google Analytics 4 integration to view analytics data in Brightspot, you must first add the integration to the CMS.
To add the Google Analytics 4 integration to Brightspot:
- From the left navigation, under Admin, click Sites & Settings.
-
In the Sites widget, select a site to integrate with Google Analytics 4, or select Global to integrate all your sites.
-
Under the Integrations tab, in the Integrations field, click Add, and select Google Analytics 4 from the list.
-
In the Measurement ID field, enter your site's measurement ID. For information about finding your measurement ID, see
[GA4]Measurement ID.The measurement ID generates a JavaScript snippet that is incorporated into your site pages. The snippet enables tracking of your site by Google Analytics.
-
Toggle off Disabled.
-
Click Save.
To configure your Brightspot site to retrieve Google Analytics information, see Configuring a site to retrieve analytics.
Configuring a site to retrieve analytics
After the Google Analytics 4 integration has been added to Brightspot (as outlined in Adding the integration), you can configure Brightspot to retrieve analytics data for specific sites and assets.
To configure Brightspot to retrieve Google Analytics 4 data:
- From the left navigation, under Admin, click Sites & Settings.
-
In the Sites widget, select a site to integrate with Google Analytics 4.
tipIf you only have one set of credentials for your Google Analytics account, you can set those credentials under the Global site, and they will cascade down to all of your other sites. The value in the Credentials field is the only value that cascades down to your other sites. You must still enter the Property ID and remaining settings for each site for which you want to retrieve Google Analytics 4.
-
Under the Integrations tab, expand the Google Analytics 4 cluster.
-
Using the table after step 8 as a reference, complete the fields as needed.
tipIf the integration has been configured properly, Brightspot displays a confirmation message. If no message appears, please review the data that you input to ensure it is correct.
-
Click Save.
-
Change to the Global site.
-
Under the Integrations tab, expand the Google cluster.
-
Verify that the Task Host field contains the name of the host running the import from Google Analytics.
Google Analytics 4 settings—Integrations tab
| Field | Description |
|---|---|
| Enable Google Analytics Import | Toggle on to turn on the Google Analytics 4 integration. When toggled off, none of your sites can leverage the integration. This setting is only available on the Global site. |
| Credentials | Private JSON key that was downloaded from the Google API service account as described in Create a service account key. Copy the key into this field, including the opening and closing braces. You can set the Credentials at the Global site level and have that value cascade down to all of your other sites, or you can enter unique credentials for each site if you have per-site Google Analytics credentials. Credentials entered at the site level always supersede those entered at the Global level. For example, you would use different credentials if your organization has different GCP Service Accounts with access to different Google Analytics accounts and properties. Click Click here to validate your Google API credentials to validate that Brightspot can correctly communicate with Google's APIs. |
| Property ID | ID of the property that was generated in your Google Analytics account as described in Create a new Google Analytics 4 property. You can configure your account to have multiple properties, each with a different set of data. |
| Import Time Zone | Set the time zone for your data import. This setting must match the time zone of the same property as specified in the Property ID field above. |
| Page Report Enabled | Toggling on this setting allows the import of page views data at the per-page level. In addition, the following features become available: • Sort dynamic lists by page view as described in Sorting dynamic lists by page views. • Include page views in the search panel as described in Including page views in the search panel. • Include page views in an asset's Analytics accordion as described in Viewing item-level analytics. |
| Site Reports | Type of reports to generate about traffic to your site: • Device categories—Indicates types of devices visitors are using on your site. • Demographics—Provides gender and age brackets. • Referrals—Indicates how visitors arrive at your site, such as referral traffic from other sites or clicking links in search engines. • Visits—Provides general information about site visits, such as number of sessions, users, and session duration. For more details, see [GA4] About Analytics sessions. |
| Custom Events | Custom events that Brightspot retrieves and displays either at the page level or at the site level. For details on how to create custom events, see Retrieving Google Analytics 4 custom event data in Brightspot. |
| Import Schedule | Times at which you want to ingest data from Google Analytics 4. • None—No ingestion occurs. • Cron Expression—A cron expression specifying the times at which you want to ingest data. For example, entering 0 15,45 * * * ? * ingests analytics every hour at 15 and 45 minutes after the hour. (A good utility for composing cron expressions is at freeformatter.com.)• Schedule Builder—A set of accordions for configuring the ingestion intervals. For more information, see Configuring analytics ingestion intervals with the schedule builder. This setting is only available on the Global site. :::warning Before the first run of the task, Brightspot recommends ensuring that your Brightspot site URLs match the URLs in Google Analytics 4. If they do not match, analytics data will not pull in correctly. ::: |
| Historical Days to Import | Number of days' data to import from Google Analytics. The default value for this field is 30 (days). This setting is only available on the Global site. |
Retrieving custom event data
In Google Analytics 4, a custom event is a specific event that takes place on your site that you tell Google you want to track, like a particular form submission or a page scroll percentage. Custom events are often set up in your Google Tag Manager console (see [GA4] Custom events), and then associated with custom dimensions and metrics in your Google Analytics console (see [GA4] Custom dimensions and metrics).
To retrieve event data, you must create Brightspot records that connect to these custom dimensions and metrics in order to retrieve and view custom event data at the site level and page level.
To retrieve Google Analytics 4 custom event data in Brightspot:
- From the left navigation, under Admin, click Sites & Settings.
-
In the Sites widget, select the site for which you want to configure this setting.
-
From the Integrations tab, expand the Google Analytics 4 cluster.
-
Under Custom Events, click Add, then click Find to open the content picker.
-
In the Create menu, select one of the following options:
- Page-Level Event (Custom Metric and Dimension)—Produces a custom event from a metric and dimension that appears at the page level in the Analytics widget.
- Page-Level Event (Custom Metric Only)—Produces a custom event from a metric only that appears at the page level in the Analytics widget.
- Site-Level Event (Custom Metric and Dimension)—Produces a custom event from a metric and dimension that appears at the site level in a Report widget.
- Site-Level Event (Custom Metric Only)—Produces a custom event from a metric only that appears at the site level in a Report widget.
-
Click New.
-
In the Internal Name field, enter an internal name. Brightspot uses this name in selection fields.
-
Do one of the following:
-
If creating a page-level or site-level dimension and metric record, select the applicable dimension and metric from the Dimension and Metric fields.
-
If creating a page-level or site-level metric only, select the applicable metric from the Metric field.
note- Dimensions with high cardinality (high uniqueness of data) should be avoided. Data will only be persisted for 200 unique dimension values.
- If a dimension is selected, but no metric is selected, the
eventCountmetric will be used by default.
-
-
Click Save.
warningDo not change the values after saving this record. Instead, create a new custom event to avoid polluting existing data for this custom event.
-
Click Back.
-
Select the custom event you just created from the content picker.
-
Click Save.
Depending on the configuration you select, Brightspot is now able to display custom event data at the site level or page level.
Adding analytics data to the search panel
If you have configured the Google Analytics 4 integration as described in Configuring a site to retrieve analytics, you can use the data you retrieve from Google Analytics to inform sort options in the search panel.
To add Google Analytics 4 data to the search panel:
- From the left navigation, under Admin, click Sites & Settings.
- In the Sites widget, select the site to which you want to add analytics data to the search panel.
- Under the CMS tab, expand the Analytics cluster.
- In the Task Host field, enter the task host.
- Under Page Views Supplier, select Google Analytics 4.
- Under the Interval and Amount fields, select the time interval and number by which you want to organize page view data from Google Analytics 4. For example, to limit page view data to the last week, select Days under Interval and enter
7under Amount. - Click Save.
Configuring Analytics ingestion intervals with the schedule builder
If you selected Schedule Builder in the Import Schedule list, you can use the schedule builder to configure the times at which Brightspot ingests data from Google Analytics. Examples of intervals are the following:
- Every hour.
- Every 15 minutes.
- Every Monday at midnight.
- Every Sunday at 1:00 am and 1:00 pm.
The following illustration is an example of an ingestion scheduled to run every 15 minutes.
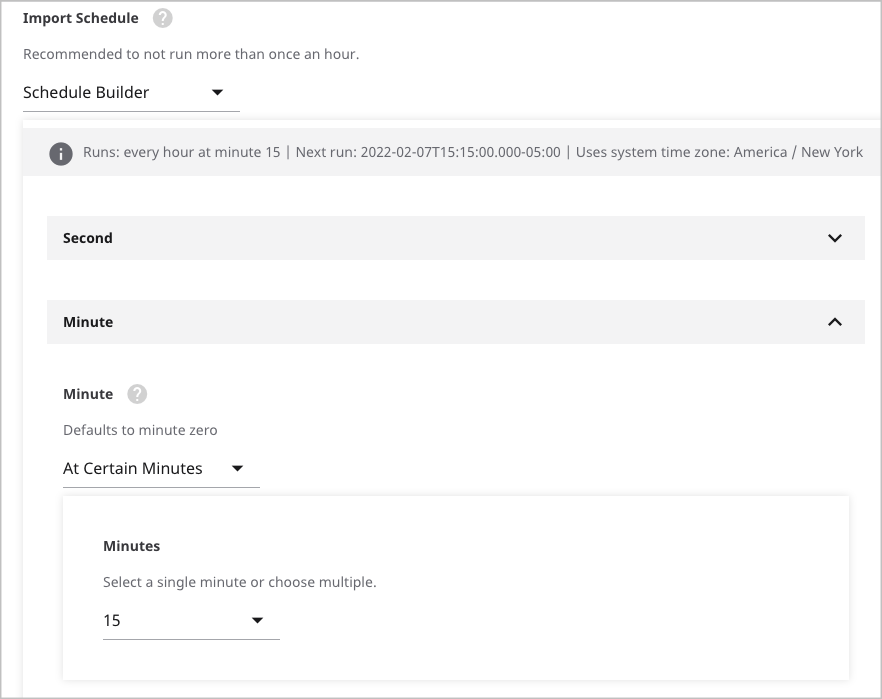
The following sections describe the options available for different time categories. (The examples use a 24-hour clock.)
Second
| Value | Description | Example |
|---|---|---|
| Start of minute | Ingestion runs at the first second of every minute. | Ingestion runs at 11:05:00, 11:06:00, 11:07:00, etc. |
| At certain seconds | Ingestion runs when the time is at the specified seconds. | Selecting 0 and 30 in this field means the ingestion runs at 11:05:00 and 11:05:30. |
| Every second | Ingestion runs every second. | Ingestion runs at 11:05:00, 11:05:01, 11:05:02, etc. |
| Every second in range | Ingestion runs at each second in the range. | Selecting Start=0 and End=30 means the ingestion runs at 11:05:00, 11:05:01, 11:05:02, …, 11:05:30. |
| Every X seconds | Ingestion runs at the start second and then every x seconds thereafter. | Selecting Start=10 and Frequency=20 means the ingestion runs at 11:05:10, 11:05:30, 11:05:50, 11:06:10, etc. |
Minute
| Value | Description | Example |
|---|---|---|
| Start of hour | Ingestion runs at the first minute of an hour. | Ingestion runs at 11:00:00, 12:00:00, 13:00:00, etc. |
| At certain minutes | Ingestion runs when the time is at the specified minutes. | Selecting 0 and 30 in this field means the ingestion runs at 11:00:00 and 11:30:00. |
| Every minute | Ingestion runs every minute. | Ingestion runs at 11:05:00, 11:06:00, 11:07:00, etc. |
| Every minute in range | Ingestion runs at each minute in the range. | Selecting Start=0 and End=5 means the ingestion runs at 11:00:00, 11:01:00, 11:02:00, …, 11:05:00. |
| Every X minutes | Ingestion runs at the start minute and then every x minutes thereafter. | Selecting Start=10 and Frequency=20 means the ingestion runs at 11:10:00, 11:30:00, 11:50:00, 12:10:00, etc. |
Hour
| Value | Description | Example |
|---|---|---|
| At certain hours | Ingestion runs when the time is at the specified hours. | Selecting 0 and 12 in this field means the ingestion runs at 00:00:00 and 12:00:00. |
| Every hour | Ingestion runs every hour. | Ingestion runs at 11:00:00, 12:00:00, 13:00:00, etc. |
| Every hour in range | Ingestion runs at each hour in the range. | Selecting Start=0 and End=5 means the ingestion runs at 00:00:00, 01:00:00, 02:00:00, …, 05:00:00. |
| Every X hours | Ingestion runs at the start hour and then every x hours thereafter. | Selecting Start=11 and Frequency=5 means the ingestion runs at 11:00:00, 16:00:00, 21:00:00, 11:00:00 (the following day), etc. |
Day
| Value | Description | Example |
|---|---|---|
| Every day | Ingestion runs every day. | Ingestion runs on Sunday, Monday, Tuesday, etc. |
| Every x days of month | Ingestion runs at the start day of the month and then every x days thereafter. | Selecting Start=5 and Frequency=10 means the ingestion runs June 5, June 15, June 25, July 5, etc. |
| Every x days of week | Ingestion runs at the start day of the week and then every x days thereafter. | Selecting Start=Sunday and Frequency=3 means the ingestion runs on Sunday, Wednesday, Saturday, Sunday, etc. |
| Last day of month | Ingestion runs on last day of the month. | Ingestion runs on January 31, February 28/29, March 31, etc. |
| Last weekday of month | Ingestion runs on last weekday of the month. | For the year 2022, ingestion runs on January 31 (Monday), February 28 (Monday), March 31 (Thursday), etc. |
| Last X of month | Ingestion runs on the last selected day of the month. | Selecting Day=Thursday for the year 2022, ingestion runs on January 27, February 24, March 31, etc. |
| Nearest weekday to Xth of month | Ingestion runs on the nearest weekday before or after the selected day. | Selecting Day=12 for the year 2022, the ingestion runs on January 12 (Wednesday), February 11 (Friday), March 11 (Friday), etc. |
| On certain day of certain week in month | Ingestion runs on selected day within selected week. | Selecting Week=Fifth and Day=Monday, ingestion runs on Monday in the fifth week (days 29 and later) of a month. If there is no Monday in the fifth week, ingestion does not run. |
| On certain days of month | Ingestion runs on selected numbered days. | Selecting Days=1 and 15 means the ingestion runs on January 1 and 15, February 1 and 15, March 1 and 15, etc. |
| On certain days of week | Ingestion runs on selected days of the week. | Selecting Days=Monday and Wednesday means the ingestion runs every Monday and Wednesday. |
| X days before end of month | Ingestion runs on the number of days prior to end of the month. | Selecting Days=3 for the year 2022, the ingestion runs on January 28 (Friday), February 25 (Friday), March 28 (Monday), etc. |
Month
| Value | Description | Example |
|---|---|---|
| Every month | Ingestion runs every month. | Ingestion runs in January, February, March, etc. |
| During certain months | Ingestion runs when the time is within the specified months. | Selecting January and June in this field means the ingestion runs in January and June. |
| Every month in range | Ingestion runs between the two specified months. | Selecting Start=January and End=June means the ingestion runs every month from January to June. |
| Every X months | Ingestion runs in the start month and then every x months thereafter. | Selecting Start=3 and Frequency=5 means the ingestion runs in March, August, December, March (the following year), etc. |