Brightcove
The Brightcove integration provides access to the videos you manage through Brightcove. When you identify a video to use, you import it into Brightspot and then add it to assets such as articles and galleries.
This section describes how to configure the integration in Brightspot, make the corresponding settings in your Brightcove console, and perform an integrated search.
The plugin requires a Brightcove Video Cloud account. See Getting Started with Video Cloud Studio.
Including Brightcove in a build
The following table lists the dependencies to include in your build configuration.
| Artifact | Description |
|---|---|
com.psddev:brightcove | Exposes core Brightcove functionality for configuration, federated searching, and importing/exporting. |
Runtime prerequisites
-
Developer configuration—
- Extend
ExternalItemConverterto import theBrightcoveVideoExternalItemas a BrightspotVideo. - Extend
VideoProviderfor Brightcove videos. - Implement a concrete importer/exporter to use the respective importing and exporting background tasks.
- Extend
-
Ops configuration—Configure a client ID and client secret. For details, see Managing API Authentication Credentials.
-
CMS configuration—Configure the site interfacing with Brightcove. For details, see Configuring the Brightcove integration.
See also:
Configuration
You can configure integrated search with Brightcove at the Global level or the site level. Global configurations are inherited by all sites, and site-level configurations override Global configurations. This topic explains how to configure this integrated search at the Global level.
To configure integrated search with Brightcove:
-
In your Brightcove console, obtain your account ID, player ID, client ID, client secret, and policy key. For details, see Managing API Authentication Credentials. To obtain the policy key, see Getting the policy key.
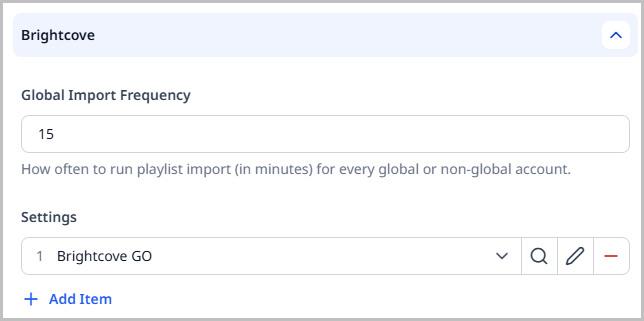
- From the left navigation, under Admin, click Sites & Settings, then select the Global site.
-
From the Integrations tab, expand the Brightcove cluster.
-
In the Global Import Frequency field, enter the number of minutes after which Brightspot imports videos added to Brightcove.
noteFrequent imports keep your Brightspot video inventory up to date, but they may also cause an increase in resource load. The default frequency is once every minute.
-
Under Settings, click and select Create New.
-
In the Internal Name field, enter an internal name. Brightspot uses this name in selection fields.
-
Expand Credentials, and enter the credentials from step 1.
-
Expand Import, and make the following settings:
- Task Host Name—The IP or domain name of the Brightspot host that imports videos from Brightcove.
- Ingestion Run Record—Read-only field displaying the times when the importer last checked for new videos in Brightcove, and when the importer last ingested a video into Brightspot.
- Import Enabled—Toggle on to import videos from your Brightcove account that were not previously imported. If importing Brightcove videos for the first time, toggle this field on.
- Full Import Enabled—Toggle on to import all videos from your Brightcove account, including videos that were previously imported. This field is ignored if the Import Enabled field is toggled off.
- Import User—Brightspot records the selected user as the one who initiates the import from Brightcove.
-
Click Save.
-
Click Back.
-
From the Settings list, select the integration you created.
-
Click Save.
Importing a Brightcove video
Use the following procedure to search for and use a video from Brightcove.
To search for and use a Brightcove video:
-
Open the search panel.
-
Set the content types filter to Brightcove Video.
noteThe external type Video (Brightcove) is not the same as Brightcove Video. If Brightcove Video is not available as an external type, the integration with Brightcove is not configured. See Configuring the Brightcove integration.
-
Add other filters or search text. For additional information, see Search filters. Brightspot lists any matching videos.
-
Click the video.
-
In the content edit form, click Import.
Brightspot imports the video's metadata and displays it in a content edit form. You can modify the title, description, or other metadata, and then use the video in an asset.
For additional information about importing external assets, see Importing external videos.
See also:
Manually refreshing a Brightcove video
When you configure the Brightcove ingestion, Brightspot imports (and refreshes) videos at the specified import frequency. For example, if the import frequency is five minutes, Brightspot automatically refreshes the video and metadata every five minutes. You can also manually refresh a video using the following procedure.
To manually refresh a video from Brightcove:
-
Search for and open the imported video.
-
In the Brightcove widget, do one of the following:
-
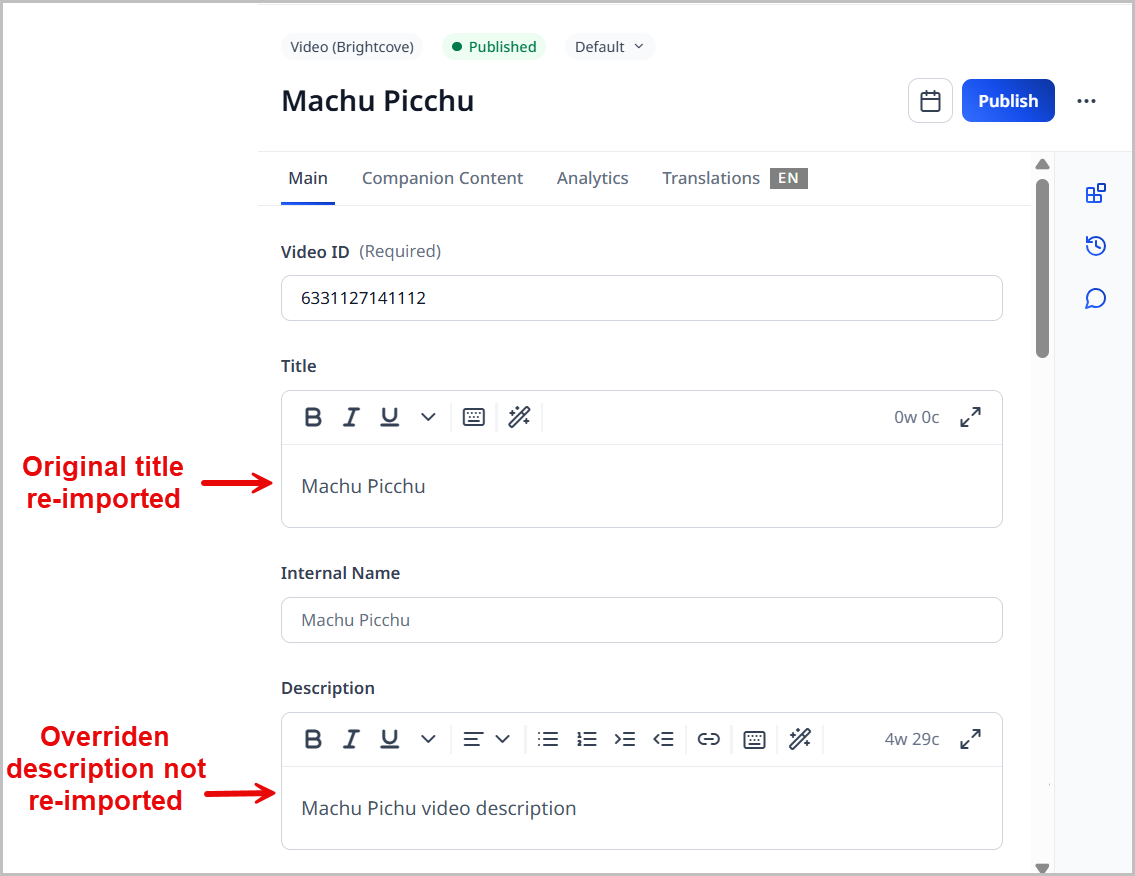
Click Force Read From Brightcove—Re-imports the title and description from Brightcove, unless you manually modified them. For example, if you modified a video's description in Brightspot but not the title, this re-import retrieves the title but not the description.
-
Click Force Write to Brightcove—Exports any changes you made to the video back to Brightcove.
-
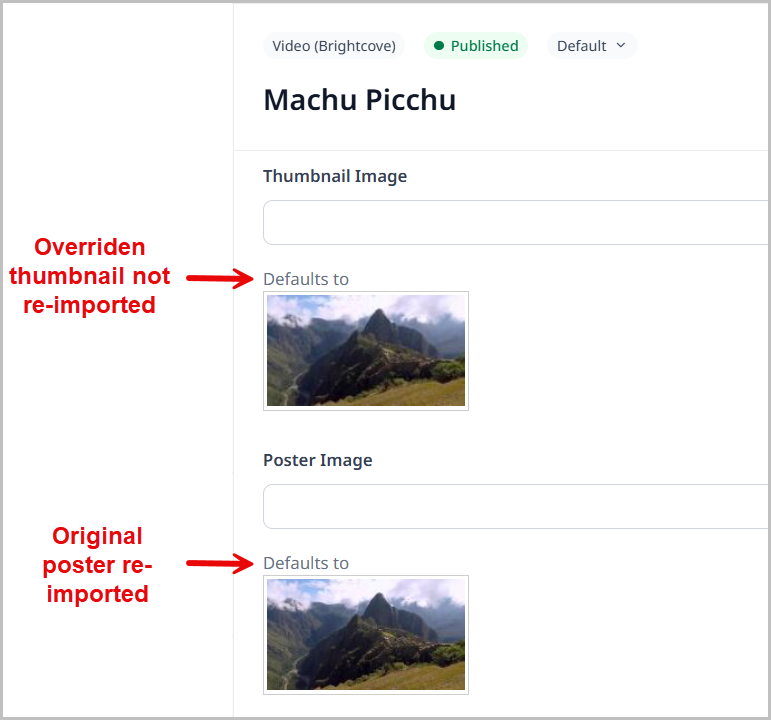
Click Force Read Images From Brightcove—Re-imports the video, poster, and thumbnail, unless you manually modified them. For example, if you modified a video's thumbnail in Brightspot but not the poster, this re-import retrieves the poster but not the thumbnail.
-
See also:
Uploading Brightcove videos individually
This topic discusses how to upload individual Brightcove videos to Brightspot.
For a wire frame example of what this content type can look like on your site, see Brightcove video design.
You may find it faster to upload Brightcove videos in bulk. See Importing a Brightcove video.
To upload an individual video from Brightcove:
- In the header, click .
- From the Create list, select Video (Brightcove).
- Using the following table as a reference, complete the fields as needed.
- Complete your site's workflow and publish the video.
After you save your video, you can use it in assets such as articles and playlists. You can also add videos to text you compose in the rich-text editor.
- Main
- Companion Content
| Field | Description |
|---|---|
| Video ID | Enter the ID of the Brightcove video you want to upload. |
| Title | Enter a title. When you add the video to another asset, the title is visible to visitors to your site. |
| Internal Name | Enter an internal name for this asset. Brightspot uses this name internally, such as in the search panel and recent activity widget. This name is not visible to visitors to your site. |
| Description | Enter a description. This description is not visible to visitors to your site. |
| Thumbnail Image | Click and select an image. This image is not visible to visitors to your site; it appears in Brightspot widgets, such as the search panel. (If you don't select a thumbnail image, Brightspot uses the video's first frame as the thumbnail.) |
| Poster Image | Click and select an image. When you add the video to an asset, the poster is visible to visitors to your site. (If you don't select a poster image, Brightspot uses the video's first frame as the poster.) |
| Default Mute | Select Enabled to mute the video when it begins playing. This is helpful if you have Default Autoplay set to Enabled. |
| Default Autoplay | Select Enabled to have the video play automatically when a visitor navigates to its page. |
| Tags | Select the tags associated with this asset. |
Metadata
| Field | Description |
|---|---|
| Duration | The length of the video. |
| Aspect Ratio | The aspect ratio of the video. |
| Dimensions | The dimensions of the video. |
Companion content is an asset associated with a video or audio file. Brightspot cues the visitor to view the companion content at a specific time during the media's playback.
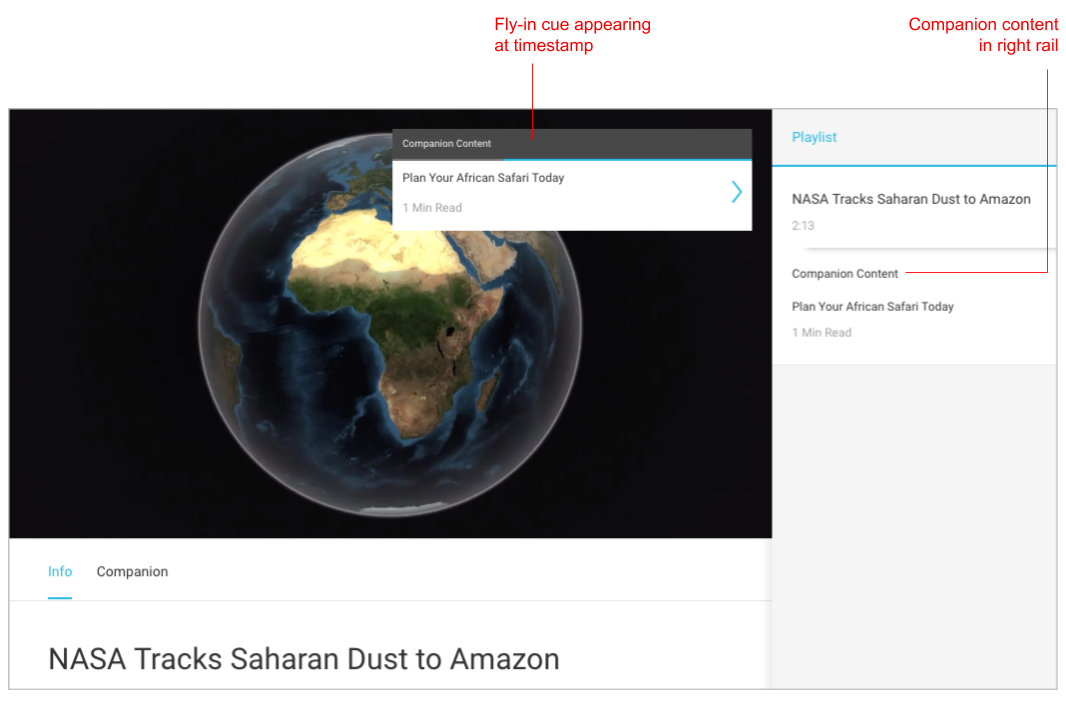
Cues for companion content appear differently depending on your version of Brightspot. For example, they can appear in a right or left rail, “fly in” during the media’s playback, or as markers in the progress bar.
To create companion content:
- Click Add Timed Companion.
- In the Companion field, click .
- Search for and select the companion content.
- In the Timestamp field for each entry, enter the timestamp in
hh:mm:ssformat at which the cue appears.