Rich-text editor
The rich-text editor (RTE) is Brightspot's primary authoring surface. It appears in the Body field of articles, pages, and other text-heavy assets, and supports text formatting, embedded media, collaborative annotation, and more.
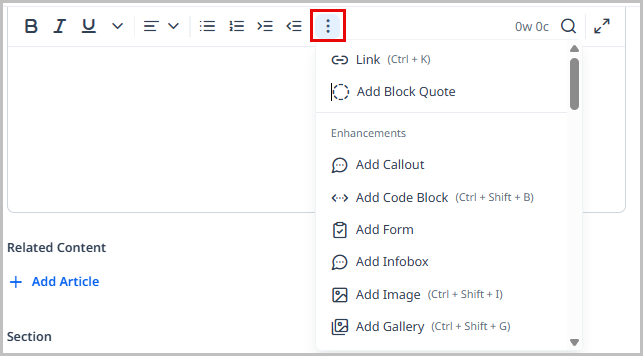
The toolbar adapts to the available width: when the editor is narrow—for example, when a preview panel is open—less-common options collapse under .
Brightspot fully supports the UTF-8 encoding standard. Editors can author content in any UTF-8 character set natively, and visitors interact with published pages in their native language.
What you can do in the rich-text editor
The table below summarizes available capabilities. Each is covered in detail in the sections that follow.
| Capability | Description |
|---|---|
| Formatting text | Bold, italic, underline, strikethrough, superscript, subscript. |
| Aligning text | Left, center, or right alignment. |
| Adding lists | Bulleted or numbered lists, with optional numbering reset. |
| Indenting text | Increase or decrease indentation. |
| Adding headers | H2 through H5 headings and horizontal rules. |
| Adding hyperlinks | Internal links to Brightspot assets, external URLs, or site search. |
| Embedding enhancements | Images, videos, galleries, modules, HTML, iframes, quotes, and snippets. |
| Adding tables | Insert tables with row and column management. |
| Adding inline code | Inline code formatting. |
| Adding HTML or iframe embeds | Raw HTML or embedded iframes. |
| Adding quotes | Attributed pull quotes. |
| Adding snippets | Reusable modular content blocks. |
| Custom keyboard | Insert special Unicode characters. |
| Find and replace | Search for and replace terms throughout the body. |
| Track changes | Accept or reject edits with change tracking. |
| Commenting | Add inline comments for collaborators. |
| Full-screen editing | Expand the editor to fill the browser window. |
| AI features | Generate content using the AI plugin. |
Formatting text
To format text:
-
Enter or select the text to be formatted.
-
Click the desired formatting option in the toolbar:
- Bold
- Italic
- Underline
- Strikethrough
- Superscript
- Subscript
- Clear Formatting
Aligning text
To align text:
-
Enter or select the text to be aligned.
-
Click the desired alignment option in the toolbar:
- Left
- Center
- Right
Adding lists
To add a list:
-
Enter or select the text to be set in a list.
-
Click the desired list type in the toolbar:
- Bulleted list
- Numbered list
For numbered lists, you can reset the starting number at any point in the list.
To reset numbering:
- Double-click any list item's number.
- In the Reset Numbering popup, enter the number at which the list should restart.
- Click Save.
Indenting text
To indent text:
-
Enter or select the text to indent.
-
Click the desired option in the toolbar:
- Add indent
- Remove indent
Adding hyperlinks
To add a hyperlink:
-
Enter or select the text to hyperlink.
-
Click .
-
Under Link, choose one of the following:
- Internal—Search for and select an existing asset. On the Advanced tab, select the link target and optionally add an anchor.
- External—Enter an external URL. On the Advanced tab, select the link target.
- Site Search—Search for and link to a site search results page.
-
Click Save & Close.
Adding headers
To add a header:
- Enter or select the text to set as a header.
- Click Format , then select a heading size (H2, H3, H4, or H5). Select HR to insert a horizontal rule instead.
Embedding enhancements
Enhancements are content objects you embed directly into the body of an asset—images, videos, galleries, modules, and more. You can embed a new enhancement built from scratch (inline) or pull in one that already exists in Brightspot (shared).
| Type | Description |
|---|---|
| Inline | Built from scratch inside the asset. The enhancement exists only in this asset and is saved with it. |
| Shared | An existing asset or module pulled into the body. Changes to the shared enhancement affect every asset that uses it. |
Moving enhancements
To reposition an enhancement, either cut and paste it, or click the enhancement to reveal its editing toolbar and use the controls described below.
| Button | Description |
|---|---|
| Moves the enhancement up one paragraph. | |
| Moves the enhancement down one paragraph. | |
| Enables drag-and-drop repositioning. Click the button, move the mouse to the target position, then click again to place the enhancement. |
Alignment
Each enhancement includes alignment options at the bottom of its configuration panel.
| Alignment | Example |
|---|---|
| Left Alignment |  |
| Center Alignment - Contained |  |
| Right Alignment |  |
Dragging and dropping media
New shared media files can be uploaded directly into the rich-text editor by dragging and dropping them from your file system.
Adding inline code
To add inline code:
- Enter or select the text to format as code.
- Click in the toolbar.
Adding HTML or iframe embeds
To add an HTML or iframe embed:
-
Click in the rich-text editor where you want the embed to appear.
-
Click , then select HTML or Iframe.
-
In the Shared field, do one of the following:
- Search for and select an existing HTML or iframe embed.
- Click Create New to create one:
- HTML—Enter an Internal Name and paste your code into the Raw HTML field.
- Iframe—Enter an Internal Name and a URL, then set the iframe's height and width in pixels.
-
Click Save & Close.
Adding quotes
To add a pull quote:
- Enter or select the text to display as a quote.
- Click .
- Enter attribution in the Attribution field.
- Click Save & Close.
Adding snippets
Snippets are small pieces of reusable modular content. See Snippet for information about creating them.
To add a snippet:
- Click in the rich-text editor where you want the snippet to appear.
- Click .
- Search for and select the desired snippet, or create a new one.
- From the Variant list, select a variant if desired.
- Click Save & Close.
Adding tables
| Action | Instructions |
|---|---|
| Add table | 1. Click where you want the table. 2. Click and draw a table on the grid. |
| Add row | 1. Place the cursor inside the table. 2. Click , then select Add Row Above or Add Row Below. |
| Delete row | 1. Place the cursor inside the row to delete. 2. Click , then select Delete Row. |
| Add column | 1. Place the cursor inside the table. 2. Click , then select Add Column Left or Add Column Right. |
| Delete column | 1. Place the cursor inside the column to delete. 2. Click , then select Delete Column. |
| Merge cells | 1. Click and drag to select the cells to merge. 2. Click , then select Merge Cells. |
| Split cells | 1. Click inside a previously merged cell. 2. Click , then select Split Cell. |
Custom keyboard
The custom keyboard lets you insert Unicode characters that are not available on a standard keyboard.
To insert a Unicode character:
- Click in the rich-text editor where you want the character to appear.
- Click .
- Select the character from the keyboard panel.
To add characters to the custom keyboard, see Adding characters to the rich-text editor's virtual keyboard.
Find and replace
To find and replace text:
-
In the toolbar, click .
-
Enter the term to find. Matching instances are highlighted throughout the body, and the total count appears next to the search field. Click and to move between instances.
-
Click to expand the replace controls.
-
Optionally refine the search:
- Case Sensitive—Matches only the exact letter case you entered.
- Whole Word—Matches only the complete word, not substrings. For example,
graphdoes not matchpolygraphorgraphs.
-
Enter a replacement term in the Replace with field. The Replace and Replace All buttons become available.
-
Click Replace to replace the currently highlighted instance, or click Replace All to replace every occurrence.
Track changes
Track changes lets editors and reviewers see what has been added or removed without immediately accepting the edits.
To enable track changes:
- In the toolbar, toggle on Track Changes.
The track-changes toolbar appears with the following controls:
| Control | Description |
|---|---|
| Accept Changes | Accepts the change at the current cursor position. |
| Reject Changes | Rejects the change at the current cursor position. |
| Accept All | Accepts all pending changes. |
| Reject All | Rejects all pending changes. |
| Preview | Previews the text as it would appear with all changes accepted. |
These controls are also available in full-screen editing mode.
Commenting
Inline comments allow editors and reviewers to leave notes without altering the published body text.
Adding comments
- Position the cursor where you want to place the comment, with no text selected.
- Click in the toolbar.
- Type the comment.
- Click again to exit commenting mode.
Brightspot can be configured to let editors highlight text and convert it to a comment in one click. See Converting text to comments.
Deleting comments
- Click inside the comment.
- Click in the toolbar.
Showing or hiding comments
- Click in the toolbar to toggle comment visibility.
Responding to comments
- Enter full-screen mode by clicking . Comments and tracked changes appear in the right rail.
- Click next to the comment to respond.
- To delete a response, click .
Converting text to comments
When this setting is enabled, editors can select text and click to convert the selection into a comment rather than typing the comment manually.
To enable conversion from text to in-line comments:
- Click > Admin > Sites & Settings > Sites > Global.
- Select the CMS tab, then expand the RTE cluster.
- Toggle on Create Comment From Highlight.
- Click Save.
Full-screen editing
Full-screen mode expands the rich-text editor to fill the entire browser window, which is useful for long-form authoring and when reviewing tracked changes or comments in the right rail.
To enter full-screen editing mode:
- Click in the toolbar.
AI features
If the AI plugin is installed, the Create with AI tool is available inside the rich-text editor. See Create with AI.
Keyboard shortcuts
The following shortcuts are available in the editing area. Your Brightspot configuration may include additional shortcuts.
| Action | Windows / Linux | Mac |
|---|---|---|
| Selection | ||
| Select all | Ctrl-A | ⌘-A |
| Select one character right | Shift-Right | ⇧-Right |
| Select one character left | Shift-Left | ⇧-Left |
| Select to end of line | Shift-End | ⇧-Ctrl-Right |
| Select to beginning of line | Shift-Home | ⇧-Ctrl-Left |
| Select one line down | Shift-Down | ⇧-Down |
| Select one line up | Shift-Up | ⇧-Up |
| Select to end of editing area | Shift-Ctrl-End | ⇧-⌘-Down |
| Select to beginning of editing area | Shift-Ctrl-Home | ⇧-⌘-Up |
| Select next word | Shift-Ctrl-Right | ⇧-⌥-Right |
| Select previous word | Shift-Ctrl-Left | ⇧-⌥-Left |
| Select one page down | Shift-PageDown | ⇧-PageDown |
| Select one page up | Shift-PageUp | ⇧-PageUp |
| Navigation | ||
| Move cursor up | Up | Up |
| Move cursor down | Down | Down |
| Move cursor left | Left | Left |
| Move cursor right | Right | Right |
| Move to beginning of paragraph | — | Ctrl-A |
| Move to end of paragraph | — | Ctrl-E |
| Move one word left | Ctrl-Left | ⌥-Left |
| Move one word right | Ctrl-Right | ⌥-Right |
| Move to beginning of editing area | Ctrl-Home | ⌘-Up |
| Move to end of editing area | Ctrl-End | ⌘-Down |
| Move to end of line | End | ⌘-Right |
| Move to beginning of line | Home | ⌘-Left |
| Scroll down one page | PageDown | PageDown |
| Scroll up one page | PageUp | PageUp |
| Deletion | ||
| Delete to beginning of line | Ctrl-Shift-Backspace (Linux) | ⌘-Delete |
| Delete to end of line | Ctrl-Shift-Delete (Linux) | — |
| Delete to left | Backspace | Delete |
| Delete to right | Delete | Ctrl-D |
| Delete word to right | Ctrl-Delete | — |
| Delete word to left | Ctrl-Backspace | — |
| Paragraph alignment | ||
| Left | Ctrl-Alt-L | ⌘-⇧-L |
| Center | Ctrl-Alt-E | ⌘-⇧-E |
| Right | Ctrl-Alt-R | ⌘-⇧-R |
| Text formatting | ||
| Bold | Ctrl-B | ⌘-B |
| Italic | Ctrl-I | ⌘-I |
| Underline | Ctrl-U | ⌘-U |
| Strikethrough | Ctrl-Alt-X | ⌘-⇧-X |
| Superscript | Ctrl-Shift-- | ⌘-. |
| Subscript | Ctrl-= | ⌘-, |
| Clear character formatting | Ctrl-Space | ⌘-\ |
| Hyperlink | Ctrl-K | ⌘-K |
| Lists | ||
| Bulleted list | Ctrl-Shift-8 | ⌘-⇧-8 |
| Numbered list | Ctrl-Shift-7 | ⌘-⇧-7 |
| Demote list level | Ctrl-] | Ctrl-] |
| Promote list level | Ctrl-[ | Ctrl-[ |
| Line break inside list | Shift-Enter | Shift-Return |
| Find | ||
| Find in editing area | Ctrl-F | ⌘-F |
| Special | ||
| Type raw HTML | Ctrl-Shift-C | Ctrl-⇧-C |
| Show special character keyboard | Ctrl-Shift-K | ⌘-⇧-K |
| Undo | Ctrl-Z | ⌘-Z |
| Redo | Ctrl-Y | ⌘-⇧-Z |
| Enhancements | ||
| Pull quote | Ctrl-Shift-Q | — |
| Image | Ctrl-Shift-I | Ctrl-⇧-I |
| Gallery | Ctrl-Shift-G | Ctrl-⇧-G |
| Playlist | Ctrl-Shift-P | Ctrl-⇧-P |
| Video | Ctrl-Shift-V | Ctrl-⇧-V |
| Module | Ctrl-Shift-M | Ctrl-⇧-M |
| Collaboration | ||
| Toggle comment insertion | Ctrl-Shift-′ | Ctrl-⇧-′ |