Post-publish actions
Post-publish actions provide a way to present next steps to editors once they have published content. Post-publish actions are presented in a pop-up directly in the content edit page, saving editors the time of navigating to multiple widgets to take the same actions.
With post-publish actions, you can:
- Enable or disable post-publish actions at the global, site, or user levels.
- Automatically display post-publish actions at the global, site, or user levels.
- Manually display post-publish actions using the menu in an asset's content edit form.
Developers can customize the post-publish actions widget to reflect the editor's workflow. In the following example, post-publish actions allow editors to immediately place content into a list of modules without having to navigate to them directly.
Developers can configure the post-publish pop-up to display messages, fields, and/or widgets.
This section covers how to maximize the post-publish actions available to you by default in Brightspot.
Enabling post-publish actions
This topic describes how to enable post-publish actions.
To enable post-publish actions:
- From the left navigation, under Admin, click Sites & Settings.
-
In the Sites widget, select the site for which you want to enable post-publish actions, or select Global to enable for all sites.
-
Click , located to the left of , and type
Post Publish. -
From the Enable Post Publish Actions list, select one of the following:
- Enabled—Editors can promote assets immediately after their publication without opening the containing asset. (This saves the step of opening and modifying the containing asset.)
- Disabled—Editors can promote assets by opening the containing asset.
-
From the Open Post Publish Actions Automatically list, select one of the following:
- Enabled—Brightspot automatically displays the Post Publish Actions widget after an asset is published for the first time.
- Disabled—Editors access the post-publish actions widget by clicking > Post Publish Actions in the editorial toolbar.
-
Click Save.
Editors can override the site-level settings, and enable or disable post-publish placement in their profiles. For details, see Configuring your profile and Profile settings.
Performing post-publish actions
In standard versions of Brightspot 4.5.3 or later, post-publish actions are only available if at least one of the following conditions is true:
- A homepage contains a lead or content module.
- A section contains a lead or content module.
- A tag contains a lead or content module.
If you have any of the previous conditions, you can replace an asset in the lead or content module with the asset you just published. (Your organization's developers can add additional conditions and post-publish actions.)
To promote an asset after publication:
-
Publish the asset. If the Post Publish Actions widget appears, skip to step 3.
-
In the editorial toolbar, click > Post Publish Actions.
-
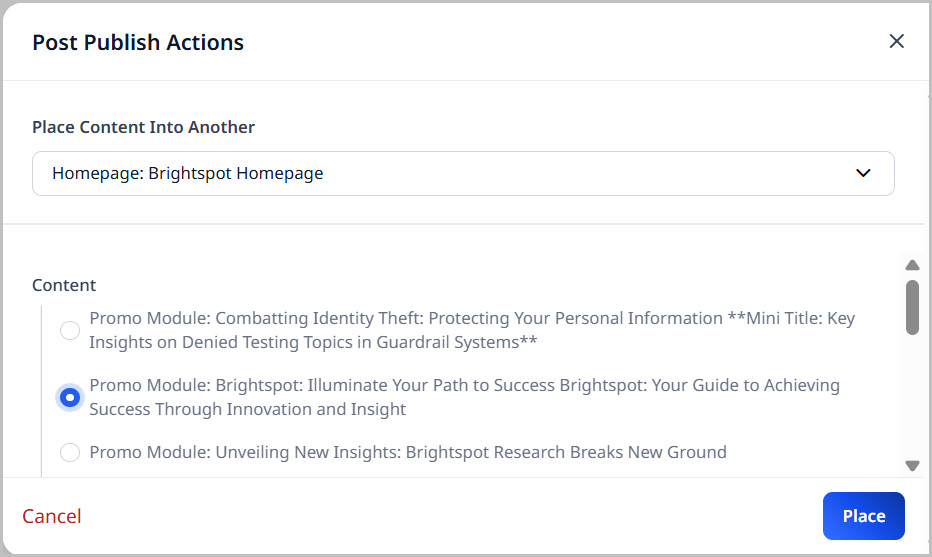
In the Post Publish Actions widget, do the following:
- From the Place Content Into Another list, select one of the available assets. The Post Publish Actions module refreshes to show the available placements based on the selection made in the Place Content Into Another field.
- Select where you want to place the asset you just published.
- Click Place. Brightspot displays a confirmation message.
- Repeat steps a–c to configure additional placements.