Google Drive
Brightspot's Google Drive integration lets you search and import files from a linked Google Drive account into federated search, and can keep an imported file in sync with later changes in Drive.
Configuring the integration
To configure the Google Drive integration:
- From the left navigation, under Admin, click Sites & Settings, then select the Global site.
- From the Integrations tab, expand the Google cluster.
- In the Drive Client ID field, type the OAuth client ID from the Google Developer Console.
- In the Drive Client Secret field, type the OAuth client secret from the Google Developer Console.
- Click Save.
Brightspot displays the redirect URI to add in the Google Developer Console (in the form https://your-host/googleDriveAuth) next to the Drive Client ID field.
Linking your account
Google Drive imports files on behalf of the signed-in editor rather than a shared service account. If you have not linked your Google Drive account, the search results panel shows a "Click here to authenticate Google Drive" prompt instead of a search field.
To link your Google Drive account:
- Open the search panel for Google Drive.
- Click the authentication link ("Click here to authenticate Google Drive" the first time, or Link another account to add an additional account).
- Sign in to Google and approve the requested permissions.
After you approve access, Brightspot returns you to the search panel and Google Drive is ready to search.
Whether Convert Google Doc and Convert Google Sheet appear in the Converter list below depends on your site's dependencies. Sites that do not have these specific conversion types available define their own converters instead. See Extending the plugin.
Importing a Google Doc
Use the following procedure to import a Google Doc from Google Drive into Brightspot.
To import a Google Doc:
-
Open the search panel.
-
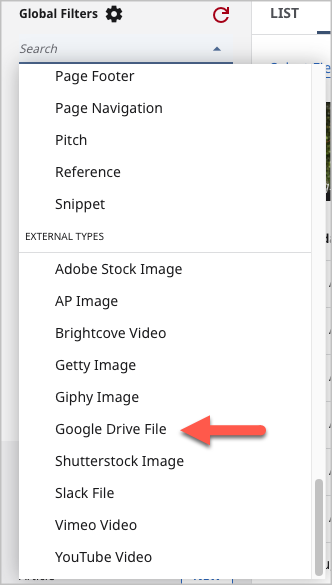
Set the content types filter to Google Drive File.
-
If this is the first time you are searching for files in Google Drive, do the following:
- In the search panel, click Click here to authenticate Google Drive.
- Follow the prompts to allow Brightspot to access your Google Drive account.
- Click Close.
-
Add other filters or search text. For additional information, see Search filters. Brightspot lists any matching files.
-
Click on the Google Drive file you want to import.
-
Under the Converter list, select one of the following:
-
Convert Google Doc—
-
Under Convert to Type, select one of the following:
- Article—Imports the Google Doc as an article draft. You can then modify the draft as described in Article.
- Blog Post—Imports the Google Doc as a blog post draft. You can then modify the draft as described in Blog post.
- Document—Imports the Google Doc as a document draft. You can then modify the document as described in Document.
-
-
Import Google File as Downloadable File—
-
Under Import Type, select one of the following:
- Attachment File—Imports the Google Doc as an attachment file that can be downloaded.
- Document—Imports the Google Doc file as a published document. You can then modify the document as described in Document.
(These imports are ideal for sharing the imported files with digital asset management.)
warningAs imported files approach or exceed 100 MB, there is an increased possibility of a timeout occurring. For best results, reduce the file's size before initiating an import.
-
-
-
In the content edit form, click Import.
Brightspot imports the file and displays it in a content edit form. You can modify the imported file.
Any changes you make to an imported Google Drive file in Brightspot are not reflected in the source file.
For additional information about importing external assets, see Importing external videos.
Importing a Google Sheet
You can import tags, sections, or users into Brightspot from a Google Sheet.
To import a Google Sheet:
-
In the header, click the search field to open the search panel.
-
Under Global Filters, in the Any Content Type filter, select Google Drive File.

-
Click the title of the Google Sheet you want to import into Brightspot.
-
Under the Converter list, select one of the following:
-
Convert Google Sheet—
-
Under Convert to Type, select one of the following:
- Section—Imports the Google Sheet as a section draft. You can then modify the draft as described in Section.
- Tag—Imports the Google Sheet as a tag draft. You can then modify the draft as described in Tag.
- Tool User—Imports the Google Sheet as a tool user draft. You can then modify the user as described in Users and roles.
-
After choosing one of the available types, proceed to step 5 below.
-
-
Import Google File as Downloadable File—
-
Under Import Type, select one of the following:
- Attachment File—Imports the Google Sheet as a published attachment file that can be downloaded.
- Spreadsheet—Imports the Google Sheet file as a published spreadsheet. You can then modify the spreadsheet as described in Spreadsheet.
-
-
-
Toggle on Has Header Row if your Google Sheet includes a header row. When toggled on, Brightspot lists the headings for you as you configure field mappings. When toggled off, Brightspot lists the columns as letters.
-
Under Field Mappings, do the following:
-
Click .
-
Under Column, select the column containing the field you are mapping.
-
Under Field, select one of the following:
-
If importing tags or sections:
- Display Name—Sets the values in this column as the names of the tags or sections in Brightspot.
- Description—Sets the values in this column as the descriptions of the tags or sections in Brightspot.
- Parent—Sets the values in this column as the parents of the tags or sections you are importing into Brightspot. If no parent by the given name already exists, Brightspot creates it and assigns the tag or section to which it pertains.
-
If importing users:
- Name—Sets the values in this column as the names of the users in Brightspot.
- Email—Sets the values in this column as the email addresses of the users in Brightspot.
- Username—Sets the values in this column as the usernames of the users in Brightspot.
- Password—Sets the values in this column as the passwords of the users in Brightspot. You may enter a password, or enter
changemeto force the user to change their password upon first log in.
-
-
Repeat steps 6a–6c for all columns in the Google Sheet.
-
-
Click Import.
-
When the import completes, refresh the page to view the list of the tags, sections, or users you imported.
noteAll tags, sections, or users imported from a Google Sheet to Brightspot are published upon the completion of the import, but without URLs. For details on the options you have available when updating them, see Tag, Section, and Users and roles.
Example Import
The following image displays a Google Sheet that has been configured for import into Brightspot.
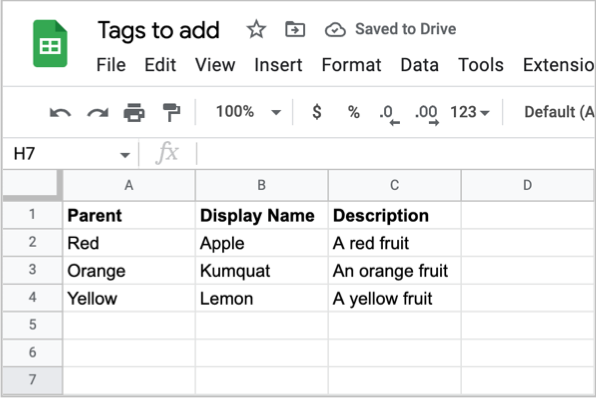
In the Import widget, under Field Mappings, three mappings are configured pertaining to the three columns in the sample spreadsheet:
-
Mapping 1—Brightspot maps column A as parent.
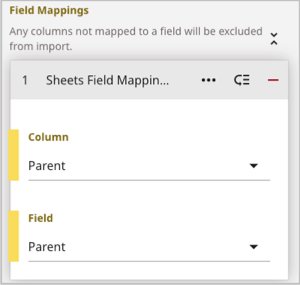
- In the Column field, column A (referred to in the Google Sheet header as "Parent") is selected.
- In the Field field, Parent is selected.
-
Mapping 2—Brightspot maps column B as tag name.
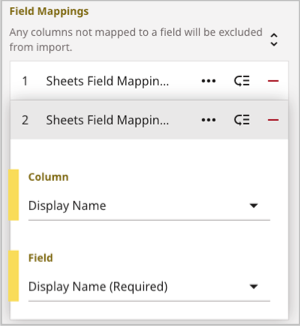
- In the Column field, column B (referred to in the Google Sheet header as "Display Name") is selected.
- In the Field field, Display Name is selected.
-
Mapping 3—Brightspot maps column C as description.
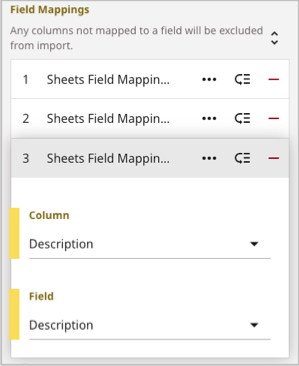
- In the Column field, column C (referred to in the Google Sheet header as "Description") is selected.
- In the Field field, Description is selected.
After clicking Import, Brightspot performs the import according to the following mappings:
Appleis created as a tag withRedas its parent andA red fruitas its description.Kumquatis created as a tag withOrangeas its parent andAn orange fruitas its description.Lemonis created as a tag withYellowas its parent andA yellow fruitas its description.
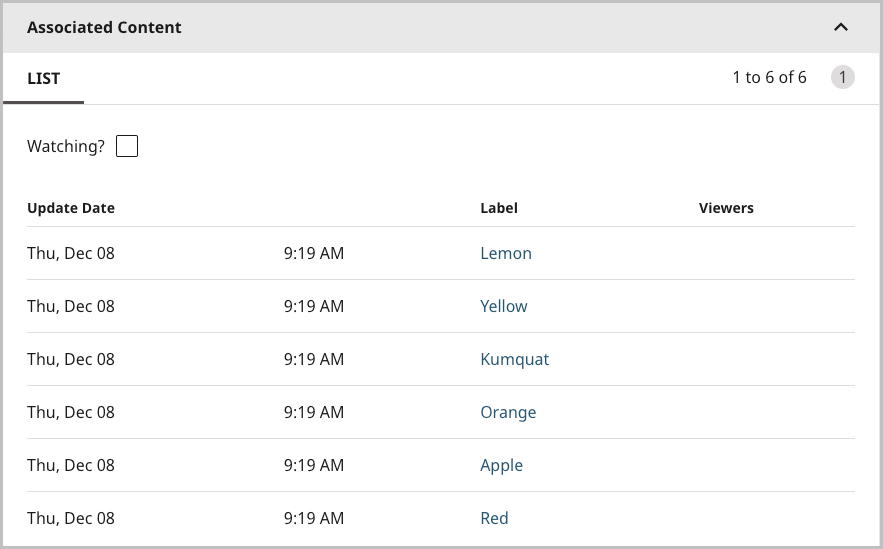 A list of tags imported from the Google Sheet. | 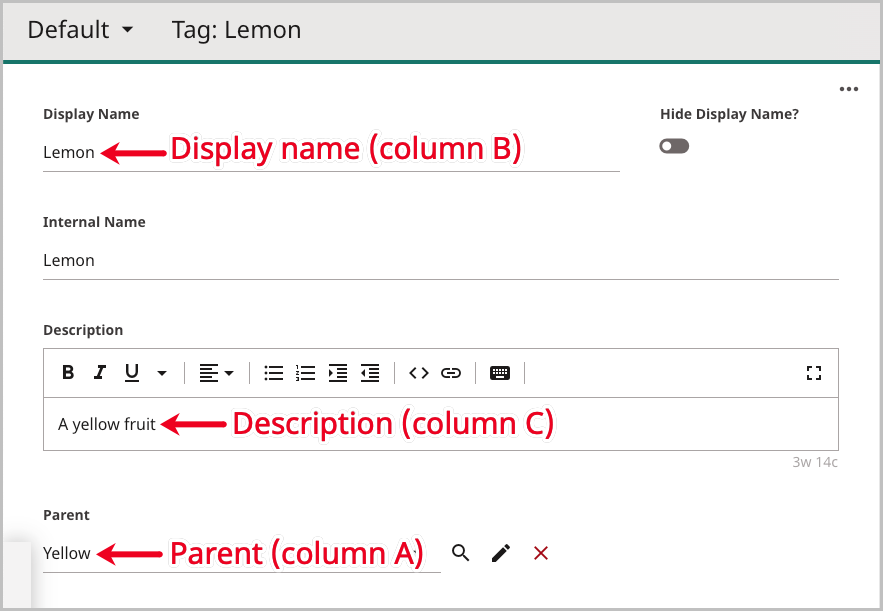 The tag Lemon imported from the Google Sheet. The parent Yellow and the description A yellow fruit are associated to it. |
Re-importing a Google Drive file
If a Google Drive file is edited after being imported to Brightspot, you can re-import its latest version to Brightspot.
To re-import a Google Drive file:
- In the header, click the search field to open the search panel.
- Under Global Filters, in the Any Content Type filter, under External Types, select Google Drive File. Brightspot displays a list of Google Drive files.
- Click the Google Drive file you want to re-sync. In the Sync widget, Brightspot indicates whether any changes were made in the Google Drive file.
- Click Reimport From Source. Brightspot refreshes the page with updates from the re-imported Google Drive file.
- If necessary, re-publish the changes.
Syncing Google Drive assets
The source files of assets imported from Google Drive may change from time to time. In order to ensure the assets published on Brightspot are the most current version, you must sync them with the source file. This is done using the Sync widget.
The Sync widget lets you know whether the version you currently have published on Brightspot is current, or if the source file has been modified since it was last imported. In the image below, you can see the message that lets you know your asset is using the current version of the source file and is in sync.
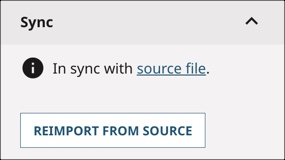
If the source file has changed since you last imported it into your asset, the following message displays in the Sync widget.
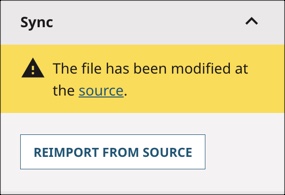
To view the source file to see what changes have been made, click source. This opens the Google Drive file in a new tab or window. Here, you can look at the source file to determine whether you want the updates to be displayed on your published Brightspot asset.
If you decide you would like to update the content of your asset, click Reimport From Source. This opens a pop-up that asks you to confirm that you would like to reimport the file. To confirm this process, click Sync Now.
This pulls in the latest version of the source file from Google Drive.
Remember to save or publish your asset once the reimporting process is complete. If the asset was already published, Brightspot creates a draft with the differences instead of overwriting the published version directly—failing to save or publish that draft results in the reimported file not being retained in your asset.
If the source file is deleted, the asset's content edit form no longer displays the Sync widget.