Tag
Tags are a way for content teams to add additional metadata to an asset, and they can be used in two ways:
- A tag can be applied to assets.
- A tag can be its own page that lists associated assets.
Tags are a useful way to group content both internally and externally. If you want to use a tag to only group content internally, you may opt to hide the tag from public pages and modules.
For a wire frame example of what this content type can look like on your site, see Tag design.
Creating tags
To create a tag:
- In the header, click .
- From the Create list, select Tag.
- Using the following tables as a reference, complete the fields as needed.
- Complete your site's workflow and publish the asset.
- Main
- SEO
- Overrides
- Advanced
- Styles
- Locale
| Field | Description |
|---|---|
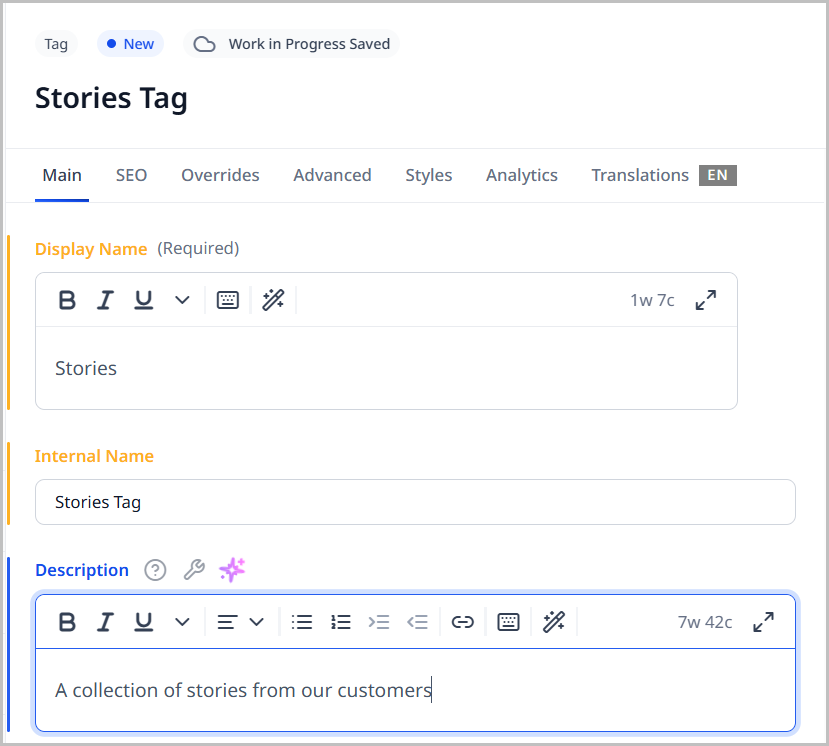
| Display Name | Enter the Display Name for this tag. This name is visible to visitors and users. |
| Internal Name | Enter an internal name for this asset. Brightspot uses this name internally, such as in the search panel and recent activity widget. This name is not visible to visitors to your site. |
| Description | Enter a description. This description is visible to the visitors to your site. |
| Parent | If you are creating a hierarchy of tags, from the Parent selection field, select a parent tag. If the parent tag is not listed, do the following: - Click to open a content picker. - Search for an existing tag or, from the Create widget, click New Tag to create a new one. You return to the content edit form. |
| Hidden | Toggle on to hide the tag on all public pages. |
| Lead | Make a selection: - None—No page heading appears for the tag. - Page Heading—Displays a page heading for the tag. See Page heading for more information on creating a page heading. |
| Content | Make a selection: - Inherit—retains the content settings from the parent. - Add After—Adds modules after the content associated with the tag. For more information, see Modules and Above, beside, and below layout blocks. - Add Before—Adds modules before the content associated with the tag. For more information, see Modules and Above, beside, and below layout blocks. - Replace—Replaces content associated with the tag with modules. For more information, see Modules. Repeat to include additional items. |
| Field | Description |
|---|---|
| Title | Text appearing in the asset's <title> tag. Brightspot automatically populates this field from data on the Main tab, and you can override this as needed by entering a new title. |
| Suppress SEO Display Name | If toggled on, your site's name will not appear in the <title> tag and subsequently in search results. |
| Description | Text appearing in the asset's <meta name="description"> tag. Brightspot automatically populates this field from data on the Main tab, and you can override this as needed by entering a new description. |
| Robots | Text appearing in the item's <meta name="robots"> tag. For an explanation of the available options, see Robots Meta Directives. |
| AMP Disabled | Toggle on to disable generation of an AMP version of this asset. For details, see AMP. |
Logo & Icons Override
| Field | Description |
|---|---|
| Logo | Select a new image to serve as the logo that displays on this asset. For information about creating a logo, see Image Logo. |
| News Publisher Logo | Select a new image to serve as the news publisher logo that displays on this asset. |
Layout Overrides
| Field | Description |
|---|---|
| Hat | Select one of the options to override the inherited hat. For details, see Creating a hat. |
| Navigation | Select one of the options to override the inherited navigation. For details, see Creating a navigation. |
| Banner | Select one of the options to override the inherited banner. For details, see Applying a breaking news banner. |
| Footer | Select one of the options to override the inherited footer. For details, see Creating a footer. |
| Above | Select one of the options to override the inherited Above layout block. For details, see Layout structure. |
| Aside | Select one of the options to override the inherited Aside layout block. For details, see Layout structure. |
| Below | Select one of the options to override the inherited Below layout block. For details, see Layout structure. |
Advanced
| Field | Description |
|---|---|
| Exclude from Dynamic Results | Toggle on to prevent this asset from showing up in dynamic list modules. For details, see List module. |
Promo Overrides
| Field | Description |
|---|---|
| Promo Title | Enter text to override this asset's title when used in a promo. Brightspot automatically populates this field from data on the Main tab, and you can override this as needed by entering a new title. |
| Promo Description | Enter text to override this asset's description when used in a promo. Brightspot automatically populates this field from data on the Main tab, and you can override this as needed by entering a new description. |
| Promo Image | Image appearing in the asset's image when the asset is used as a promo. Brightspot automatically populates this field from data on the Main tab, and you can override this as needed by selecting a new image. |
| Promo Category | Text appearing in the asset's category when the asset is used as a promo. Brightspot automatically populates this field from data on the Main tab, and you can override this as needed by entering a new category. |
| Promo Category Link | Link associated with the promo category. This field inherits from the selected promo category, and you can override this as needed. |
Share Overrides
| Field | Description |
|---|---|
| Share Title | Text appearing in the asset's title when a visitor shares the asset. automatically populates this field from data on the Main tab, and you can override this as needed by entering a new title. |
| Share Description | Text appearing in the asset's description when a visitor shares the asset. automatically populates this field from data on the Main tab, and you can override this as needed by entering a new description. |
| Share Image | Image appearing in the asset's image when a visitor shares the asset. Brightspot automatically populates this field from data on the Main tab, and you can override this as needed by selecting a new image. |
Site Map
| Field | Description |
|---|---|
| Change Frequency | Select an option from the list to denote how frequently the page is likely to change. This value provides general information to search engines and may not correlate exactly to how often search engines crawl this asset. See the <changefreq> tag definition in Sitemaps XML format. |
| Priority | Enter a value to designate this asset's priority over other URLs on your site. Valid values are 0.0 to 1.0. This allows you to relay to search engines which pages you deem most important for crawlers. For more information, see the <priority> tag definition in Sitemaps XML format. |
RSS Settings
| Field | Description |
|---|---|
| Disable Feed | Toggle on to remove this asset's RSS feed. (A visitor's RSS reader may retain a previously retrieved feed.) |
| Render Full Content | Toggle on to deliver an asset's entire text—not just the title or headline—to the RSS feed as plain text. |
| Enabled Feed Item Types | Select the content types to which these settings apply, or leave blank to apply the settings to all content types. For example, if you are publishing a section, you can select Article in this field so that these settings apply only to articles with a section. |
Page Heading Styles
| Field | Description |
|---|---|
| Template | Select the template of this module from the list of options. Templates are visual presentation presets that differ depending on the type of module. |
| Preset | Select one of the following: - None—Applies styling from the site's theme. - Custom—Opens a form to customize the site's theme for this asset. - (Various)—Aside from None or Custom, there may be additional options in this list depending on the value selected in the Template field. If the selected template has presets, then those presets are able to be selected in this list and applied. For information about configuring template presets, see Creating a template preset. |
| Page Heading Size | Select the size of the page heading's text. |
| Page Sub Heading Size | Select the size of the page sub-heading's text. |
| Field | Description |
|---|---|
| Locale | Sets the content's locale. This setting can also be used to auto-localize content based on the users requested locale. |
As necessary, add associated content to this asset. For details, see Creating associated content.
Tag hierarchies
A political publication, for example, can have several tags grouped under Issues, one of which is Transportation. If your publication publishes five or 10 items a year in the category of transportation, then a single tag is sufficient for all of them; a visitor can easily scan the list of publications associated with Transportation and find the one of interest.
However, suppose you have a high-volume site that publishes a dozen items every day pertaining transportation. A visitor looking at the tag page Transportation will find hundreds of matching items with little chance of finding the desired item. In this scenario, you can help your visitors by providing more specific tags, such as different modes of transportation. To better manage large numbers of tags, you can organize them into a hierarchy.
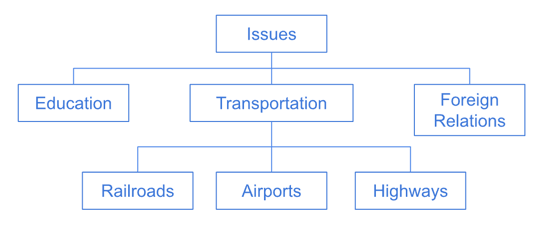
Referring to the previous diagram—
- Issues is a parent tag of Education, Transportation, and Foreign Relations.
- Transportation is a parent tag of Railroads, Airports, and Highways.
If you associate a parent tag with an item, Brightspot does not automatically assign the children tags.
Importing tags
You can import tags from an external file. Using this feature may be easier than adding tags individually.
To upload tags:
- In the header, click .
- From the Create list, select Tag CSV Importer. A content edit page appears.
- Click Download CSV Template. Your browser downloads a CSV file. The columns in the CSV file correspond to some of fields in the table Creating a tag.
- Populate the CSV file.
- In the New Tags CSV Importer content edit page, click Choose, and navigate to your populated CSV file.
- In the editorial toolbar, click Import.
Brightspot imports the tags, and displays the results in a log file.
Brightspot uses the following validation rules when importing tags:
- Display Name is a required field; all other fields are optional.
- Display Name must be unique in the CSV file and not already exist in Brightspot. If a display name occurs more than once, Brightspot imports the first occurrence and flags the other occurrences as an error.
- If the URL field is blank, Brightspot creates it from the Display Name field.
- If the SEO Title field is blank, Brightspot creates it from the Display Name field.
- If the SEO Keywords field has more than one keyword, separate them with a comma (White Roses, Red Roses).