Book
A book is a container used to display help content to your site visitors. It is comprised of chapters and topics. Books have a table of contents along the left rail that allows your visitors to navigate through topics. You organize the table of contents as you add content to the book.
For a wire frame example of what this content type can look like on your site, see Book design.
Creating books
To create a book:
- In the header, click .
- From the Create list, select Book.
- Using the following tables as a reference, complete the fields as needed.
- Complete your site's workflow and publish the book.
- Main
- SEO
- Overrides
| Field | Description |
|---|---|
| Display Name | Enter a display name. This name is visible to the visitors to your site and sits at the top of the table of contents. When visitors click this name, they are taken back to the landing page for your book. |
| Internal Name | Enter an internal name for this asset. Brightspot uses this name internally, such as in the search panel and recent activity widget. This name is not visible to visitors to your site. |
| Description | Enter a description that describes this asset. This description is visible to the visitors to your site. |
| URL Slug | This field, by default, is auto-populated by a Title, Name, Display Name, or Headline field, and becomes part of the asset's URL. Auto-populated slugs are lowercase, have diacritics removed, and any symbols or spaces are replaced with -. You can modify the URL Slug field if necessary. |
| Body | The main landing page of the book. See Rich-text editor. |
| Chapters | The contents of the book. See Chapters. |
| Field | Description |
|---|---|
| Title | Text appearing in the asset's <title> tag. Brightspot automatically populates this field from data on the Main tab, and you can override this as needed by entering a new title. |
| Suppress SEO Display Name | If toggled on, your site's name will not appear in the <title> tag and subsequently in search results. |
| Description | Text appearing in the asset's <meta name="description"> tag. Brightspot automatically populates this field from data on the Main tab, and you can override this as needed by entering a new description. |
| Robots | Text appearing in the item's <meta name="robots"> tag.For an explanation of the available options, see Robots Meta Directives. |
Media
| Field | Description |
|---|---|
| Primary Media Type | Select the primary media type of this article, either None, Audio, Gallery, Text, Video. This selection determines how the asset is treated when used as a promo. For example, if you select Video, the promo image will have a play arrow overlaid on top of it. |
Logo & Icons Overrides
| Field | Description |
|---|---|
| Logo | Select a new image to serve as the logo that displays on this asset. For information about creating a logo, see Image Logo. |
| News Publisher Logo | Select a new image to serve as the news publisher logo that displays on this asset. |
| Default Promo Image | Image appearing in the asset's image when the asset is used as a promo. Brightspot automatically populates this image from the site's default promo image, and you can override this as needed by selecting a new image. |
Layout Overrides
| Field | Description |
|---|---|
| Hat | Select one of the options to override the inherited hat. For details, see Creating a hat. |
| Navigation | Select one of the options to override the inherited navigation. For details, see Creating a navigation. |
| Banner | Select one of the options to override the inherited banner. For details, see Applying a breaking news banner. |
| Footer | Select one of the options to override the inherited footer. For details, see Creating a footer. |
| Above | Select one of the options to override the inherited Above layout block. For details, see Layout structure. |
| Aside | Select one of the options to override the inherited Aside layout block. For details, see Layout structure. |
| Below | Select one of the options to override the inherited Below layout block. For details, see Layout structure. |
Advanced
| Field | Description |
|---|---|
| Exclude from Dynamic Results | Toggle on to prevent this asset from showing up in dynamic list modules. For details, see List module. |
| Exclude from Search Results | Toggle on to prevent this asset from showing up in search results on your site. |
Promo Overrides
| Field | Description |
|---|---|
| Promo Title | Enter text to override this asset's title when used in a promo. Brightspot automatically populates this field from data on the Main tab, and you can override this as needed by entering a new title. |
| Promo Description | Enter text to override this asset's description when used in a promo. Brightspot automatically populates this field from data on the Main tab, and you can override this as needed by entering a new description. |
| Promo Image | Image appearing in the asset's image when the asset is used as a promo. Brightspot automatically populates this field from data on the Main tab, and you can override this as needed by selecting a new image. |
| Promo Category | Text appearing in the asset's category when the asset is used as a promo. Brightspot automatically populates this field from data on the Main tab, and you can override this as needed by entering a new category. |
| Promo Category Link | Link associated with the promo category. This field inherits from the selected promo category, and you can override this as needed. |
Share Overrides
| Field | Description |
|---|---|
| Share Title | Text appearing in the asset's title when a visitor shares the asset. Brightspot automatically populates this field from data on the Main tab, and you can override this as needed by entering a new title. |
| Share Description | Text appearing in the asset's description when a visitor shares the asset. Brightspot automatically populates this field from data on the Main tab, and you can override this as needed by entering a new description. |
| Share Image | Image appearing in the asset's image when a visitor shares the asset. Brightspot automatically populates this field from data on the Main tab, and you can override this as needed by selecting a new image. |
Site Map
| Field | Description |
|---|---|
| Change Frequency | Select an option from the list to denote how frequently the page is likely to change. This value provides general information to search engines and may not correlate exactly to how often search engines crawl this asset. See the <changefreq> tag definition in Sitemaps XML format. |
| Priority | Enter a value to designate this asset's priority over other URLs on your site. Valid values are 0.0 to 1.0. This allows you to relay to search engines which pages you deem most important for crawlers. For more information, see the <priority> tag definition in Sitemaps XML format. |
Adding chapters
Once you have created a book, you can add topics to the book in the form of chapters and sub-chapters.
- Chapters provide logical breakpoints in the book structure for you to group similar topics. For example, you might have a chapter titled
Ad Placementthat contains all of your topics about placing ads on your site. - Each chapter can include subchapters—smaller groupings of similar topics, or the topics that fit under the chapter heading. Brightspot's knowledge management supports an infinite hierarchy of nested sub-chapters to give you the flexibility to organize your content as needed; however, keep in mind, nesting sub-chapters can affect the how the table of contents displays. Make sure to preview your work before publishing to ensure your table of contents looks as desired.
To add chapters to a book:
-
In the Chapters field, click Add.
-
Select Inline or Shared. See Creating inline chapters or Creating shared chapters.
-
If desired, add subchapters from the Sub Chapters field.
Table of contents
Once you have added chapters, you can organize your table of contents. Organizing is a simple drag and drop process that allows you to place your content in the desired order.
To organize the table of contents:
-
Search for and open the desired book.
-
Scroll to the Chapters field. This field shows all of the chapters you have already added to the book, in the order they are displayed in the table of contents.
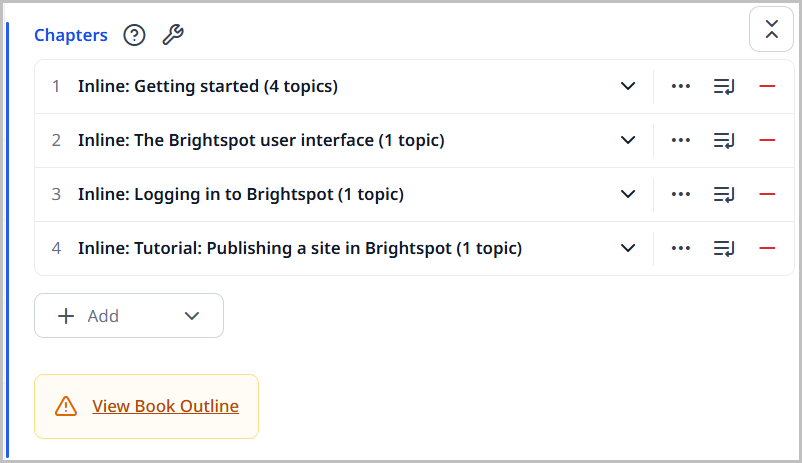
-
Click next to the chapter you want to move that chapter.
-
Drag and drop that chapter into the desired position.
To organize sub-chapters within a chapter, open the chapter you want to organize, and then drag and drop the sub-chapters into the desired order.