Mailchimp
We are actively working to improve this documentation. The content you see here may be incomplete, subject to change, or may not fully reflect the current state of the feature. We appreciate your understanding as we continue to enhance our docs.
Mailchimp is a marketing automation platform and email marketing service for managing mailing lists and creating email marketing campaigns. Brightspot uses Mailchimp to cultivate mailing lists and then use those lists when sending out newsletters.
Configuration
To configure the Mailchimp integration:
- Click > Admin > Sites & Settings.
-
Select the site for which you want to configure this integration.
-
Click Integrations > Mailchimp.
-
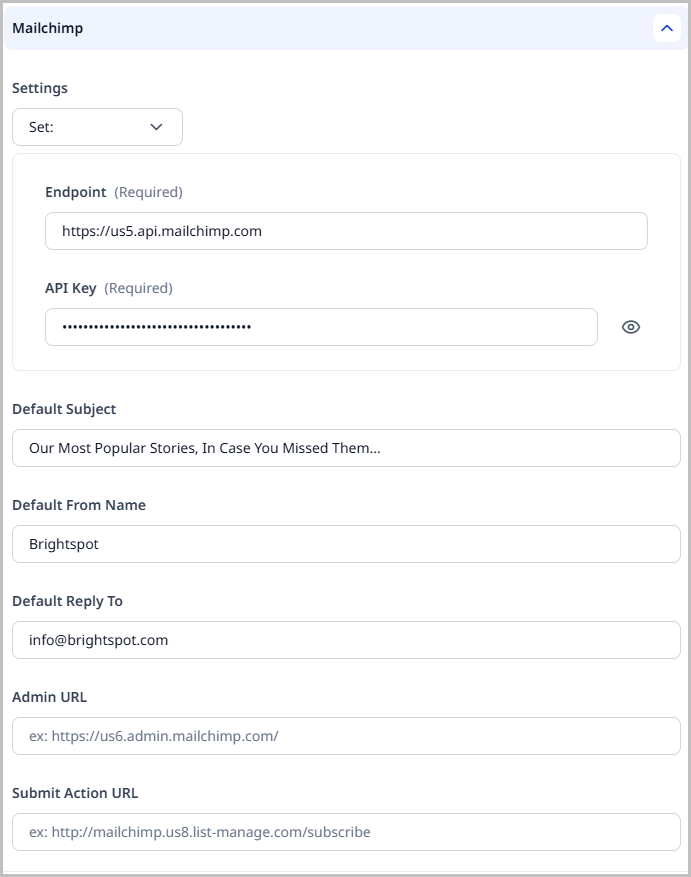
In the Settings field, select Set. Selecting None does not allow for this integration to be enabled for this site.
-
Enter your Endpoint and APIKey. Both of these values are obtained from Mailchimp.
-
You also have the option to set the following default fields for your newsletter emails:
- Default Subject—Enter the default subject line for the emails from Mailchimp that contain your newsletters.
- Default From Name—Enter the default name for the individual or entity that the newsletter emails appear to come from.
- Default Reply To—Enter the default email address for individuals who wish to reply to your email mailings.
-
Enter the Admin URL. This value is obtained from Mailchimp.
-
Click Save.
Creating campaigns
Brightspot integrates with Mailchimp to allow you to create campaigns to distribute your newsletters. Prior to creating a campaign, you must create your audience and segments in Mailchimp.
Campaigns are created from the Mailchimp widget that appears in the right rail of the newsletter content edit form after the newsletter is published. If you do not publish your newsletter, you will not have the Mailchimp widget available.
To create a Mailchimp campaign:
-
After publishing your newsletter, click Create New Campaign in the Mailchimp widget in the side toolbar. The Create Campaign pop-up appears.
-
Select the Audience List for this campaign.
-
(Optional) Select the Segment for this campaign.
tipRemember, audiences and segments for campaigns are created within Mailchimp, not Brightspot.
-
Enter the Campaign Title for your new campaign.
-
Enter the Subject Line. This is what the recipients of this newsletter see as the subject of the email containing the newsletter.
-
The From Name and Reply To fields are auto-populated with the defaults set on the Mailchimp integration page in Brightspot. When you select an audience, the From Name and Reply To values are brought over from Mailchimp; however, these values can be overwritten if necessary.
-
Save your new campaign. Once you save your campaign, the Mailchimp widget changes and displays the Options menu. This is where you can manage your campaign.
tipNewsletters can only be assigned to one Mailchimp campaign, but a single Mailchimp campaign can have multiple newsletters assigned to it.
Testing campaigns
Once you have a newsletter campaign set up, you may find it useful to test it before sending it out to the actual audience. This allows you to make sure the newsletter is being delivered and displaying properly.
To test a Mailchimp newsletter campaign:
-
Click Options in the Mailchimp widget to display the Options menu.
-
Click Send Test Email to open the Send Test Emails pop-up window.
-
Expand Emails and select Values or Comma Delimited.
- Select Values if you want to enter the email addresses to receive this test email individually. Click to add additional email addresses.
- Select Comma Delimited if you want to enter the email addresses to receive this test email in a comma-separated list.
-
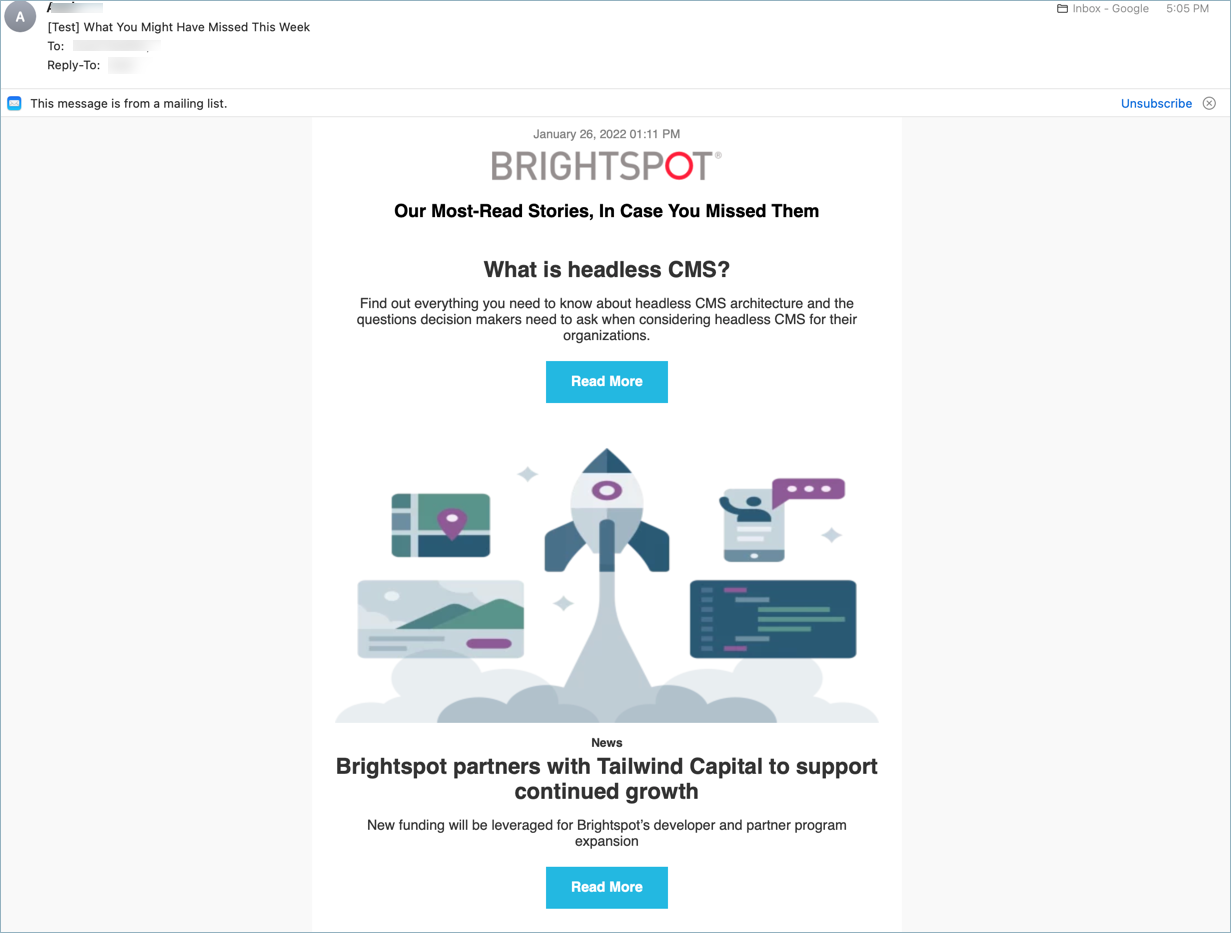
Click Send. The test newsletter is delivered to those email addresses you added. If it is not delivered to your test recipients, you may want to visit Mailchimp and verify your settings.
Updating campaigns
If necessary, once your campaign is saved, you have the ability to make changes.
To update a Mailchimp campaign:
Once a campaign is scheduled, it can no longer be updated.
- Click Options in the Mailchimp widget to display the Options menu. The Options menu is only available after a newsletter campaign has been created.
- Click Update Campaign. This displays the Update Campaign form which contains all of the fields you completed when you created the campaign.
- Make any changes that are needed.
- Click Update.
Scheduling campaigns
Once you have created your Mailchimp newsletter campaign, you can schedule when you would like it to begin.
To schedule a Mailchimp newsletter campaign:
-
Click Options in the Mailchimp widget to display the Options menu. The Options menu is only available after creating a newsletter campaign.
-
Click Schedule. This displays the Schedule Campaign form.
-
Click to open the scheduler.
-
Select the date and time you would like the campaign to begin.
tipYou can only schedule a Mailchimp campaign to begin on the quarter-hour (:00, :15, :30, :45).
-
Click Set. The Schedule Campaign form refreshes to display the date and time you selected.
tipClick Clear to erase the schedule.
-
Click Schedule Campaign to schedule the campaign to begin at the date/time you selected. The Mailchimp widget updates to show the date/time the campaign is scheduled to begin.
Once a Mailchimp campaign is scheduled, you can no longer modify the settings. The Update Campaign button in the Options menu changes to View Settings.
Sending campaigns immediately
You have the option to send a Mailchimp newsletter campaign immediately without scheduling it in advance.
To send a Mailchimp campaign immediately:
- Click Options in the Mailchimp widget to display the Options menu.
- Click Send Now to open the Send Campaign pop-up window.
- Toggle the Are you sure you want to send this campaign now field to on to confirm that you want to send the campaign immediately.
- Click Send Campaign Now.
Viewing a campaign's activity log
As your Mailchimp campaign for your newsletter progresses, you may want to see the activity log for the campaign (to diagnose errors, for example).
To view a Mailchimp campaign's activity log:
- Click Options in the Mailchimp widget to display the Options menu.
- Click View Activity Log to display the View Activity Log pop-up window. This activity log displays all of the actions that have occurred with your Mailchimp campaign and is updated as each event occurs.
Disconnecting campaigns
Once a newsletter is connected to a Mailchimp campaign, you may find it necessary to remove that newsletter from the campaign. Brightspot provides an easy way to accomplish this task.
To disconnect a newsletter from a campaign:
- Click Options in the Mailchimp widget to display the Options menu.
- Click Disconnect From Campaign to display the Disconnect Campaign pop-up window.
- Toggle the Are you sure you want to disconnect this template from the Mailchimp Campaign field to on to confirm that you want to disconnect this campaign.
- Click Disconnect. The newsletter has been disconnected from the Mailchimp campaign.