Localization
We are actively working to improve this documentation. The content you see here may be incomplete, subject to change, or may not fully reflect the current state of the feature. We appreciate your understanding as we continue to enhance our docs.
The platform-localization module enables Brightspot CMS sites to deliver content in multiple languages by managing static text localization, locale-specific content derivation, and site-level language configuration. The library handles both static UI text (navigation labels, form fields, etc.) and dynamic content organization across different locales.
Enterprise publishers often make their assets available in multiple languages. For example, a publisher with visitors in England, Spain, Germany, and Korea publishes all its assets in all four languages. To give visitors a seamless multi-lingual experience, you need to localize your site.
Web pages contain two forms of text: dynamic and static. Dynamic text changes with each asset a visitor views, and static text remains the same regardless of the asset.
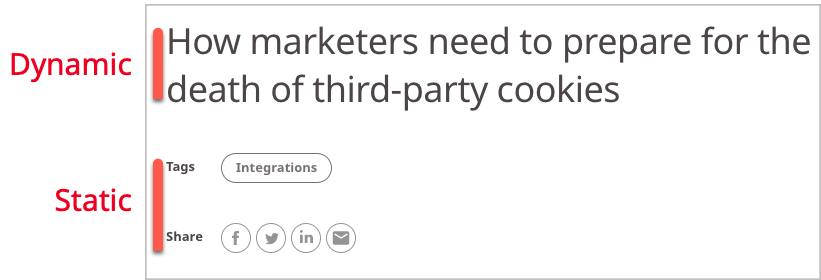
Referring to the previous illustration, the headline is dynamic—it changes when the visitor clicks on a link to view a different asset. The words Tags, Share, and Integrations are static—they remain the same regardless of the asset a visitor is reading.
Localizing a site is the process of providing the static text in a different language. For example, localizing a site for Spanish requires providing translations for the terms Tags, Share, and Integrations. (In contrast, providing dynamic text in different languages requires translating assets from one language to another.)
Strategies
Typically, there are two strategies for delivering translated and localized content:
- Place the translated site in a separate directory under the top-level directory.
- Place the translated site in its own domain.
The following table provides examples of each strategy.
| Asset | English (en) | Spanish (es) | French (fr) |
|---|---|---|---|
| Homepage | example.com/ | example.com/es/ | example.fr/ |
| About us | example.com/about-us | example.com/es/quiénes-somos | (Not translated) |
| Contact us | example.com/contact | example.com/es/contáctenos | example.fr/contacter |
| Terms and conditions | example.com/terms | example.com/es/términos | example.fr/conditions-générales |
Referring to the above table, there are two scenarios for delivering translated content. In the first scenario, all the Spanish translations are stored under an /es directory in the same domain as the English site. In the second scenario, all the French translations are accessed from a different domain example.fr. The first scenario requires adding a Spanish localization to the English site; the second scenario does not require adding a localization, as the entire site is in French.
How Brightspot delivers localized text
When delivering a web page to a browser, Brightspot sends the dynamic text as well as the static text (see illustration, above). For example, when a visitor requests a URL example.com/es/términos, Brightspot sends the translated Spanish dynamic text for example.com/terms. In addition, Brightspot determines the language of the required localized static text using one of the following methods:
- Using a query parameter—Brightspot provides localized text corresponding to the value of a query parameter
lang. - Using the asset's locale—If the visitor requested
example.com/es/términos, and the assettérminoshas a Spanish locale, then Brightspot knows to deliver the localized Spanish static text. (Some sites provide a link, such asLeer en español, to render the current asset in Spanish.) - Using the site's locale—If the visitor requested
example.fr/conditions-générales, and the siteexample.frhas a locale of fr-FR, then Brightspot knows to deliver the localized French static text. (Some websites provide a globe icon so visitors can view the entire site in a different language.) - Using a default language—Every Brightspot server is configured with a default locale, typically US English. If you don't make a configuration at the site, content, or query-parameter level, Brightspot delivers the localized static text in the corresponding language.
Steps for providing localized text
The following steps are required to deploy localized text:
-
Add static text for each locale (see Configuring localized static text).
-
Configure the delivery mechanism for localized text (see Configuring localization delivery).
-
Optional:
- Configuring the locale for each asset (see Configuring an asset's locale).
- Configuring the locale for an entire site (see Configuring a site's locale).
When localization is not necessary
Not every website requires localization. If your entire website is delivered in a single locale, then there is no need to localize the static text.
Configuring localized static text
Display names
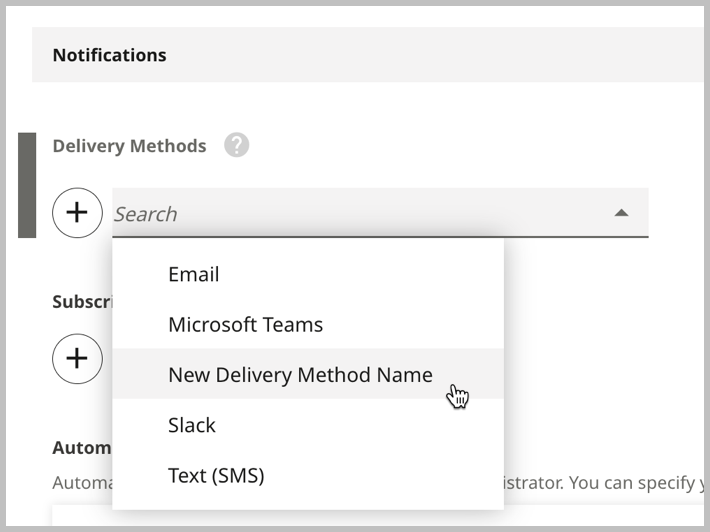
You can configure localized static text to change display names, like the name of an available delivery method for the purposes of notifications, in Brightspot. This is helpful for editors who want to customize the Brightspot UI. This topic contains an example of how to change the display name of a notification delivery method.
To configure localized static text to change display names:
-
Follow steps 1–5a in Configuring localized static text.
-
In the Name field, enter the fully qualified class name of the view you are localizing. For this example, enter
com/psddev/cms/notification/BrowserDeliveryOption.NoteTo find fully-qualified class names in Brightspot, for the sake of editing other display names in a similar manner, see Viewing developer info.
-
Under Entries, click .
-
In the Key field, enter the key for the static text you are localizing. For this example, enter
displayName. -
In the Value field, enter the localized text. For this example, enter the new display name of the notification delivery method. For this example, enter
New Delivery Method Name. Your form should look similar to the following:
-
Click Save.
Brightspot then changes the display name for the value you input.
Objects in fields
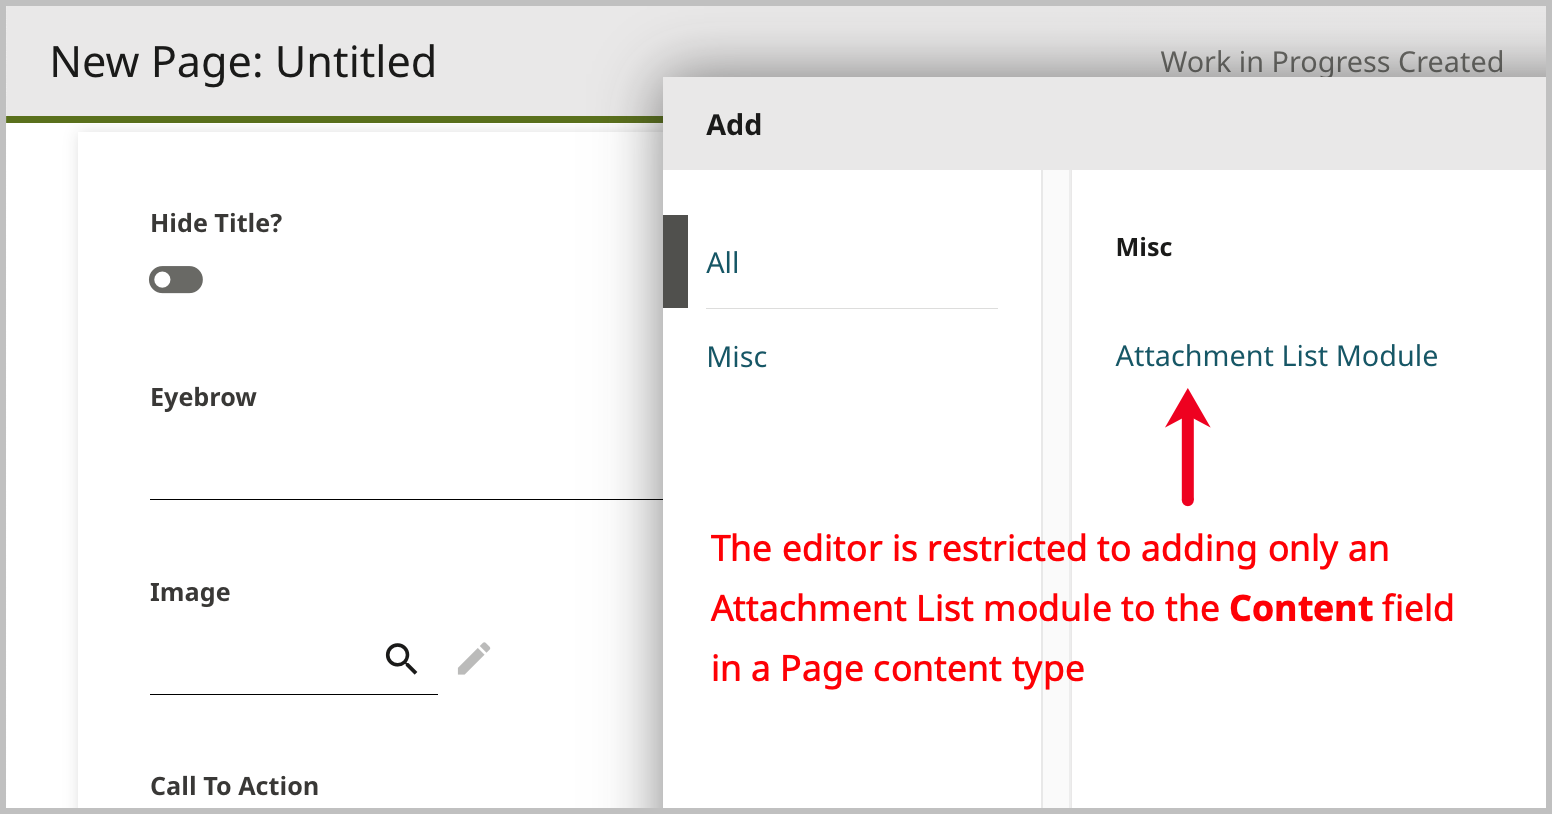
You can configure localized static text to restrict content types that can be used in reference fields. This is helpful for editors who want to make changes to the Brightspot UI. This topic contains an example of how to restrict editors to adding only Attachment List modules to the Content field in the Page content type.
To configure localized static text to restrict types in fields:
-
Follow steps 1–5a in Configuring localized static text.
-
In the Name field, enter the fully qualified class name of the view you are localizing. For this example, enter
brightspot/genericpage/GenericPage.NoteTo find fully-qualified class names in Brightspot, for the sake of making other restrictions in a similar manner, see Viewing developer info.
-
Under Entries, click .
-
In the Key field, enter the key for the static text you are localizing. For this example, enter
field.contents.groups. -
In the Value field, enter the localized text. For this example, enter the object type to which you want to restrict the field. For this example, enter
brightspot.module.list.attachment.inline.AttachmentListModulePlacementInline. Your form should look similar to the following: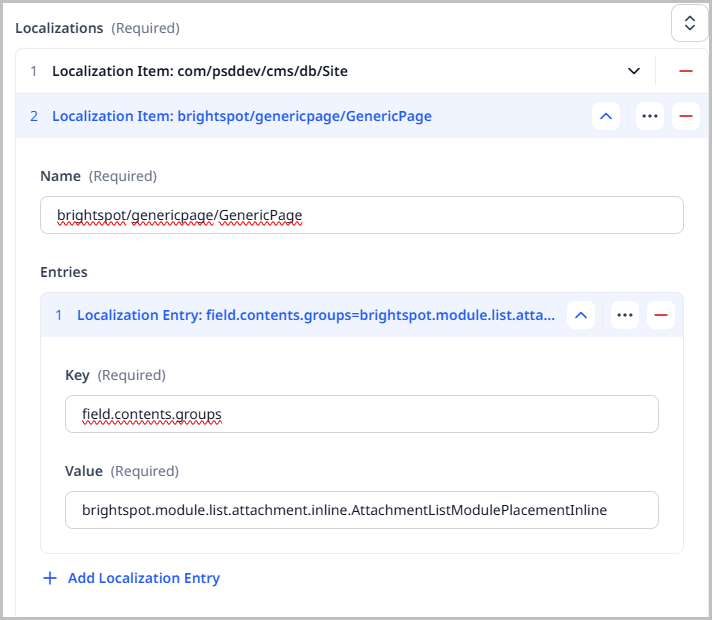
-
Click Save.
Brightspot then restricts the type of objects that can be added to the field you input.
Configuring date formats in localization bundles
The following sections describe how you can configure the date format for a specific locale-content type pair. For example, in the en-US locale, you can have one date format for articles and a different date format for galleries.
For the procedure to make these configurations, see Configuring localized static text.
Article
For the Article content type, you can customize the format string Brightspot applies to the date published or date modified.
| Field | Valid value |
|---|---|
| Name | com/psddev/styleguide/article/ArticlePageView |
| Key | dateFormat |
| Value | Any Java formatting string. For details, see the section "Common date formats," below. |
You can customize the date format to reflect almost any representation of a date.
Gallery
For the Gallery content type, you can customize the format string Brightspot applies to the date published or date modified.
| Field | Valid value |
|---|---|
| Name | com/psddev/styleguide/gallery/GalleryPageView |
| Key | dateFormat |
| Value | Any Java formatting string. For details, see the section "Common date formats," below. |
You can customize the date format to reflect almost any representation of a date.
Listicle
For the Listicle content type, you can customize the format string Brightspot applies to the date published or date modified.
| Field | Valid value |
|---|---|
| Name | com/psddev/styleguide/listicle/ListiclePageView |
| Key | dateFormat |
| Value | Any Java formatting string. For details, see the section "Common date formats," below. |
You can customize the date format to reflect almost any representation of a date.
Live Blog
For the Live Blog content type, you can customize the format string Brightspot applies to the date published or date modified.
| Field | Valid value |
|---|---|
| Name | com/psddev/styleguide/liveblog/LiveBlogPageView |
| Key | dateFormat |
| Value | Any Java formatting string. For details, see the section "Common date formats," below. |
You can customize the date format to reflect almost any representation of a date.
Common date formats
The following table lists formatting strings used by popular news sites.
| Formatting string | Example |
|---|---|
| North America | |
hh:mm a z, E MMMM d, yyyy | 10:15 AM EDT, Fri March 6, 2023 |
MMMM d, yyyy hh:mm a | March 6, 2023 7:45 PM |
MMM dd, yyyy hh:mm a z | Mar 06, 2023 7:08 AM EDT |
| Europe | |
dd/MM/yyyy - hh:mm | 07/03/2023 - 14:03 |
dd MMMM yyyy hh:mm | 07 March 2023 18:10 |
dd.MMM, hh:mm | 07. Mar, 03:07 |
dd MMM yyyy hh:mm z | 07 Mar 2023 10:18 CEST |
dd MMMM yyyy 'at' hh:mm | 07 March 2023 at 03:07 |
dd MMMM yyyy 'at' hh'h'mm | 07 March 2023 at 03h29 |
dd MMMM yyyy | 07 March 2023 |
yyyy-MM-dd | 2023-03-07 |
See also:
- SimpleDateFormat at oracle.com
- Java SimpleDateFormat Online Tester
Configuring localization delivery
When a visitor requests a page, Brightspot needs to deliver the page's static text in the correct language. The following procedure describes how you configure Brightspot to determine the correct language for static text.
To configure localization delivery:
- Click > Admin > Sites & Settings.
-
In the Sites widget, select the site for which you want to configure this setting, or select Global to configure this setting for all sites.
-
From the Front-End tab, expand the Localization cluster.
-
From the Locale Provider list, select one of the following:
- None—The value for the locale parameter is in the query parameter
lang. When you select this option, be sure every URL that needs to include localized static text includes the query parameterlang, such ashttps://brightspot.com/mytest?lang=es. - Content—The locale for static text appears in the requested asset. (For information about configuring an asset's locale, see Configuring an asset's locale.)
- Site—The locale for static text appears in the site containing the requested asset. (For information about configuring a site's locale, see Configuring a site's locale.)
- System Default—The locale is configured on the Brightspot server.
- None—The value for the locale parameter is in the query parameter
-
Click Save.
Configuring site locales
If you configured the locale provider to use site-based localization, then you need to configure the site's locale.
To configure a site's locale:
- Click > Admin > Sites & Settings.
-
In the Sites widget, select the site for which you want to configure this setting.
-
From the CMS tab, expand the Localization cluster.
-
Under Localization Badge Display, select one of the following options:
- Inherit—Inherits the Global setting for localization badge display.
- Enabled—When creating or modifying an asset, this setting displays locale badges in the header and in the editorial toolbar. This field defaults to the first locale set in the current site.
- Disabled—Turns off localization badge display for this site.
-
Under Available Locales, select Configure Locales.
-
Under Locales, click , and select one of the available locales.
-
Click Save.
Configuring asset locales
If you configured the locale provider to Content, then you need to configure a locale for each asset.
To configure an asset's locale:
- Create or open an asset whose locale you want to configure.
- Click > Translations.
- From the Locale list, select this asset's locale.
- Complete your site's workflow and publish the asset.