Configuration
Before running experiments, a CMS administrator must grant experimentation permissions to the appropriate roles and, optionally, add the Experiments widget to a dashboard.
Adding experimentation permissions to a role
Before you can use the experimentation feature, you must first ensure your role has the necessary permissions.
To add experimentation permissions to a role:
- From the left navigation, under Admin, click Users & Roles.
-
In the Roles widget, select the role to which you want to give experimentation actions.
-
Under Additional Permissions, click , then select Experimentation.
-
In the Permissions field, select one or multiple of the following permissions you want the role to have:
- Archive Experiment—The role can archive experiments.
- Archive Variation—The role can archive variations.
- Calculate Experiment Duration—The role can determine how long the experiment will run.
- Create Experiment—The role can create new experiments.
- Create Multiple Running Experiments—The role can create multiple, simultaneously running experiments. Brightspot recommends only giving this role to advanced experimentation users, as improper use can cause skewed data and ineffective experiments.
- Create Mutually Exclusive Group—The role can create mutually exclusive groups.
- Create Shared Goal—The role can create shared goals.
- Create Variation—The role can create new variations.
- Delete Experiment—The role can delete archived experiments.
- Delete Variation—The role can delete archived variations.
- Edit Experiment—The role can edit existing experiments.
- Edit Variation—The role can edit existing variations.
- End Experiment—The role can end ongoing experiments.
- Restore Experiment—The role can restore experiments from an archived state.
- Restore Variation—The role can restore variations from an archived state.
- Toggle Status—The role can toggle the status of the experiment.
- View Experiment Results—The role can view experiment results.
- View Experiments—The role can see the Experiments widget on the content edit page.
- View Variations—The role can view variations.
-
Click Save.
Creating shared goals
A shared goal is a goal definition you can reuse across multiple experiments, so you do not have to redefine the same tracking rules each time. Creating a shared goal requires the Create Shared Goal permission.
To create a shared goal:
- Go to the CMS's Admin area, and select Shared Goals.
- Click New Goal.
- In the Name field, give the goal a name.
- Under Account, select the experimentation account this goal belongs to.
- Under Goal Type, select and configure one of the five goal types described in Configuring experiments.
- Click Save.
Once created, a shared goal is available to select under Goal when configuring an experiment on that account. See Configuring experiments for details.
Creating mutually exclusive groups
A mutually exclusive group prevents a visitor from entering more than one experiment in the group at the same time, so overlapping experiments do not interfere with each other's results. Creating a mutually exclusive group requires the Create Mutually Exclusive Group permission.
To create a mutually exclusive group:
- Go to the CMS's Admin area, and select Mutually Exclusive Groups.
- Click New Group.
- In the Name field, give the group a name.
- Under Account, select the experimentation account this group belongs to.
- In the Tag field, type a suffix for the group's Kameleoon tag. Brightspot adds the
ME-GROUP-prefix automatically. - Click Save.
Once created, a mutually exclusive group is available to select under Mutually Exclusive Group when configuring an experiment on that account. See Configuring experiments for details.
An administrator can also configure a default mutually exclusive group on the experimentation account, which applies automatically to any experiment that does not select one explicitly.
Experiments widget
You can configure the Experiments widget to gain insight into the experiments that are running on your content.
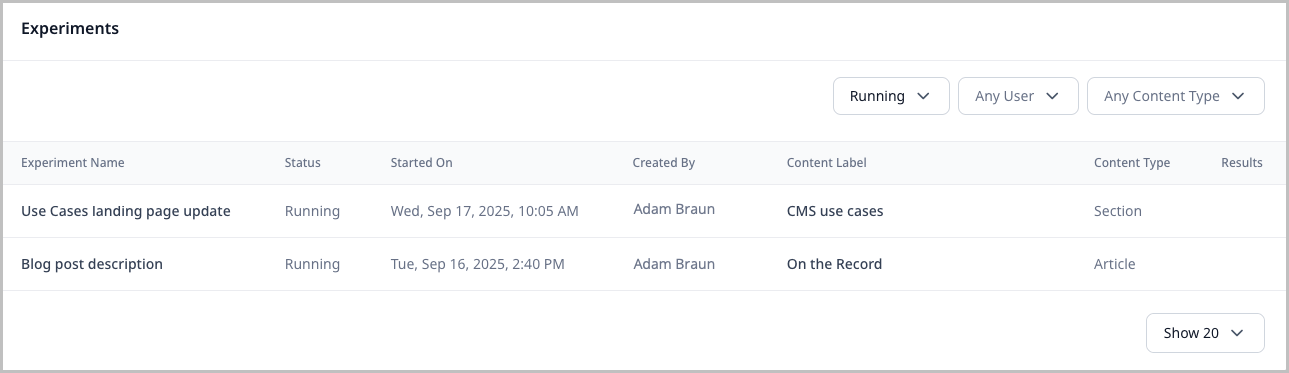
To add the Experiments widget:
- From the left navigation, under Admin, click Content Types.
- From the Dashboards list, select an existing dashboard to which you want to add the Experiments widget, or create a new one. For details on creating a new dashboard, see Creating a shared dashboard.
- Under Main Tab Columns, expand an existing column or add a new one.
- Under Widgets, click , then select Experiments Widget.
- Click Save.
To use the Experiments widget:
The Experiments widget allows you to view and filter for experiments being run for content across your site.
- Filters—Filter for experiments by status, creator, or content type.
- Experiment Name—The name of the experiment.
- Status—The status of the experiment.
- Started On—The date and time when the experiment started.
- Created By—The experiment creator.
- Content Label—The name of the asset for which the experiment is being run.
- Content Type—The asset's content type.
- Results—Results of the experiment. Click the bar chart icon to view.