Amazon Elemental
This integration is a premium integration. To activate the integration, you must follow a typical software development life cycle, which will incur additional costs. For more details on this integration or on other premium integrations, please contact your Brightspot representative.
With Amazon Elemental, you can easily convert and edit videos that you added to Brightspot, providing a personalized experience for your visitors. Amazon Elemental also provides live streaming capabilities with the opportunity for later playback.
Brightspot provides the following services with Amazon Elemental: MediaConvert, MediaLive, and MediaTailor. You can configure all three components, or only those components you use.
Configuration
The following table lists the dependencies required to include the Amazon Elemental integration in your build.
| Dependency | Group ID | Artifact ID |
|---|---|---|
| AWS: Elemental | com.psddev | aws-elemental |
Configuring the Amazon Elemental region
If you manage your own Amazon Elemental account, you may need to configure the AWS region in Brightspot.
To configure the Amazon Elemental region:
- Click > Admin > Sites & Settings > Sites > Global.
- Under Integrations, expand AWS Elemental.
- In the Region field, enter the region to use when making requests to AWS Elemental (or leave blank to use the region in your Brightspot server's configuration).
- Click Save.
Configuring MediaConvert
Brightspot integrates with Amazon's MediaConvert service to provide video conversion to a wide variety of resolutions, bit rates, file formats, refresh rates, and other settings.
To configure Elemental MediaConvert:
- Configure the Amazon Elemental region as described above.
- In the Edit Global widget, under Integrations, expand AWS Elemental MediaConvert.
- Toggle on Enable MediaConvert Service.
- In the MediaConvert Role ARN and MediaConvert SQS Queue Name fields, enter the corresponding values from your AWS console.
- In the MediaConvert Sync Button Delay (Minutes) field, enter the number of minutes after which Brightspot displays a button in the content edit form to check if a conversion is complete.
- Click Save.
See also:
Configuring MediaLive
Brightspot integrates with Amazon's MediaLive service to deliver live video streams.
To configure Elemental MediaLive:
- Configure the AWS Elemental region as described above.
- If you want to activate MediaLive, toggle on Enable Media Live Service.
- In the Media Live Role ARN field, enter the corresponding value from your AWS console.
- Click Save.
See also:
Configuring MediaTailor
Brightspot integrates with Amazon's MediaTailor service to deliver personalized ads during a video's playback.
To configure Elemental MediaTailor:
- Configure the AWS Elemental region as described above.
- In the Edit Global widget, under Integrations, expand AWS Elemental MediaTailor.
- Toggle on Enable MediaTailor Service.
- Click Save.
See also:
Configuring a live stream
You can use Brightspot to stream a live event using Amazon's MediaLive service. This section describes how to configure an individual live stream.
To configure a live stream:
-
Obtain the feed information from the live-stream producer. This information typically includes an Amazon Resource Name (ARN), security group ID, and permitted rules.
-
Configure the AWS Elemental region as described in Configuring the Amazon Elemental region.
-
Configure MediaLive as described in Configuring MediaLive.
-
In the header, click .
-
Under Create, select Live Video, and then click New. The content edit page appears.
-
In the Internal Name field, enter an identifying name.
-
From Provider, select AWS Elemental. A form appears.
-
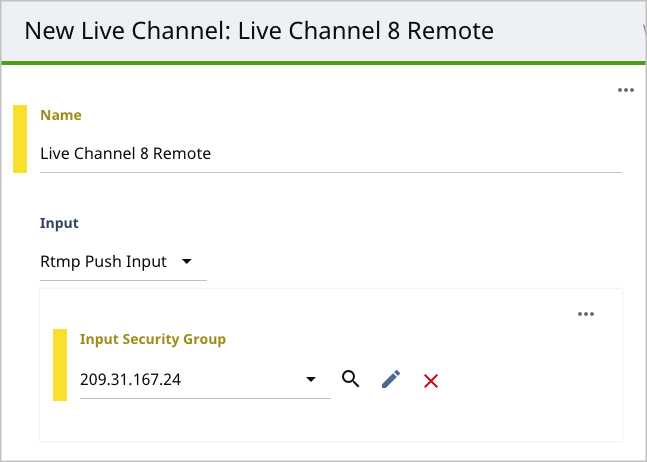
From the Channel list, select Create New. A New Live Channel content edit page appears.
-
In the Name field, enter an identifying name.
-
From the Input list, select the protocol you determined in step 1. A form appears.
-
In the Input Security Group field, enter the information you determined in step 1.
-
Under Live Output, enter settings for transmitting the live feed.
-
Under VOD, enter settings for saving the live stream for later playback.
-
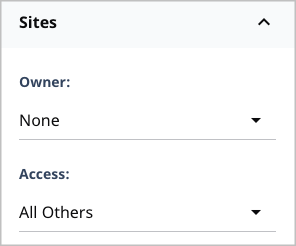
If you want to share this setting with your other sites, in the Sites widget, do the following:
-
From the Owner list, select None.
-
From the Access list, select All Others.
-
-
Click Save.
-
Click Back. You return to the New Live Video content edit page.
-
Complete the rest of the form.
-
Complete your site's workflow.
When the live stream starts, you can record it for playback at a later time.
See also:
- Saving live video streams for later playback
- Working with Inputs in AWS Elemental MediaLive
- Working with Input Security Groups
Adding captions to videos
You can deliver captions along with your videos. As visitors watch a video, they also see the captions you provide.
To add captions to a video:
-
Acquire the caption file if available.
-
Create a new video in Brightspot.
-
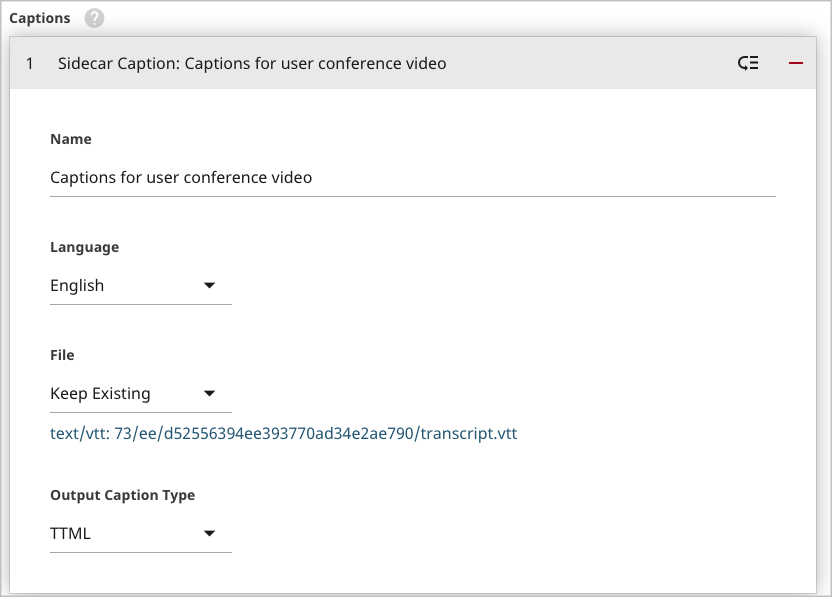
Under Main > Captions, do one of the following:
-
If the video contains an embedded caption file, select Embedded Caption. Skip to step 5.
-
If you have an external caption file, select Sidecar Caption. A form appears.
-
-
For information about filling out the form, see IMSC, TTML and WebVTT (Sidecar) Output Captions and SCC, SRT (Sidecar) Output Captions.
-
Complete your site's workflow and publish the video.
Providing videos in multiple formats
Depending on your target audience, you may need to distribute videos in a variety of formats. For example, you may want to offer visitors two versions of the same video: a low-fidelity version at 50 Mbps and a high-fidelity version at 100 Mbps. Similarly, you may want to offer the same video with different resolutions, one at 1280×720 and another at 1960×1080.
Depending on your version of Brightspot, you can upload videos and automatically convert them to a variety of formats. Contact your Brightspot administrator to determine which target formats are available.
To provide a video in multiple formats:
- Create a new video in Brightspot.
- Toward the right of the widget, click > Advanced.
- From the Transcoding Settings selection field, select one of the available settings, or click search to create one-off settings for this conversion. For information about configuring transcoding settings, see Configuring MediaConvert.
- From the Overlays list, select or create an overlay that appears along with the video.
- Complete your site's workflow and publish the video.
When the conversion is complete, Brightspot lists the different formats under > Outputs.
Post-production activities for videos
After Amazon Elemental processes your video, you can perform two post-production activities: select a thumbnail, and configure an advertising stream.
Editing and selecting thumbnails for videos
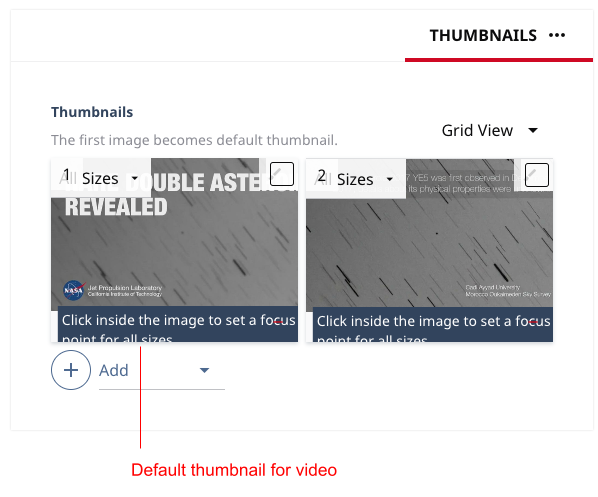
Depending on your Brightspot configuration, AWS Elemental provides thumbnails you can select as a promo for your video. If there are multiple thumbnails, Brightspot uses the first one for the promo.
To edit or select a thumbnail:
-
Create a new video in Brightspot, or open an existing video.
-
Toward the right of the widget, select > Thumbnails. A list of available thumbnails appears.
-
If you want to add alt text to a thumbnail, do the following:
- Select List View.
- In the Alt Text field, enter the alt text.
-
If you want to manually add a thumbnail, do the following:
- Under Thumbnails, click .
- To add a one-off thumbnail, select One-Off Image.
- To add a shared thumbnail, select Shared.
- Complete the form.
-
If you want to delete a thumbnail, click .
-
To change the thumbnail that Brightspot uses for the video, drag it to the first position in the list of thumbnails.
-
Complete your site's workflow and publish the video.
See also:
Configuring ads for delivery during video playback
If you are registered with an ad service such as Google's Doubleclick For Publishers (DFP), you can push ads to your visitors during video playbacks. You can rely on the ad service's default ad-selection logic, or you can provide custom selection criteria.
To deliver ads during video playback:
- Create a new video in Brightspot, or open an existing video.
- Under > Advanced, expand MediaTailor.
- From the MediaTailor Configuration list, select Select.
- In the selection field, select one of the available MediaTailor configurations.
- Complete your site's workflow and publish the video.
See also:
Saving live video streams for later playback
If you are streaming a live event, you can save the recording as a video so visitors can watch it at a later time.
To save a live stream:
- Configure the live stream channel as described in Configuring a live stream.
- In the content edit form, click Start Channel. Brightspot starts saving the live stream.
- Click Stop Channel. Brightspot stops saving the live stream.
- Repeat steps 2–3 to save intermittent segments of the live stream.
Under > Outputs, Brightspot saves each video segment as a new video.