View models
In the model-view-view model pattern, the view model receives raw data from the model and transforms that data to produce a view. Brightspot’s view models accomplish this transformation in two steps. In the first step, the view model receives two categories of data:
- Content, such as text, images, and videos available through methods in a received model object.
- Web environment, such as HTTP header fields, query strings, and cookies available through annotations.
The view model implements methods specified in an underlying Java interface such that there is one method for each item appearing in the view. For example, if a view has three elements (headline, body, and date published), the view model includes three methods to return each element individually. If those elements require additional logic, such as instantiating a locale to properly format a date, the view model implements the corresponding methods and constructors accordingly.
In the second step, the view model transforms the extracted data into a form the view is expecting.
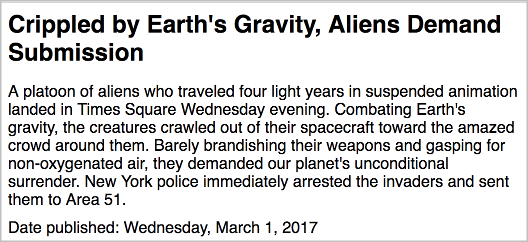
In the following example, the view model uses the getHeadline and getBody methods to access those model elements; it also uses the @HttpHeader annotation and getDatepublished method to access and format the publication date in a manner indicated by the client’s locale.
1import com.psddev.cms.view.ViewModel;2import com.psddev.cms.view.servlet.HttpHeader;34public class ArticleViewModel extends ViewModel<Article> {56@Override7①public String getHeadline() {8return model.getHeadline();9}1011@Override12②public String getBody() {13return model.getBody();14}1516@HttpHeader("Accept-Language")17③public String acceptLanguage;1819@Override20④public String getDatepublished() {2122⑤Date datePublished = model.getDatePublished();2324⑥String httpLocale = this.acceptLanguage.substring(0,5);2526⑦Locale readerLocale = null;27if (httpLocale.equals("en-US")) {28readerLocale = new Locale("en","us");29} else {30readerLocale = new Locale("en","au");31}3233⑧DateFormat df = DateFormat.getDateInstance(DateFormat.FULL, readerLocale);3435⑨return "Date published: " + df.format(datePublished);3637}3839}
- ①Returns the article’s headline.
- ②Returns the article’s body.
- ③Extracts the Accept-Language field from the HTTP header. The first five characters of this field provide the locale, such as en-us.
- ④Returns a date in a format as expected by the client’s locale prepended with the string Date published: .
- ⑤Retrieves the date published from the model.
- ⑥Extracts the first five characters from the Accept-Language field to get the client’s language and country.
- ⑦Declares a standard Locale variable; set it to en-us or en-au depending on the characters extracted from the Accept-Language field.
- ⑧Instantiates a DateFormat variable that formats the date based on the discovered locale.
- ⑨Returns the formatted date prepended with the string Date published: .
The following image is an example of the previous snippet’s output.
You can modularize your code by implementing the interface PageEntryView—a marker interface you can use to determine the required view model based on the model’s class or other criteria. See the following example.
1public class ArticleViewModel extends ViewModel<Article> implements PageEntryView {23if ((model instanceof DailySection) || (model instanceof WeeklySection)) {4return createView(SectionViewModel.class, model);5} else {6return createView(ArticleViewModel.class, model);7}8}
Methods
Any view model you create is a subclass of the abstract class ViewModel and optionally an implementation of an interface based on your view.
In the following declaration, ArticleViewModel extends the abstract class ViewModel for an Article.
1import com.psddev.cms.view.ViewModel;23public class ArticleViewModel extends ViewModel<Article> { }
ViewModel provides several methods and callbacks you can use to fine-tune a view’s generation. For details, see ViewModel.
View model Lifecycle
The order of events in the view model’s lifecycle is as follows:
shouldCreateonCreate- Extract data from model, optionally using
createVieworcreateViews.
The following sections describe these methods.
shouldCreate
This method is called prior to onCreate, and indicates if Brightspot should actually generate the view when a client requests a particular model instance. The inherited value from the abstract class is true, which means Brightspot always generates the view for the requested object. You can introduce logic to test if Brightspot should continue creating the view. For example, if a user is not authorized to view an article, you can prevent Brightspot from generating the view.
1protected boolean shouldCreate() {2return user.isAuthorized() ? true : false;3}
onCreate
This method is called after shouldCreate and before generating any of the view’s components. You can use this method for retrieving or building additional content not included in the received model. For example, when a user requests an article, the model received by the view model includes properties pertaining to the article itself, typically heading, author, and body. To display a list of articles recently viewed by the user, or any other information not related to the article itself, implement additional logic in the onCreate method. The following snippet is an example of finding articles recently viewed by a user at the time of rendering the requested article.
1public class ArticleViewModel extends ViewModel<Article> {23private List<Article> histViewedArticles;45@Override6①protected void onCreate(ViewResponse response) {7super.onCreate(response);8histViewedArticles = historyItem.findByUser(user,20);9}1011②protected List<Article> getArticleHistory() {12return histViewedArticles;13}1415}
- ①Overrides the abstract method onCreate to retrieve the last 20 articles viewed by the current user. For details about the methods available from the ViewResponse parameter, see ViewResponse.
- ②Returns the list of recently viewed articles.
createView
This method creates a view using the specified view-model class and model. You can use this method to modularize your code. For example, you can have a single view model associated with all your content types. Regardless of the item a client requests, the single view model is run, and inside that view model you can identify the correct view model for creating the view.
1if (model instanceof Section) {2return createView(SectionViewModel.class, model);3} else {4return createView(ArticleViewModel.class, model);5}
createViews
This method creates an Iterable over views using the specified view-model class and model. You can use this method to create a series of related views, such as a series of comments to an article, which you incorporate into a parent view.
1public class CommentListViewModel extends ViewModel<CommentList> {23public Iterable<CommentsView> getComments() {4return createViews(CommentsViewModel.class, model.getComments());5}67}
In the previous snippet creates an Iterable of comment views based on data provided by the model CommentList.
1createView(CommentListViewModel.class, CommentListViewModel.getComments());
The previous snippet creates a single view comprised of the comments provided by the view model CommentListViewModel.
Advanced view modeling
This section describes some advanced techniques for working with view models.
ModelWrapper
Some models wrap models which themselves wrap models. For example, an article can contain two types of image models, one a closeup and another a panorama. Each of those models wraps an image model that is comprised of the raw image and a caption. For the article to access the image—
- The article first accesses the intermediate model (CloseUp or Panorama).
- From the intermediate model, accesses the image itself.
Brightspot provides a convenience function unwrap that saves the second step. Placing unwrap in the intermediate model allows access to the image directly.

Referring to the previous illustration—
- Article includes an abstract marker class ImageOption. This is a useful technique for easily including additional classes into Article: any concrete subclass of ImageOption automatically appears as an option in Article.
- Each concrete subclass of ImageOption, CloseUp, and Panorama implements unwrap. This method returns the Image wrapped in either model.
The following example describes how to implement unwrap as envisioned in the previous illustration.
Step 1: Implement low-level model
1import com.psddev.cms.db.Content;2import com.psddev.dari.util.StorageItem;34public class Image extends Content {56private StorageItem rawImage;78private String caption;910/* Getters and setters */1112}
Step 2: Implement intermediate-level models
Model for CloseUp
1public class CloseUp extends ImageOption {23@Embedded4private Image image;56public Image getImage() {7return image;8}910@Override11①public Object unwrap() {12return getImage();13}14}
- ①Implements the unwrap method. When accessing CloseUp, a parent model can immediately access the lower-level Image.
Model for Panorama
1public class Panorama extends ImageOption {23private Image image;45public Image getImage() {6return image;7}89@Override10①public Object unwrap() {11return getImage();12}1314}
- ①Implements the unwrap method. When accessing Panorama, a parent model can immediately access the lower-level Image.
Step 3: Implement abstract model
1import com.psddev.cms.db.Content;2import com.psddev.cms.view.ModelWrapper;3import com.psddev.dari.db.Recordable;45@Recordable.Embedded6public abstract class ImageOption extends Content implements ModelWrapper, Directory.Item {78}
The previous snippet is an abstract marker class. Any of its concrete subclasses become available to its enclosing class.
Step 4: Implement top-level model
1import com.psddev.cms.db.Content;23public class Article extends Content implements Page, ImageOption {45①private ImageOption imageOption;67public ImageOption getImageOption() {8return imageOption;9}1011}
- ①Declares the imageOption field. Because ImageOption is an abstract class, any concrete subclass becomes an option for Image Option in the content edit form.
Step 5: Implement low-level template
This file is saved as Image.hbs.
1<div>2<img src="{{imageSrc}}">3</div>4<div>5{{caption}}6</div>
Step 6: Implement low-level data file
This file is saved as Image.json.
1{2①"_template": "Image.hbs",3"imageSrc": "http://url/to/any/image.jpg",4"caption": "Static caption"5}
- ①Provides the link between the image’s view and the template.
Step 7: Implement low-level view model
The following snippet provides the data for the embedded image’s view.
1import com.psddev.cms.db.ImageTag;2import com.psddev.cms.view.ViewModel;3import styleguide.content.article.ImageView;45public class ImageViewModel extends ViewModel<Image> implements ImageView {67①public String getImageSrc() {8return new ImageTag.Builder(model.getRawImage()).toUrl();9}1011②public String getCaption() {12return model.getCaption();13}1415}
- ①Retrieves the URL.
- ②Retrieves the caption.
Because of the implementation of unwrap, there is no need to create a view model for the intermediate-level CloseUp or Panorama.
Rendering rich text with RichTextViewBuilder
By default, Brightspot’s rich-text editors store escaped HTML tags. For example, rich-text editors store bold text</b> as <b>bold text</b>. To ensure unescaped HTML tags appear in your rendered pages, you need to use the RichTextViewBuilder.buildHtml method. The following example shows how to implement a rich-text editor and render its output.
Step 1: Render string field as rich-text editor
1import com.psddev.cms.db.Content;2import com.psddev.cms.db.ToolUi;34public class Article extends Content implements Page {56@ToolUi.RichText7private String body;89}
In the previous snippet, the annotation @ToolUi.RichText renders the body field as a rich-text editor. For detailed information about customizing the appearance and functionality of the rich-text editor, see Rich text.
Step 2: Implement templates
The following file is saved as Article.hbs.
1<div>2{{headline}}3{{body}}4</div>
The following file is saved as Article.json.
1{2"_template": "Article.hbs",3"headline": "This is a placeholder for the headline",4"body": "This is a placeholder for rich text"5}
Step 3: Implement view model
1import com.psddev.cms.rte.RichTextViewBuilder;2import com.psddev.cms.view.ViewModel;3import styleguide.content.article.ArticleView;45public class ArticleViewModel extends ViewModel<Article> implements ArticleView {67@Override8①public CharSequence getBody() {9②return RichTextViewBuilder.buildHtml(model.getBody(),10rte -> createView(RichTextElementView.class, rte));11}1213}
- ①Implements the getBody method declared in the view interface.
- ②Takes the escaped HTML from the model’s body and combines it with a standard rich-text view class to produce unescaped HTML.

Conditional redirects
Because the onCreate event occurs before Brightspot generates any of the view’s components, you can use it to perform conditional redirects.
1import com.psddev.cms.view.ViewModel;2import com.psddev.cms.view.ViewResponse;34public class ArticleViewModel extends ViewModel<Article> implements ArticleView {56①protected void onCreate(ViewResponse response) {7if (somestatement == true) {8response.redirectTemporarily("http://domain/temporary-redirect-page.html");9②throw response;10}1112}1314}
- ①The ViewResponse parameter passed to onCreate contains a variety of fields you can initialize and send back to the client. For details, see View Response.
- ②Terminates the onCreate method, so Brightspot does not create the view.
View model overlays
A view-model overlay is a mechanism for adding data to a view. Brightspot “overlays” the additional data on top of the views’ data produced by the view models. The data may be related to the underlying model producing the view, or it could be used to provide common data across all views. For example, you can easily add a permalink to all of your project’s pages with a view-model overlay. This feature also saves you the effort of possibly extending existing models or creating a new class hierarchy to add the object to many view models.
Direct view model overlay value
You can directly add a specific view model overlay key’s value to every view. The following example describes how to create a view model overlay that inserts a permalink into each view. This example works best if you define a default URL for the site as described in Global-only settings.
Step 1: Create model
You can use any new or existing model with an overlay. No extra coding is required. For an example of a simple model, the snippet "Simple content type with text and image fields."
Step 2: Create view model overlay
Creating a view model overlay
1package content.article;23import com.psddev.cms.view.ViewModelOverlay;4import com.psddev.dari.db.State;5import com.psddev.dari.util.CompactMap;6import java.util.Map;7import java.util.function.Supplier;8import com.psddev.cms.db.Directory;910①public class PermalinkViewModelOverlay implements ViewModelOverlay {1112@Override13②public Map<String, Supplier<Object>> create(Object model, String viewTemplate) {14Map<String, Supplier<Object>> overlay = new CompactMap<>();15③overlay.put("fullPermalink",() -> State.getInstance(model).as(Directory.ObjectModification.class).getFullPermalink());16return overlay;17}18}
- ①Declares a class that implements ViewModelOverlay. Any class that implements this interface injects its key-value pairs into every view.
- ②Creates a map of key-value pairs.
- ③Retrieves the current page’s permalink, and assigns it to the key fullPermalink. (For this example to work you also need to configure the Default Site URL as explained in Settings for the Global site.) You can add any number of key-value pairs to the overlay.
Step 3: Create data file
You can use any new or existing Styleguide JSON data file. No extra coding is required.
Step 4: Insert overlay key Into template
Referring to the snippet "Creating a view model overlay," you now have access to the key fullPermalink in every view by inserting that key as a placeholder in a Handlebars template. When rendering the view, Brightspot retrieves the value for the placeholder without your implementing a method in any view model.
1<html>2<body>3<div class="Article">4<div class="Article-headline">5<h1>{{headline}}</h1>6</div>7<div class="Article-body">8{{body}}9</div>10<div class="Article-body">11Permalink to this item: {{fullPermalink}}12</div>13</div>14</body>15</html>
In the previous snippet, the placeholder {{fullPermalink}} is the key contained in the overlay.

Indirect view model overlay value
You may need to overlay a view on a given view’s value. To do this, you create a view model overlay that returns an object for a particular key. When the view model overlay adds the object to the view model, it converts the object to a view using the view system to find an appropriate view model. The view model for this particular object must be marked with the ViewModelOverlayValueEntryView interface to indicate to the view system the appropriate view to use for the object in the context of the view model overlay.
The following example describes how to use a view model overlay to add a footer to an existing view for articles. The example assumes you already have a working parent model, view, and view model into which you want to insert the overlay’s view.
Step 1: Create child model
Create a model Footer.java for the footer.
1import com.psddev.cms.db.Content;2import com.psddev.dari.util.StorageItem;34public class Footer extends Content {56private StorageItem imageFile;7private String caption;89/* Getters and setters */1011}
Step 2: Create child template
Create a template Footer.hbs for the footer. The overlay injects this template as it renders the parent view.
1<div class="Footer">2<p class="Footer-p">{{caption}}</p>3<p class="Footer-p"><img src="{{imagefile}}"/></p>4</div>
Step 3: Create child data file
In the same directory as Footer.hbs, create the corresponding data file Footer.json.
1{2"_template": "Footer.hbs",3"caption": "{{words(4)}}",4"imagefile": "{{image(100, 100)}}"5}
Step 4: Create view model overlay
Declare a view model overlay class FooterViewModelOverlay, and insert an instance of the footer’s model into the overlay.
1import com.psddev.cms.view.ViewModelOverlay;2import com.psddev.dari.util.CompactMap;3import com.psddev.dari.util.UrlStorageItem;45①public class FooterViewModelOverlay implements ViewModelOverlay {67@Override8public Map<String, Supplier<Object>> create(Object model, String viewTemplate) {910②if (model instanceof Footer) {11return null;12}1314③Map<String, Supplier<Object>> overlay = new CompactMap<>();1516④Footer footer = new Footer();17UrlStorageItem file = new UrlStorageItem();18file.setPath("http://foo-bar.png");19footer.setImageFile(file);20footer.setCaption("This web site delivered by:");21⑤overlay.put("footer", () -> footer);22return overlay;23}2425}
- ①Declares a class that implements ViewModelOverlay. Any class that implements this interface makes its overlay map available to calling parent views.
- ②Tests if the current model is a Footer. If it is, do not inject the view model into the current view model. (Without this test, Brightspot enters an infinite loop, always inserting a footer view model into another footer view model.)
- ③Instantiates an overlay map.
- ④Instantiates the child model and set its properties.
- ⑤Adds the model to the overlay map using the key footer.
Step 5: Create child view model
In the same directory as Footer.java, create a view model FooterViewModel.java.
1package content.article;23import com.psddev.cms.view.ViewModel;4import com.psddev.cms.view.ViewModelOverlayValueEntryView;5import styleguide.content.article.FooterView;67①public class FooterViewModel extends ViewModel<Footer> implements FooterView, ViewModelOverlayValueEntryView {89@Override10public CharSequence getImagefile() {11return model.getImageFile().getPublicUrl();12}1314@Override15public CharSequence getCaption() {16return model.getCaption();17}18}
- ①Adds the marker interface ViewModelOverlayValueEntryView. Brightspot uses this marker as an indication to insert the rendered view in any parent view that calls the corresponding overlay key you created in Step 4.
Step 6: Add overlay key to parent template
Open the template for which you want to include the overlay, and use the overlay key used in Step 4.
1<html>2<body>3<div class="Article">4<div class="Article-headline">5<h1>{{headline}}</h1>6</div>7<div class="Article-body">8{{body}}9</div>10<div>11①{{footer}}12</div>13</div>14</body>15</html>
- ①At run time, Brightspot replaces the placeholder
{{footer}} with the entire template created in Step 2, along with the associated view model logic and styling.
